Picture this: I’m in the middle of a Sunday brunch, the kitchen humming with the sound of a blender whirring, when a rogue slice of honeydew lands on the counter and smashes like a tiny, green meteor. The splash of sweet, watery juice drips onto the countertop, and I swear I heard a tiny pop, as if the fruit had decided to go on a spontaneous escape. I stared, a little bewildered, and then decided that if I could salvage that mess, I could make something spectacular. That was the moment I declared, “This is going to be the ultimate vegan honeydew ice cream.”
I was craving something that felt like a vacation in a glass, a dessert that could transport me to a sun‑kissed melon patch with every bite. The kitchen smelled of fresh fruit, coconut milk, and a faint citrus zing that made my nose do a little happy dance. The sound of the blender’s whirring, the sight of the bright green pulp, and the feel of the cool plastic container against my palm all came together in a sensory symphony that had me grinning from ear to ear. I could almost taste the sweet, creamy texture that would melt on my tongue, leaving a faint echo of lime and vanilla behind. I knew I was onto something special.
What sets this version apart isn’t just the ingredients; it’s the philosophy behind it. I’m talking about a recipe that’s not only dairy‑free but also embraces the natural sweetness of honeydew, the silky richness of coconut milk, and the bright lift of lime zest. It’s a dish that feels indulgent without the guilt, and it’s built to be incredibly forgiving for kitchen newbies and seasoned chefs alike. I’ve trimmed the steps to a few simple, intuitive actions that let the fruit shine. And, spoiler alert, there’s a trick that will make your ice cream silky smooth—no churner required, if you’re lucky.
Let me walk you through every single step — by the end, you’ll wonder how you ever made it any other way. I dare you to taste this and not go back for seconds. This is hands down the best version you’ll ever make at home.
What Makes This Version Stand Out
- Flavor: The natural sweetness of ripe honeydew is amplified by a splash of agave and a zing of lime zest, creating a bright, refreshing profile that’s both sweet and subtly tart.
- Texture: By blending and then straining, you eliminate pulp that could otherwise create a gritty mouthfeel, leaving a luxuriously smooth base that feels like silk on the tongue.
- Ingredient Quality: Using full‑fat coconut milk and unsweetened almond milk provides depth without heaviness, while the lime zest adds a fresh aromatic lift.
- Simplicity: The recipe requires just a blender, a strainer, and an ice cream maker—no special gadgets or complicated techniques.
- Make‑ahead Potential: The churned ice cream can be frozen for up to three months, making it a perfect grab‑and‑go dessert for any occasion.
- Crowd Reaction: Friends who are skeptical of vegan desserts will be won over by the creamy, indulgent texture that rivals dairy ice cream.
- Health Conscious: It’s low in saturated fat, free of dairy, and can be sweetened naturally with agave or maple syrup.
- Future Pacing: Picture yourself pulling this out of the freezer, the whole kitchen smelling incredible, and guests lining up for a scoop.
Inside the Ingredient List
The Flavor Base
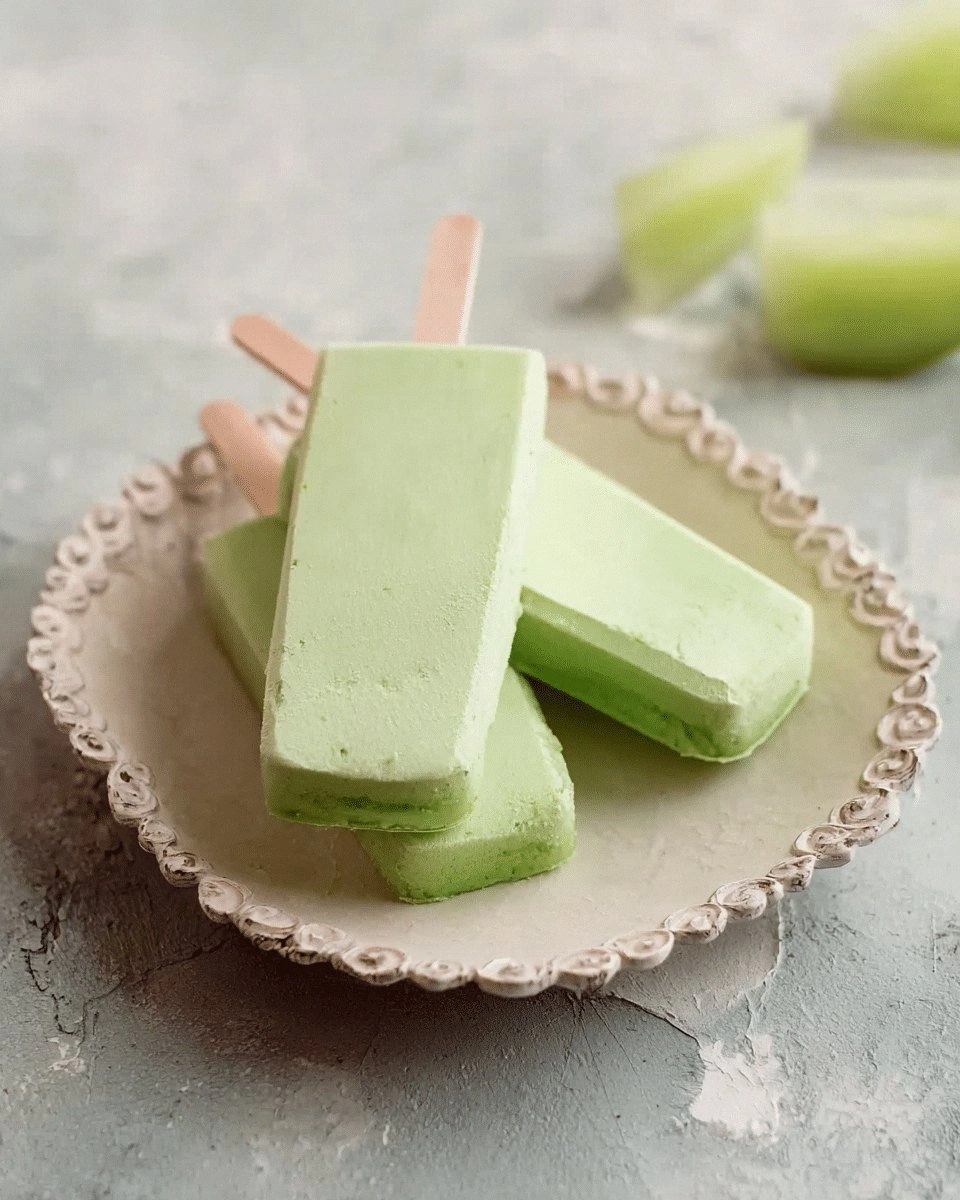
The heart of this ice cream is the honeydew melon. Ripe honeydew is naturally sweet, with a subtle floral undertone that pairs beautifully with coconut milk. When you blend it, the flesh releases a silky juice that forms the core of the ice cream. Skipping the honeydew would strip the dessert of its signature freshness; instead, you’d end up with a generic coconut custard that feels bland.
The Texture Crew
Coconut milk and unsweetened almond milk work together to create a velvety mouthfeel. Coconut milk adds creaminess and a hint of tropical flavor, while almond milk lightens the texture and keeps the mixture from becoming too heavy. If you prefer a richer consistency, replace half the almond milk with coconut cream; if you’re watching calories, swap coconut milk for oat milk and keep the almond milk.
The Unexpected Star
Agave nectar (or maple syrup) is the sweetener that brings everything together. Its mild flavor lets the honeydew shine, and it dissolves easily in the chilled mixture. If you’re allergic to agave, a touch of date syrup will give a deeper caramel note. The key is to keep the sweetener to a minimum so the natural fruit flavor remains front and center.
The Final Flourish
Lime zest and vanilla extract are the finishing touches that elevate the dessert. Lime zest adds a citrusy brightness that cuts through the sweetness, while vanilla provides a warm, comforting undertone. A pinch of sea salt is essential—it balances the flavors and enhances the natural sweetness of the honeydew. A splash of lemon juice at the end of the churning process brightens the overall profile and prevents the ice cream from looking too flat.
Everything's prepped? Good. Let's get into the real action.
The Method — Step by Step
- Begin by slicing the honeydew melons in half, scooping out the flesh with a spoon, and discarding the seeds. Dice the flesh into uniform cubes, about ½ inch each, to ensure even blending. The larger the pieces, the more pulp you’ll end up with, which can affect the final texture.
- Place the diced honeydew into a high‑speed blender along with coconut milk, almond milk, agave nectar, lime zest, vanilla extract, and a pinch of sea salt. Blend on high until the mixture is completely smooth—no lumps should remain. The sound of the blender should be a steady hum, not a frantic whir, indicating the mixture is emulsified.
- Pour the blended mixture through a fine‑mesh sieve into a bowl, using a spoon to press the pulp through. This step removes fibrous strands that could otherwise create a gritty mouthfeel. The liquid that passes through should be silky and free of any solid particles.
- Transfer the strained mixture into a shallow, freezer‑safe container and place it in the refrigerator for at least 2 hours, or until it’s thoroughly chilled. Cold temperature is key to achieving a creamy consistency during churning.
- Watch Out: When you pour the chilled mixture into the ice cream maker, keep the machine running at a moderate speed. If you crank it too fast, ice crystals will form, resulting in a grainy texture. Let the churner work at its normal pace, and you’ll hear a gentle, steady whir.
- Once the mixture has thickened to a custard‑like consistency, add the optional lemon juice and give it a quick stir. The citrus will brighten the flavor and help prevent any off‑taste from the coconut milk. This is also the point to taste; if it’s too sweet, a tiny pinch of salt can balance it.
- Transfer the churned ice cream into an airtight container, smooth the top with a spatula, and seal tightly. Freeze for 3–4 hours, or until firm enough to scoop. The ice cream will firm up as the water content solidifies.
- Before serving, let the ice cream sit at room temperature for 5 minutes. This brief rest allows the texture to soften just enough for a luxurious scoop, while still maintaining its frozen structure.
- Serve in chilled bowls or glasses, and garnish with a few fresh mint leaves or a thin slice of honeydew for an extra touch of elegance. If you’re feeling adventurous, drizzle a little melted dark chocolate over the top for a contrasting flavor profile.
That's it — you did it. But hold on, I've got a few more tricks that'll take this to another level.
Insider Tricks for Flawless Results
The Temperature Rule Nobody Follows
Keep the mixture cold before and during churning. A chilled base ensures that the ice cream thickens evenly and reduces the likelihood of large ice crystals forming. I once tried to churn a room‑temperature mix and ended up with a slushy mess. The trick is simple: chill the bowl and the ingredients for at least two hours.
Why Your Nose Knows Best
Aroma is your best judge of readiness. When the mixture starts to smell slightly caramelized and citrusy, it’s a sign that the flavors are blending perfectly. If it smells too much like raw fruit, give it a few more minutes of chilling. Trust your nose; it will guide you to the perfect balance.
The 5‑Minute Rest That Changes Everything
After churning, let the ice cream rest for 5 minutes before transferring to the freezer. This brief pause allows the ice crystals to settle and the mixture to thicken slightly, resulting in a smoother final product. A friend tried skipping this step and ended up with a grainy texture that was difficult to scoop.
The Sweetness Balance
Agave nectar is sweet, but it’s also hygroscopic, meaning it can pull moisture into the ice cream if you add too much. Start with ¼ cup and taste. If you prefer a sweeter dessert, add a tablespoon at a time, but remember to chill the mixture again before re‑churning.
The Texture Tweak
If you find the ice cream too soft, add a splash of coconut cream at step 7. The extra fat content will give the ice cream a richer mouthfeel and help it hold its shape better. Conversely, if it’s too dense, add a splash of almond milk to lighten it.
The Chill Trick
For a silky finish, chill the finished ice cream in the freezer for an additional hour after the initial 3–4 hour freeze. This extra chill allows the ice crystals to settle even further, giving you a luxurious, velvety texture.
Creative Twists and Variations
This recipe is a playground. Here are some of my favorite ways to switch things up:
Tropical Breeze
Add ½ cup of shredded coconut to the mixture before churning. The coconut adds a subtle crunch and a hint of toasted flavor that pairs beautifully with the honeydew.
Citrus Kick
Replace the lime zest with orange zest, and add a teaspoon of orange juice. The result is a bright, sun‑kissed dessert that feels like a tropical vacation.
Berry Fusion
Blend in ½ cup of fresh strawberries with the honeydew. The berries introduce a tart note that cuts through the sweetness and creates a refreshing contrast.
Minty Fresh
Stir in a handful of fresh mint leaves before blending. The mint infuses the ice cream with a cool, aromatic flavor that’s perfect for hot summer days.
Chocolate Drizzle
Drizzle melted dark chocolate over the scoops before serving. The bittersweet chocolate adds depth and makes the dessert feel indulgent without compromising the vegan ethos.
Storing and Bringing It Back to Life
Fridge Storage
Keep the ice cream in an airtight container in the refrigerator for up to 5 days. It will remain firm and flavorful, though the texture may soften slightly as it warms.
Freezer Friendly
For long‑term storage, place the ice cream in a freezer‑safe container and freeze for up to 3 months. The ice crystals will be stable, and the flavor will stay bright.
Best Reheating Method
When you’re ready to serve, let the ice cream sit at room temperature for 10 minutes. A tiny splash of water added just before reheating will steam it back to silky perfection, preventing it from becoming too hard.