I ruined a perfectly good Saturday afternoon trying to make those trendy baked protein bars that every fitness influencer swears by. Picture this: almond flour everywhere, my oven smoking like a chimney, and a tray of something that looked like fossilized energy bars from 1997. My kitchen smelled like disappointment and burnt coconut. I was ready to throw in the towel and buy those overpriced, cardboard-tasting bars from the health food store when I remembered my grandmother's wisdom: the best things in life don't need an oven.
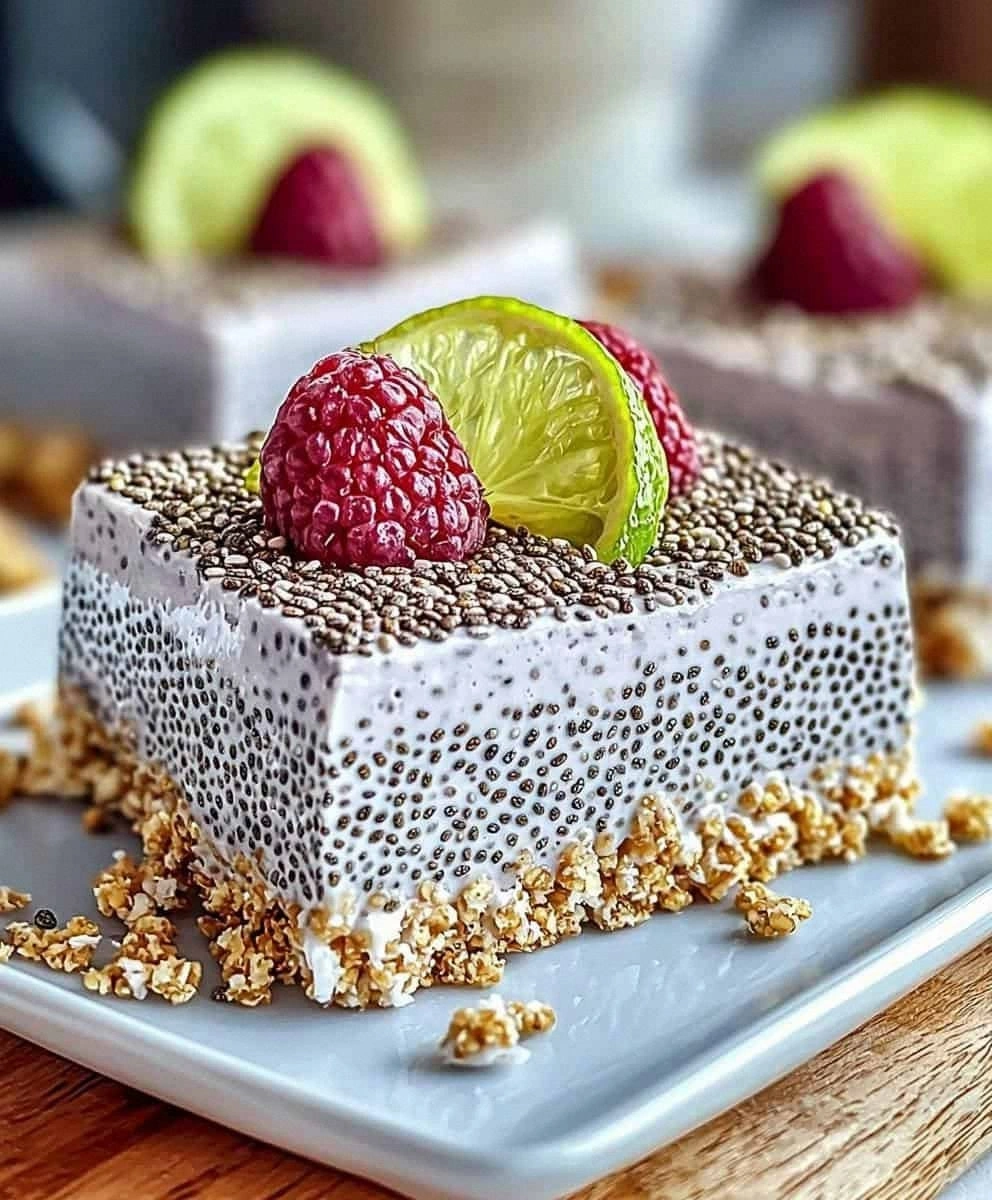
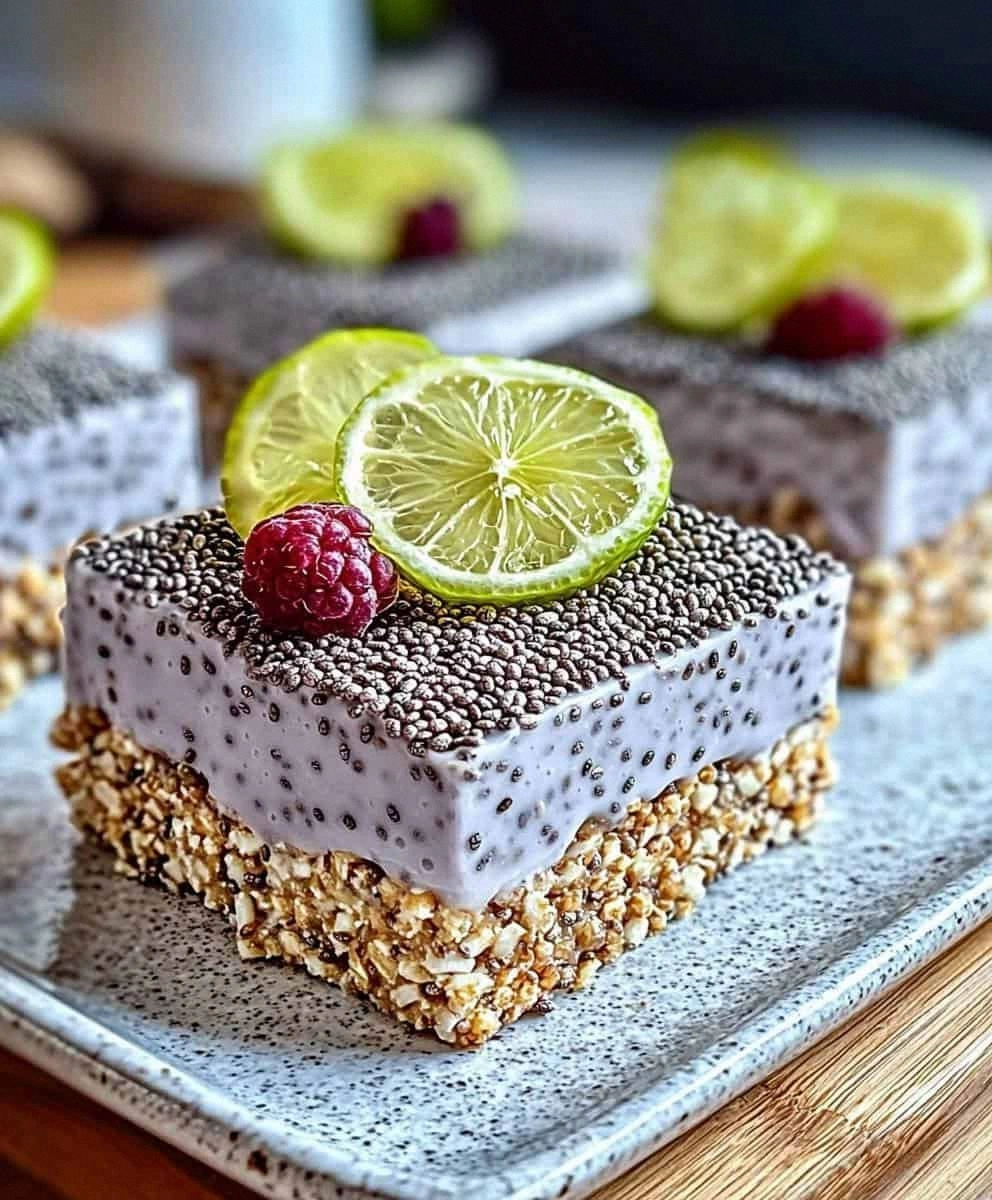
That's when I started playing around with chia seeds in my blender, and folks, what happened next was nothing short of kitchen wizardry. These no-bake chia pudding bars emerged from my refrigerator like a phoenix rising from the ashes of my baking disasters. They were creamy yet firm, sweet but not cloying, and packed with enough nutrients to make a dietitian weep with joy. The texture reminded me of those fancy panna cotta desserts from that overpriced Italian place downtown, but with the staying power of a protein bar that actually tastes like food.
Here's the kicker — my notoriously picky nephew, who thinks vegetables are poison and anything healthy is "gross," devoured three of these bars in one sitting. When I told him they were actually good for him, he looked at me like I'd performed some kind of Jedi mind trick. That's when I knew I had stumbled onto something special, something that bridges the gap between "I should eat healthier" and "I actually want to eat this every day."
Let me walk you through every single step — by the end, you'll wonder how you ever made it any other way. We're talking about bars that set up in the fridge while you binge-watch your favorite show, bars that taste like dessert but fuel you like a proper meal, bars that will make you the hero of every potluck and the envy of every lunchroom. This isn't just another healthy snack recipe; this is your new secret weapon in the eternal battle between your taste buds and your waistline.
What Makes This Version Stand Out
I've tried every chia pudding recipe on the internet, and I'm here to tell you that most of them are doing it wrong. They're either too runny (chia soup, anyone?) or so thick you could patch drywall with it. But these bars? They're the Goldilocks of healthy snacks, and here's exactly why they'll ruin you for all other attempts:
- Texture Perfection: The combination of whole chia seeds and ground oats creates this incredible layered texture that's both satisfyingly chewy and delightfully creamy. It's like your favorite candy bar and a luxurious pudding had a beautiful, nutritious baby.
- Flavor That Punches Above Its Weight: Most health bars taste like you're being punished for something. These actually taste like a treat you'd choose over dessert. The vanilla and maple create this warm, comforting base that makes the whole thing taste way more indulgent than it has any right to be.
- Zero Kitchen Skills Required: If you can operate a spoon and a refrigerator, you can make these bars. There's no candy thermometer, no "soft ball stage," no praying to the baking gods. Just mix, pour, and walk away while magic happens in your fridge.
- Meal Prep Champion: These bars actually get better after a day or two in the fridge. The flavors meld together like they're at a flavor party where everyone's becoming best friends. Make them Sunday night, and you've got grab-and-go breakfasts and snacks all week.
- Crowd-Pleasing Shape-Shifter: Kids think they're eating candy, adults think they're being virtuous, and everyone leaves happy. I've served these at everything from toddler birthday parties to marathon training groups, and the reaction is always the same: "Wait, these are healthy?"
- Customizable Like Your Favorite Playlist: Once you master the base recipe, you can remix these bars a hundred different ways. Swap the almond butter for peanut butter, add cocoa powder for chocolate lovers, throw in some protein powder for the gym rats — it's like having a new recipe every time.
- The Staying Power of Champions: Unlike those sad, soggy energy balls that turn into mush in your lunch bag, these bars hold their shape for hours at room temperature. They'll survive a hike, a commute, or an afternoon forgotten in a hot car (ask me how I know).
Alright, let's break down exactly what goes into this masterpiece...
Inside the Ingredient List
Every ingredient in this recipe is there for a reason, and I'm about to spill all the secrets about why each one matters more than you think. This isn't just a list of stuff to throw together — it's a carefully orchestrated symphony where every player has a crucial role.
The Foundation Builders
Chia seeds are the real MVPs here, and not just because they're trendy. These tiny powerhouses absorb up to ten times their weight in liquid, creating that pudding-like texture we're after. But here's what most people don't know: you want to use whole chia seeds, not ground. Whole seeds create that fun pop-caviar texture while still thickening everything perfectly. Plus, they stay fresh in your pantry for practically forever, making them the ultimate emergency health food.
Almond milk isn't just a dairy alternative — it's your flavor canvas. Go for unsweetened varieties because we're already adding maple syrup, and you want to control the sweetness level. The slight nutty flavor of almond milk pairs beautifully with vanilla, but if you're out, coconut milk will make everything taste like a tropical vacation. Just avoid rice milk; it's too thin and your bars won't set properly.
The Sweetness Squad
Maple syrup isn't just for pancakes, and once you taste how it transforms these bars, you'll never go back to honey in this recipe again. Real maple syrup (not the corn syrup stuff) brings this complex, caramel-like sweetness that makes the whole thing taste like dessert. It's also packed with minerals like manganese and zinc, so you're getting nutrition with your sugar. If you're watching your glycemic index, you can swap in date syrup, but maple really is the flavor winner here.
Vanilla extract is your secret weapon for making everything taste more expensive than it is. Don't go for the imitation stuff — real vanilla extract has over 200 flavor compounds that create this warm, aromatic base note. It's like adding a cozy sweater to your bars. If you're feeling fancy, vanilla bean paste will give you those gorgeous little black specks that make everything look gourmet.
The Texture Team
Rolled oats are doing double duty here — they absorb excess moisture and give the bars that satisfying chew. Quick oats will turn to mush, and steel cut oats stay too crunchy, so rolled oats are your Goldilocks choice. Toast them lightly in a dry pan for five minutes before using them, and you'll unlock this amazing nutty flavor that makes people ask what your secret ingredient is.
Almond butter is your binding agent and your protein boost, but it's also your flavor powerhouse. Go for natural almond butter with no added oils or sugars — the ingredients list should just say "almonds." If your almond butter is rock-solid from the fridge, microwave it for 20 seconds to make it easier to mix. Peanut butter works too, but almond butter has this subtle sweetness that plays better with the other flavors.
The Wild Cards
Shredded coconut adds this tropical, chewy element that makes every bite interesting. Go for unsweetened because sweetened coconut has this weird waxy coating that throws off the texture. If you hate coconut (I see you, coconut haters), you can swap in finely chopped almonds or just leave it out entirely. But honestly, the coconut flavor is so subtle that even coconut skeptics usually love these bars.
Dark chocolate chips are optional but highly recommended because they turn these from "healthy snack" into "legitimate dessert." Look for chips that are at least 60% cacao — anything less is just candy, and we're trying to stay on the right side of nutritious here. The bitter chocolate creates this incredible contrast with the sweet pudding base, like a healthier version of those fancy pudding cups from the grocery store.
Everything's prepped? Good. Let's get into the real action...
The Method — Step by Step
Okay, ready for the game-changer? This method is so foolproof that I've successfully taught it to my neighbor's eight-year-old, and she nailed it on the first try. We're going to build layers of flavor and texture that will make your taste buds do a happy dance, and the best part is that most of this recipe is just waiting around while the fridge does all the heavy lifting.
- Start with your liquid base: pour the almond milk into a large bowl and whisk in the maple syrup, vanilla extract, and salt until everything is completely dissolved. This step matters more than you think — if the maple syrup isn't fully incorporated, you'll get weird sweet pockets in your bars. Whisk for a full 30 seconds; your arm might get a little tired, but this is the only workout this recipe requires. The mixture should smell like melted vanilla ice cream and look like the world's most delicious latte.
- Now comes the magic moment: sprinkle the chia seeds across the surface of the liquid and resist the urge to dump them all in one spot. These little guys need personal space to absorb liquid properly, so treat them like introverts at a party — give them room to breathe. Let them sit undisturbed for exactly two minutes; set a timer because this part is crucial. You'll start to see them plumping up and creating this fascinating gel coating that's basically nature's pudding mix.
- Time to add your texture players: stir in the rolled oats and shredded coconut with a rubber spatula, making sure to scrape the bottom and sides of the bowl. The mixture will start looking like birdseed in soup, but don't panic — this is exactly what we want. Keep stirring until you don't see any dry spots of oats; this usually takes about a minute of gentle folding. The oats will start absorbing the liquid immediately, thickening everything up.
- Here's where we get our protein and healthy fats: warm up your almond butter for 15 seconds in the microwave until it's runny and pourable. Drizzle it into the bowl while stirring constantly; this prevents it from seizing up into globs that refuse to mix. The mixture will transform from soupy to creamy right before your eyes, like watching a time-lapse of pudding forming. Keep stirring until you see no streaks of almond butter — everything should be one cohesive, thick batter.
- The chocolate chip moment has arrived: fold in your dark chocolate chips gently because we want them to stay intact, not melt and create chocolate streaks. Use a folding motion like you're incorporating clouds into heaven — this keeps the chips from breaking and bleeding chocolate throughout the mixture. The batter should be thick enough that the chips don't immediately sink to the bottom, but loose enough that they distribute evenly throughout.
- Prepare your pan like a pro: line an 8x8 baking dish with parchment paper, leaving "handles" on two sides that stick up above the rim. These handles are your extraction lifeline — without them, you'll be chiseling bars out of the pan with a spatula and a lot of bad words. Spray the parchment with a light coating of coconut oil spray; this prevents sticking and adds a subtle coconut flavor that ties everything together.
- Pour the mixture into your prepared pan and use an offset spatula to spread it evenly to the corners. This is not the time for perfectionism — you're aiming for even thickness, not a mirror finish. Gently tap the pan on the counter five times to release any air bubbles that might create weird pockets in your bars. The surface should look like rocky terrain on a distant planet, with chocolate chips poking out like little mountain peaks.
- The hardest part: waiting. Cover the pan with plastic wrap, pressing it directly onto the surface to prevent a skin from forming. Slide it into the refrigerator and set a timer for at least four hours, but overnight is better if you can stand the anticipation. During this time, the chia seeds will work their gelling magic, transforming your liquid mixture into sliceable, holdable bars that defy logic.
- The moment of truth: lift the bars out using the parchment handles and place them on a cutting board. Use a sharp knife dipped in hot water to cut clean, even squares — the hot knife melts through the chocolate chips without cracking them. Wipe the knife between cuts for Instagram-worthy edges that will make your friends think you went to culinary school. You should get 9 to 12 bars depending on how generous you're feeling.
That's it — you did it. But hold on, I've got a few more tricks that'll take this to another level...
Insider Tricks for Flawless Results
After making these bars more times than I care to admit (my fridge currently has three different variations), I've discovered some game-changing techniques that separate the good batches from the legendary ones. These aren't just nice-to-haves — they're the difference between "these are pretty good" and "holy cow, can I have the recipe?"
The Temperature Rule Nobody Follows
Cold almond butter is your enemy in this recipe — it seizes up into stubborn clumps that refuse to blend, creating weird dry pockets in your bars. But here's the thing: you don't want it hot either. The sweet spot is room temperature, where it's soft enough to blend but not so warm that it melts your chocolate chips. Take your almond butter out of the fridge 30 minutes before you start, or microwave it for exactly 12 seconds. Yes, I've timed this to perfection. A friend tried skipping this step once — let's just say her bars had the texture of nutty concrete.
Why Your Nose Knows Best
Don't underestimate the power of good vanilla extract — and I'm talking about the real stuff, not the artificial kind that smells like cheap candles. Real vanilla extract has over 200 flavor compounds that bloom and develop over time, which means your bars taste more complex and interesting after a day in the fridge. The alcohol in the extract also helps distribute fat-soluble flavors throughout the mixture, creating this incredible depth that makes people ask "what's in these?" in the best possible way. If you can smell vanilla from across the kitchen when you open the bottle, you've got the good stuff.
The 5-Minute Rest That Changes Everything
After you mix everything together, let the mixture rest for five minutes before pouring it into your pan. This brief pause allows the chia seeds to start their gelling process, which means your bars will set more evenly and hold together better. It's like letting a good steak rest after cooking — the difference is subtle but noticeable. During this rest, the oats also start softening slightly, preventing that raw-oat texture that ruins so many healthy snacks. Use this time to prepare your pan, and you'll never have crumbly bars again.
The Salt Secret
That quarter teaspoon of salt isn't just for show — it's the flavor amplifier that makes everything else taste more like itself. Salt reduces our perception of bitterness, which means it makes the chocolate taste more chocolatey and the vanilla more vanilla-y. But timing matters: add it to the liquid base before the chia seeds so it dissolves completely. Undissolved salt creates weird salty pockets that'll make your friends think you dropped the shaker in the bowl. I've found that flaky sea salt works best because it dissolves quickly and doesn't have that harsh iodized flavor.
The Patience Principle
I know it's tempting to dig in after two hours, but these bars need their full four-hour beauty sleep to reach their potential. During this time, the chia seeds create this incredible gel network that holds everything together like a natural glue. Cut them too early, and you'll have a gloopy mess that falls apart in your hands. But here's the beautiful part: they actually get better after the first day. The flavors meld together like they're at a flavor conference where everyone's becoming best friends. Make them Sunday night, and by Wednesday they're absolutely transcendent.
Creative Twists and Variations
This recipe is a playground. Here are some of my favorite ways to switch things up:
The Tropical Vacation
Swap the almond butter for coconut cream and add diced dried mango and toasted macadamia nuts. Replace half the almond milk with coconut milk, and suddenly you're eating a healthy version of those tropical pudding cups from your childhood. The combination of coconut and mango creates this sunshine-in-a-bar experience that'll transport you to a beach somewhere, even if you're actually eating lunch at your desk on a Tuesday.
The Chocolate Lover's Dream
Add 3 tablespoons of cocoa powder to the liquid base and swap the chocolate chips for white chocolate chunks. The cocoa powder gives you that deep, intense chocolate flavor while the white chocolate adds creamy sweetness. It's like a reverse Oreo in bar form, and it's absolutely irresistible. Pro tip: add a pinch of espresso powder to make the chocolate taste even more chocolatey.
The Fall Harvest
Replace the maple syrup with pumpkin puree and maple combined, add cinnamon, nutmeg, and a touch of ginger. Use pecan butter instead of almond butter, and you've got all the flavors of pumpkin pie in a portable, healthy bar. These are dangerous — they taste so much like dessert that you'll forget you're eating something packed with fiber and omega-3s.
The Berry Blast
Puree a cup of mixed berries and swirl them into the mixture instead of adding chocolate chips. The berries create these beautiful marbled patterns and add natural sweetness and antioxidants. Use strawberry almond milk for an extra berry boost, and top with freeze-dried strawberry pieces for crunch. It's like a fruit and yogurt parfait that you can eat with your hands.
The Protein Powerhouse
Add 2 scoops of vanilla protein powder and reduce the oats by 1/4 cup. Use Greek yogurt instead of half the almond milk for extra protein and creaminess. These are perfect post-workout bars that actually taste good — my gym rat friends call them "cheat meals that aren't cheating."
The Holiday Spice
Add cinnamon, cardamom, and a touch of orange zest to the liquid base. Use molasses instead of maple syrup for that gingerbread flavor, and add crystallized ginger pieces instead of chocolate chips. These taste like Christmas morning and make incredible homemade gifts wrapped in parchment paper with twine.
Storing and Bringing It Back to Life
Fridge Storage
These bars are refrigerator gold — they'll keep for up to 7 days when stored properly. Wrap each bar individually in wax paper, then store them in an airtight container with a piece of parchment between layers. This prevents them from sticking together and makes grab-and-go snacking a breeze. The individual wrapping also prevents them from absorbing weird fridge odors, because nobody wants a bar that tastes like last night's leftover garlic pasta. They actually get better after day two, when the flavors have had time to meld together into something magical.
Freezer Friendly
These bars freeze beautifully for up to 3 months, making them perfect for meal prep marathons. Wrap each bar in plastic wrap, then place them in a freezer bag with the air pressed out. To thaw, just move them to the fridge overnight, or if you're impatient (like me), microwave for 30 seconds. They'll be slightly softer than fresh bars but still absolutely delicious. Frozen bars are actually amazing on hot summer days — they're like healthy pudding pops that won't drip down your arm.
Best Reheating Method
While these are designed to be eaten cold, sometimes you want that warm, comforting feeling. Microwave a bar for 10-15 seconds — just enough to take the chill off but not melt the chocolate chips. The warmth intensifies the vanilla and makes the almond butter taste like roasted nuts. If you're feeling fancy, warm them in a toaster oven at 300°F for 5 minutes. This creates slightly crispy edges while keeping the center creamy, like a healthy lava cake that won't wreck your diet.