I’m going to be brutally honest: the first time I tried to make caramel apple cheesecake bars, I ended up with a soggy mess that looked like a crime scene in a bakery. I was half‑disappointed, half‑determined, and then a friend dared me to “make the best version possible or never bake again.” That little challenge lit a fire under me, and after three failed attempts, a dozen late‑night research sessions, and a whole lot of tasting (yes, I ate half the batch before anyone else got a chance), I finally nailed it. This version is the one I’m convinced will make you forget every other cheesecake bar you’ve ever tried.
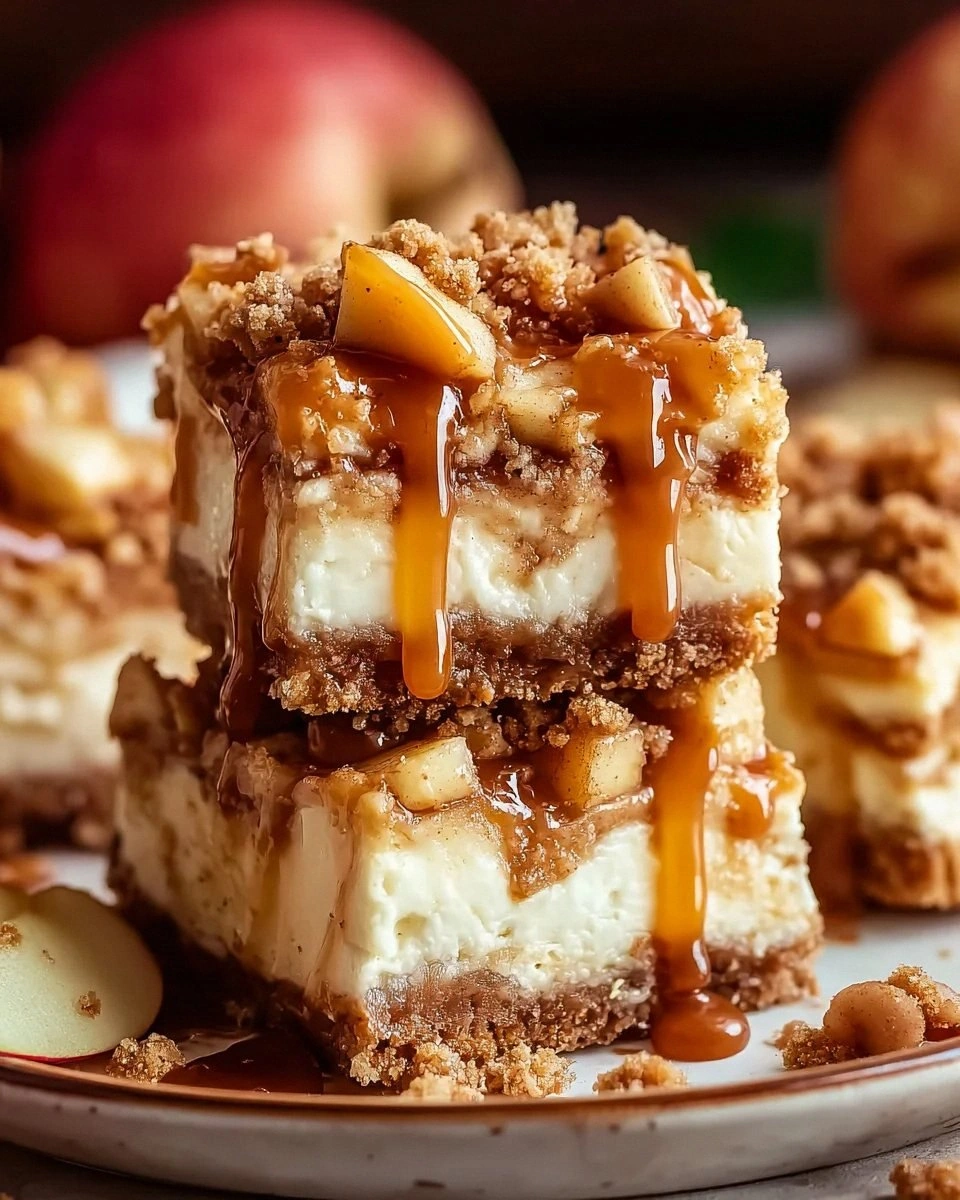
Picture this: the moment you open the oven, a warm, buttery aroma mingles with the sweet perfume of caramel and the tangy bite of fresh apples. The crust crackles under your fork like a gentle snowfall, while the creamy cheesecake layer glistens with a hint of vanilla. Then comes the caramel drizzle, a glossy river that pools into every nook, turning each bite into a glossy, buttery dream. The apples are tender yet still hold a bit of bite, their tartness perfectly balanced by brown sugar and a whisper of nutmeg. You can practically hear the soft sigh of satisfaction as the bar settles onto your plate.
What makes this version truly stand out is a secret weapon I discovered while watching a pastry chef on a late‑night cooking show: a quick, homemade caramel made with heavy cream that stays silky instead of turning grainy. Most recipes either skip the caramel entirely or use store‑bought sauce that tastes like liquid candy floss. I also introduced a sprinkle of chopped pecans to the streusel, giving each bite a satisfying crunch that contrasts beautifully with the smooth cheesecake. And because I love a good shortcut, the crust uses graham cracker crumbs that melt into a buttery base without the need for a food processor.
But the real game‑changer? A pinch of cinnamon in the crust and a dash of lemon juice on the apples that keep everything bright, aromatic, and visually stunning. I’ll walk you through every single step — from the moment you crush those crumbs to the final drizzle of caramel that shines like sunrise on a glass window. By the end, you’ll wonder how you ever settled for anything less. Let’s dive in and create a batch that will have you daring anyone to resist a second helping.
What Makes This Version Stand Out
- Flavor Harmony: The caramel, apple, and cheesecake layers are balanced so precisely that no single element overwhelms the others. Each bite feels like a symphony where every instrument has its moment.
- Texture Triple Threat: You get a crunchy crust, a creamy cheesecake middle, and a soft‑yet‑tender apple topping, all crowned with a glossy caramel glaze that adds a silky finish.
- Simplicity Meets Sophistication: Despite the impressive final product, the ingredient list is short and the steps are straightforward, making it perfect for both beginners and seasoned bakers.
- Unique Caramel Technique: Using heavy cream in the caramel prevents crystallization, giving you a sauce that stays glossy and buttery without turning grainy.
- Crowd‑Pleaser Factor: I dare you to taste this and not go back for seconds; even the most skeptical guests will be begging for the recipe.
- Ingredient Quality: Fresh Granny Smith apples and real butter give a depth of flavor that shortcuts simply can’t match.
- One‑Pan Wonder: The entire bar bakes in a single 9‑inch springform pan, meaning less cleanup and more time admiring your masterpiece.
- Make‑Ahead Magic: The bars keep beautifully in the fridge for up to three days, and the caramel can be reheated in seconds for a fresh‑out‑of‑the‑jar feel.
Inside the Ingredient List
The Flavor Base
Graham cracker crumbs are the unsung heroes of many desserts, providing a sweet, buttery foundation that’s both tender and sturdy. If you’re feeling adventurous, you can toast the crumbs lightly in a dry pan for an extra nutty aroma before mixing with butter. Skipping the crumbs means you lose that subtle crunch that supports the creamy cheesecake and keeps the bar from feeling soggy.
The Texture Crew
Unsalted butter, when melted and blended with the crumbs, creates a cohesive crust that holds together without being greasy. Use real butter—not margarine—to achieve that rich mouthfeel. If you substitute with oil, the crust will be too soft and won’t set properly, turning your bars into a gooey mess.
The Unexpected Star
Heavy cream in the caramel is the secret weapon that keeps the sauce glossy and velvety. Most store‑bought caramel sauces use corn syrup, which can become grainy when reheated. By whisking cream into melted sugar and butter, you get a sauce that stays liquid at room temperature and firms up just enough to drizzle without dripping.
The Final Flourish
Chopped pecans add a buttery crunch that contrasts with the soft cheesecake and tender apples. If you’re allergic or prefer a nut‑free version, try toasted sunflower seeds for a similar texture. A pinch of salt in the caramel balances the sweetness, preventing the sauce from tasting cloyingly sugary.
Everything's prepped? Good. Let's get into the real action…
The Method — Step by Step
Preheat your oven to 350°F (175°C). While the oven warms, line a 9‑inch springform pan with parchment paper, leaving a little overhang for easy removal later. This little trick saves you from a sticky situation when you try to lift the bars out of the pan.
Combine 1½ cups graham cracker crumbs, ½ cup granulated sugar, and ½ tsp cinnamon in a large bowl. Melt 6 tbsp unsalted butter in the microwave for about 30 seconds, then pour it over the dry mixture. Using a fork, stir until the crumbs are evenly coated and look like wet sand.
Kitchen Hack: Press the crumb mixture into the pan with the back of a measuring cup for a perfectly flat crust that bakes evenly.Bake the crust for 8‑10 minutes, or until it turns a light golden brown and smells toasty. You’ll know it’s ready when the edges start pulling away from the sides of the pan. Remove from the oven and let it cool while you prep the filling.
While the crust cools, blend 16 oz softened cream cheese, ½ cup granulated sugar, 1 tsp vanilla extract, and a pinch of salt in a stand mixer on medium speed. Scrape down the sides frequently to ensure a smooth, lump‑free mixture. Then add 2 large eggs, one at a time, mixing just until incorporated; over‑mixing can cause cracks later.
Spread the cheesecake batter evenly over the cooled crust, smoothing the top with a spatula. The batter should be thick enough to hold its shape but still pourable. Set the pan aside; we’re about to layer the apples.
Dice 2 Granny Smith apples into ¼‑inch cubes. Toss the apple pieces with 1 tbsp lemon juice, ⅓ cup brown sugar, ¼ tsp nutmeg, and a pinch of cinnamon. The lemon juice prevents browning and adds a subtle tang that lifts the apple’s natural tartness.
Watch Out: If you over‑cook the apples before baking, they’ll turn mushy and lose that delightful bite.Scatter the apple mixture over the cheesecake layer, making sure it’s evenly distributed. The apples will sink slightly as they bake, creating pockets of caramelized fruit throughout the bar.
In a separate bowl, whisk together 1 cup all‑purpose flour, ½ cup brown sugar, ½ cup chopped pecans (optional), and a pinch of salt. Cut in 4 tbsp melted butter until the mixture resembles coarse crumbs. Sprinkle this streusel evenly over the apples.
Bake the assembled bar for 30‑35 minutes, or until the edges are set and the center jiggles just a little when you gently shake the pan. The top should be golden brown, and a toothpick inserted into the streusel should come out clean.
Kitchen Hack: Rotate the pan halfway through baking for an even golden crust on all sides.While the bars cool, make the caramel. In a saucepan, melt ½ cup granulated sugar over medium heat, swirling gently until it turns amber. Remove from heat and whisk in ½ cup heavy cream and 1 tbsp butter until smooth. Add a pinch of salt and stir until fully incorporated. This sauce will thicken as it cools, turning into a glossy glaze.
Allow the bars to cool completely in the pan—about 1 hour—then drizzle the caramel over the top, letting it pool into the crevices. Use a spatula to spread any excess, creating a shiny river that catches the light. Finally, release the springform pan, slice into bars, and serve.
That's it — you did it. But hold on, I've got a few more tricks that'll take this to another level…
Insider Tricks for Flawless Results
The Temperature Rule Nobody Follows
Always bring your cream cheese to room temperature before mixing. If it’s too cold, you’ll get lumps that turn into unsightly pockets in the cheesecake. I once tried using straight‑out‑of‑the‑fridge cheese and ended up with a bumpy surface that looked like a mountain range. Letting it sit for 30 minutes on the counter does the trick, and the texture will be silky smooth.
Why Your Nose Knows Best
When the crust is done, you’ll smell a faint buttery perfume that signals it’s ready. Trust your nose more than the timer; ovens can vary by up to 25 degrees. If the scent is strong and the crust feels firm to the touch, pull it out early to avoid over‑browning. This little sensory cue saves you from a burnt base that could ruin the entire bar.
The 5‑Minute Rest That Changes Everything
After baking, let the bars sit in the turned‑off oven with the door slightly ajar for 5 minutes. This gentle residual heat helps the cheesecake set without cracking, and the steam keeps the top from drying out. Skipping this step can lead to a cracked surface that looks less professional and feels less creamy.
The Apple Prep Secret
When dicing the apples, keep the pieces uniform—about ¼‑inch cubes—so they cook evenly. Uneven pieces can result in some apple bits staying too firm while others become mush. Also, toss the diced apples in lemon juice immediately; this not only prevents browning but also adds a bright contrast that balances the sweet caramel.
Caramel Consistency Check
If your caramel thickens too quickly, you’ve likely overheated it. The moment you see the sugar melt into a deep amber, remove the pan from the heat and add the cream slowly. A quick whisk will bring it back to a smooth, pourable state. Over‑cooked caramel becomes grainy and loses its glossy sheen.
The Final Chill
Once sliced, chill the bars for at least 30 minutes before serving. This step allows the caramel to set and the cheesecake to firm up, making each slice clean and tidy. I’ve seen impatient bakers try to serve warm bars only to end up with a sticky mess that slides off the plate—don’t be that person.
Creative Twists and Variations
This recipe is a playground. Here are some of my favorite ways to switch things up:
Maple Pecan Delight
Swap the brown sugar in the apple mixture for pure maple syrup and increase the pecan amount to ¾ cup. The result is a deeper, woodsy sweetness that feels like a cozy cabin breakfast.
Pumpkin Spice Fusion
Add ½ cup canned pumpkin puree to the cheesecake batter and a pinch of pumpkin pie spice to the apple mix. This variation turns the bars into a perfect autumn treat, and the pumpkin’s moisture keeps the texture extra creamy.
Chocolate Lovers’ Dream
Stir ¼ cup melted dark chocolate into the crust before baking, and drizzle a thin layer of chocolate ganache over the caramel after it sets. The bittersweet chocolate cuts through the sweetness, creating a balanced flavor profile.
Berry Burst
Replace half of the apples with fresh raspberries or blueberries. The berries add a burst of tang and a beautiful color contrast that makes the bars look as good as they taste.
Vegan Adaptation
Use a plant‑based cream cheese, coconut oil instead of butter, and a flax‑egg mixture (1 tbsp ground flaxseed + 3 tbsp water per egg). The caramel can be made with coconut cream for a dairy‑free version that still shines.
Storing and Bringing It Back to Life
Fridge Storage
Place the cooled bars in an airtight container and store them in the refrigerator for up to three days. The caramel may thicken, but a quick microwave zap (10‑15 seconds) will bring it back to a pourable consistency.
Freezer Friendly
Wrap each bar individually in plastic wrap, then place them in a freezer‑safe zip‑lock bag. They’ll keep for up to two months. When you’re ready to enjoy, thaw overnight in the fridge and warm the caramel with a splash of water before drizzling.
Best Reheating Method
To revive the bars, preheat the oven to 300°F (150°C) and bake the slice for 8‑10 minutes. Add a tiny splash of water (about a teaspoon) to the caramel before reheating; the steam helps the sauce regain its silky texture without drying out the cheesecake.