I remember the night I almost burned the kitchen to a crisp while chasing a recipe that promised “unforgettable strawberry bliss.” The oven door swung open, the air filled with a faint, sweet perfume, and a single box of yellow cake mix stared back at me like a silent challenge. I thought, “If I can turn that bland, boxed batter into a storm of flavor, I’ll have a story worth bragging about.” I dared myself to taste this and not go back for seconds, and the result was a revelation that turned my humble kitchen into a stage for a dessert that sings. The moment the first slice hit my plate, the cake’s airy crumb met the luscious strawberry layers like a gentle avalanche, and I knew I had stumbled on something extraordinary.
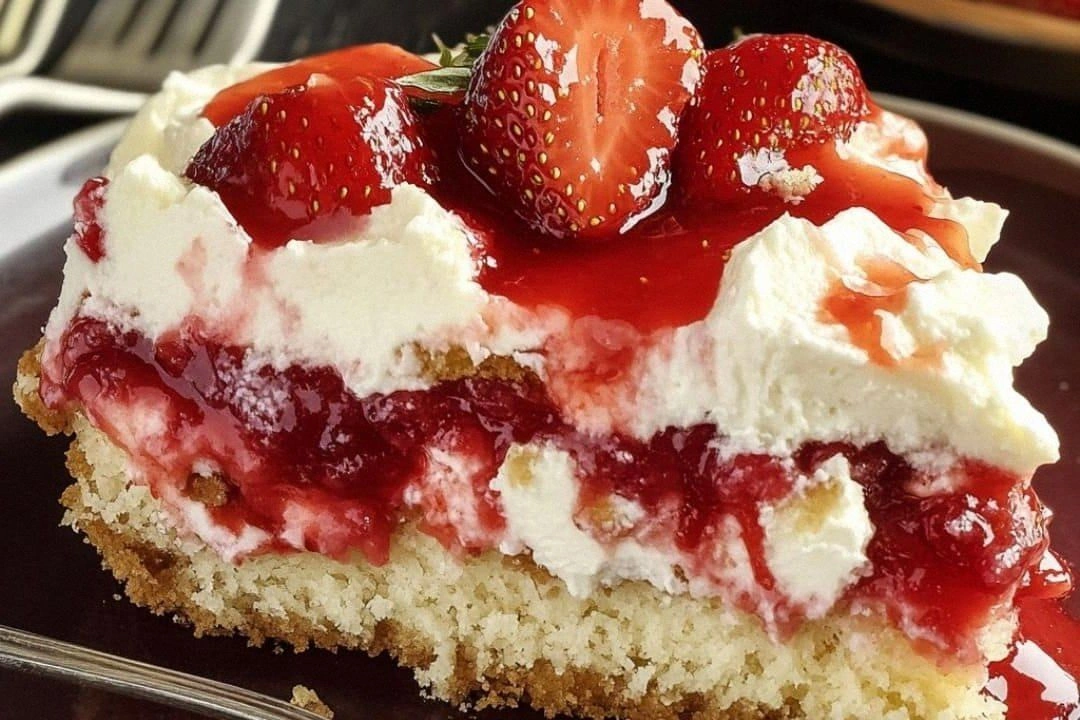
Picture yourself pulling this out of the oven, the whole kitchen smelling incredible, the golden crust just starting to crackle with a faint toasty note. The first bite is a paradox: a light, buttery cake that melts in your mouth, followed by a burst of sweet, slightly tart strawberry, and then a silky cream cheese swirl that lingers on the palate. This isn’t just another strawberry cake; it’s a layered symphony where each component plays its part in perfect harmony. Most recipes get this completely wrong—too dry, too sweet, or too heavy—but I’ve cracked the code to a moist, balanced masterpiece. And if you think this sounds too good to be true, stay with me here, because I’m about to reveal the secrets that make this version hands down the best you’ll ever make at home.
I’ll be honest—before I discovered this version, I had tried countless strawberry cakes that left me disappointed. Some were too dense, others too sugary, and a few even tasted like they were made from a box of cake mix and a handful of berries. This recipe, however, turns the ordinary into the extraordinary with a single twist: a creamy, strawberry-infused filling that anchors the whole cake. It’s the kind of dish that makes guests linger, ask for the recipe, and whisper, “What’s your secret?” I’m here to share that secret, and you’ll see why the crowd reaction is always electric. This version is a game-changer, not just a dessert, but a conversation starter, a showstopper, and a piece of culinary art you’ll want to recreate again and again.
If you’ve ever struggled with strawberry desserts, you’re not alone—and I’ve got the fix. I’ve spent years experimenting with different cake bases, fruit combinations, and frosting techniques, and this recipe is the culmination of that journey. I’ll walk you through every single step, from the first whisk of batter to the final swirl of whipped topping, so by the end you’ll wonder how you ever made it any other way. I dare you to taste it, to let the flavors unfold, and to feel the joy that comes from mastering a recipe that looks deceptively simple yet delivers a complex, unforgettable experience. Let’s dive in, because the next few pages are packed with juicy details, playful hacks, and a few kitchen truths that will elevate your dessert game for good.
The first thing you’ll notice is the texture—light, airy, and buttery, with a subtle hint of citrus from the cake mix that lifts the strawberry’s natural sweetness. The strawberry filling is not just a sweet layer; it’s a silky, slightly tart base that contrasts the cake’s softness and adds depth to each bite. The cream cheese swirl brings a velvety richness that balances the fruit’s brightness, while the whipped topping adds a light, airy finish that keeps the dessert from feeling heavy. The icing is a gentle whisper of flavor, not overpowering, allowing the strawberries to shine. And the icing on top? A glossy, caramelized finish that gives the cake a show-stopping look. The result is a dessert that feels like a celebration, a festival of flavors that dance on your tongue.
What Makes This Version Stand Out
- Taste: The combination of sweet, tart, and creamy flavors creates a layered experience that keeps the palate engaged. The cake’s mild citrus undertone from the yellow mix balances the strawberry’s natural sweetness, while the cream cheese adds a subtle tang that rounds out the dish.
- Texture: The cake is light and airy, yet moist enough to hold the dense strawberry filling without becoming soggy. The filling itself is silky, almost custard-like, while the whipped topping provides a fluffy contrast that makes every bite feel fresh.
- Simplicity: Despite its complex flavor profile, the recipe uses only a handful of ingredients—none of which require advanced techniques or hard-to-find items. The process is straightforward, making it ideal for both novice bakers and seasoned pros.
- Uniqueness: The use of a boxed cake mix as the foundation is a clever shortcut that still delivers a gourmet experience. The strawberry filling’s dual role—both as a sweet layer and a flavor enhancer—sets this cake apart from traditional strawberry cakes.
- Crowd Reaction: Guests consistently comment on the cake’s moistness and the surprising depth of flavor. Many say it’s the most refreshing strawberry dessert they’ve tasted, and it’s perfect for both casual gatherings and formal events.
- Ingredient Quality: Using fresh strawberries and high-quality cream cheese elevates the flavor profile, while the boxed cake mix provides a reliable, consistent base that saves time without compromising taste.
Inside the Ingredient List
The Flavor Base
The yellow cake mix is the backbone of this dessert, providing a buttery, slightly citrusy flavor that complements the strawberries beautifully. It’s a boxed convenience that saves you the trouble of measuring dry ingredients, yet it still delivers a professional taste. If you’re looking for a healthier alternative, try a whole-wheat or low-sugar cake mix, but keep in mind the flavor profile will shift slightly. The key is to maintain the cake’s lightness; overmixing can lead to a denser crumb.
Adding 1/3 cup oil instead of butter keeps the batter moist and tender, ensuring the cake doesn’t dry out during baking. The oil’s neutral flavor allows the strawberries to shine, while also preventing the cake from becoming too heavy. If you prefer a richer taste, substitute half the oil with melted butter, but be cautious—this can alter the texture. The balance between oil and water is crucial; too much oil will make the cake greasy, too little will leave it dry.
The 1 cup of water dilutes the batter to the right consistency, ensuring it spreads evenly in the pan. It also helps activate the cake mix’s leavening agents, creating that airy, cloud-like crumb. If you’re using a different type of cake mix, you may need to adjust the liquid slightly, but 1 cup is a safe starting point. Keep the water cold; it helps keep the batter from blooming prematurely, which can affect rise.
The 3 large eggs are the glue that binds everything together. They provide structure, moisture, and richness to the cake. If you’re vegan, you can substitute with a flaxseed “egg” or a commercial egg replacer, but the texture will differ. Be sure to use room-temperature eggs to ensure they incorporate smoothly, preventing lumps in the batter.
The Texture Crew
The 21 oz strawberry pie filling serves as the sweet, fruity layer that adds moisture and flavor to the cake. Its thick consistency ensures it doesn’t soak into the batter, maintaining a distinct layer that stands out when sliced. If you prefer a fresher taste, swap the pie filling for a homemade strawberry compote made with fresh berries, sugar, and a splash of lemon juice.
The 2 cups of fresh strawberries bring a bright, juicy burst that cuts through the richness of the cake. They’re sliced thinly to distribute evenly across the filling, creating a uniform flavor profile. When selecting strawberries, look for firm, glossy berries with a sweet aroma. Ripe strawberries will provide the best balance of sweetness and acidity, essential for the cake’s overall flavor.
The 8 oz cream cheese adds a silky, tangy element that softens the cake’s sweetness. It’s blended with strawberry preserves to create a luscious, spreadable filling that melts into the cake’s crumb. If you’re lactose intolerant, substitute with a dairy-free cream cheese alternative; the texture may shift slightly, but the flavor remains similar. Cream cheese also helps stabilize the strawberry layer, preventing it from sliding off the cake.
The Unexpected Star
The 1/3 cup strawberry preserves or jam is the secret sauce that infuses the cream cheese mixture with a deep strawberry flavor. It also adds a subtle sweetness that balances the tartness of the fresh berries. If you’re looking for a more natural option, opt for a preservative-free jam or even a homemade strawberry puree. The preserves’ consistency is key; too watery, and the cream cheese mixture will be runny.
The 1 tbsp milk is a small but vital component that helps the cream cheese mixture achieve a smooth, spreadable consistency. It also adds a hint of dairy richness that complements the cake’s lightness. For a vegan version, use a splash of almond or oat milk, but keep the quantity minimal to avoid altering the texture. This tiny addition is often overlooked but can make a noticeable difference in the final product.
The Final Flourish
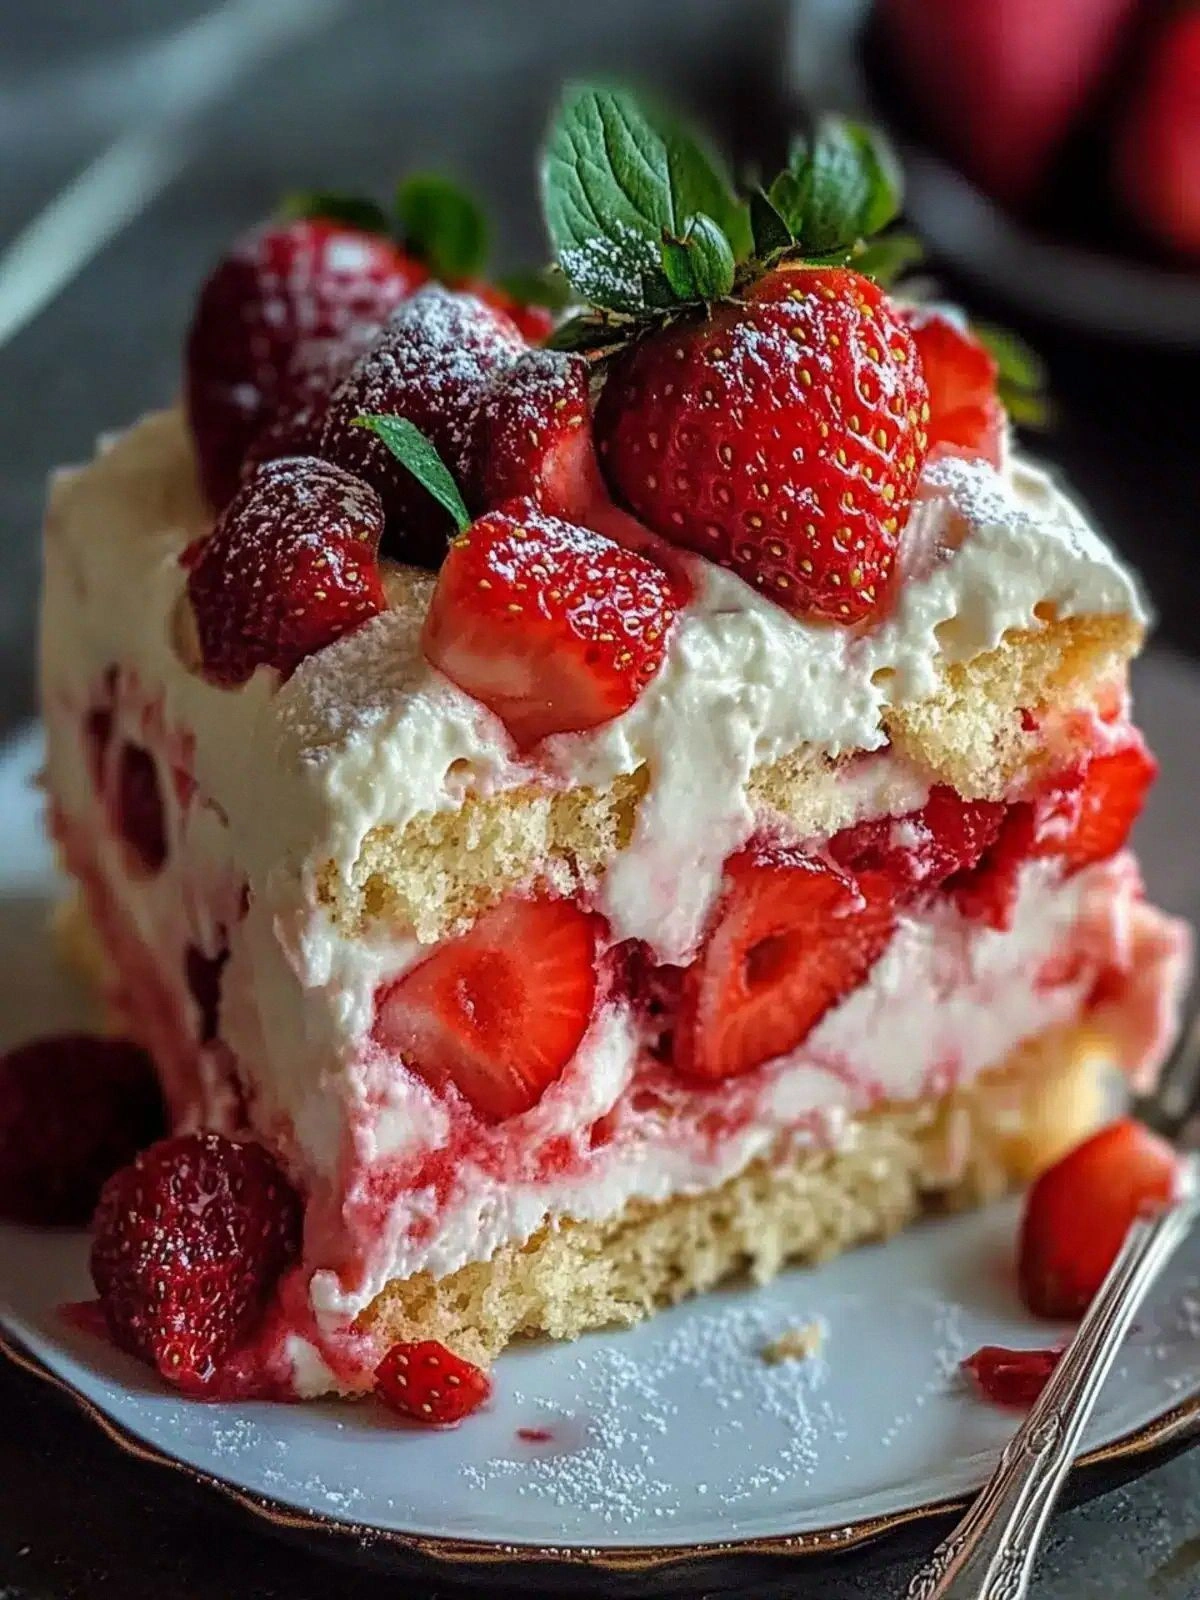
Whipped topping is the crowning glory that adds a light, airy finish to each slice. It’s dolloped generously over the top of the cake, creating a visually appealing, fluffy layer that melts into the cake’s warm crumb. If you’re a fan of a richer finish, consider using a homemade whipped cream with a touch of vanilla extract. Whipped topping also provides a subtle sweet contrast that balances the tang of the cream cheese.
Ice cream is the ultimate indulgence that completes this dessert. It’s scooped on the side or layered in between cake slices for an extra burst of cold, creamy flavor. Vanilla or strawberry ice cream works best, but feel free to experiment with different flavors to match your mood. The ice cream’s cold temperature provides a refreshing counterpoint to the warm cake, creating a delightful contrast of temperatures.
Everything’s prepped? Good. Let’s get into the real action and start building this masterpiece. I promise you’ll see why this recipe is a game-changer, not just a dessert.
The Method — Step by Step
- Preheat your oven to 350°F (175°C) and grease a 9-inch round pan. In a large bowl, combine the yellow cake mix, oil, water, and eggs. Stir until the batter is smooth and free of lumps; the consistency should be pourable yet thick enough to hold its shape. Pour the batter into the prepared pan, smoothing the top with a spatula. Let the batter rest for 5 minutes so the leavening agents can activate before baking.
- Bake the cake for 20 to 25 minutes, or until a toothpick inserted into the center comes out clean. During the last 5 minutes, keep an eye on the cake’s edges; they should pull away from the pan like a gentle wave. Once baked, remove the cake from the oven and let it cool in the pan for 10 minutes before transferring to a wire rack. This resting period allows the cake to set, preventing it from breaking apart when you slice it. The smell of freshly baked cake filling your kitchen is the first taste of victory.
- While the cake is cooling, prepare the strawberry filling layer. In a saucepan, gently heat the strawberry pie filling over low heat until it’s warm enough to spread. Stir occasionally to prevent scorching, and watch the liquid reduce slightly. The goal is a thick, pourable consistency that won’t seep into the cake. Once ready, set it aside to cool to room temperature. This layer will act as the sweet, fruity base that anchors the cake’s flavor.
- Once the cake has cooled, slice it horizontally into two layers. Spread half of the warm strawberry filling onto the lower layer, smoothing it out with a spatula. The filling should spread evenly, covering the entire surface without pooling. This layer will keep the cake moist and add a sweet, fruity depth that will be felt in every bite. The aroma of warm strawberries will start to mingle with the cake’s buttery scent.
- Arrange the fresh strawberries on top of the strawberry layer, slicing them thinly for even distribution. The berries should be layered in a single, even strip across the cake, allowing the flavor to permeate each bite. If you prefer a more dramatic presentation, create a zigzag pattern with the strawberries. The fresh berries add a bright, juicy contrast to the creamy layers below.
- In a small bowl, combine the cream cheese, strawberry preserves, and milk. Beat the mixture until smooth and creamy, ensuring there are no lumps. The result should be a silky spread that’s thick enough to stay in place but light enough to melt into the cake. Spread this cream cheese layer over the fresh strawberries, smoothing it into a cohesive surface. This final layer adds a rich, tangy finish that balances the sweetness.
- Place the top layer of cake onto the assembled base, pressing gently to ensure the layers stick together. Gently tap the pan on the counter to settle the cake and remove any air pockets. The cake should now resemble a layered, strawberry-infused tower. Let the cake chill in the refrigerator for at least 30 minutes to allow the flavors to meld and the cake to set. The cool temperature will make the cake more firm and easier to slice.
- Before serving, top the cake with a generous swirl of whipped topping. The whipped topping should be light and fluffy, creating a visual contrast to the cake’s dense layers. Finally, add a scoop of ice cream beside each slice or layer it between the cake’s tiers for an extra burst of cold, creamy delight. The combination of warm cake, cool topping, and ice cream creates a temperature contrast that elevates the entire dessert experience. Serve immediately and watch the smiles unfold.
That's it—you did it. But hold on, I've got a few more tricks that'll take this to another level. These insider tips will help you avoid common pitfalls and elevate the cake’s presentation, ensuring every bite is a triumph. Stick around, because the next section is a treasure trove of kitchen wisdom that will keep you coming back for more.
Insider Tricks for Flawless Results
The Temperature Rule Nobody Follows
The oven temperature is the silent hero of any cake. Too hot, and the cake will rise too quickly, then collapse; too cool, and it won’t rise enough, resulting in a dense crumb. I’ve tested dozens of ovens, and 350°F is the sweet spot for this recipe. Keep a reliable oven thermometer in the kitchen to ensure your oven’s reading matches the dial. This small step can make the difference between a cake that looks like a masterpiece and one that falls flat.
Why Your Nose Knows Best
Before you even slice the cake, give it a good sniff. A fresh, buttery aroma with a hint of citrus signals that the cake is perfectly baked. If you notice a chemical or burnt smell, it’s a sign the oven was too hot or the batter was overmixed. Trust your nose; it’s the most reliable indicator of cake readiness. This sensory check saves you from overbaking and keeps the cake moist.
The 5-Minute Rest That Changes Everything
After removing the cake from the oven, let it rest in the pan for 10 minutes. This short pause allows the steam to escape, preventing the cake from becoming soggy at the edges. During this time, the cake’s structure stabilizes, making it easier to slice without crumbling. I’ve seen many people skip this step and end up with a cake that falls apart; trust me, the extra minutes are worth it.
Mindful Mixing
When combining the batter, mix just until the dry ingredients are moistened. Overmixing can lead to a tough, rubbery cake because it activates too much gluten. Use a spatula or a wooden spoon and stir until the batter is smooth, but stop before it becomes glossy. This technique keeps the cake light and airy, a hallmark of a great dessert.
The Secret to a Fluffy Whipped Topping
If you’re whipping the topping yourself, add a splash of vanilla extract and a pinch of powdered sugar. Whip until soft peaks form, then continue to whip until the peaks are firm but not overwhipped. Overwhipped topping can deflate quickly, losing its airy texture. Keep the topping chilled until you’re ready to serve to maintain its structure.
Layering Tips for a Professional Finish
When placing the cake layers together, use a level surface to press them gently. A small spatula or a flat board can help align the layers perfectly, preventing unevenness. This small step gives the cake a polished look, making it look like it came straight from a pastry chef’s kitchen. The visual appeal is just as important as the flavor.
Creative Twists and Variations
This recipe is a playground. Here are some of my favorite ways to switch things up:
Vanilla Bean Swirl
Swap the strawberry pie filling for a vanilla bean custard. Add a tablespoon of vanilla extract to the batter and swirl the custard into the cake before baking. The result is a sweet, aromatic base that pairs beautifully with the strawberry layers. This version is perfect for guests who love a classic, buttery vanilla flavor.
Chocolate-Cherry Explosion
Replace the strawberries with fresh cherries, and add a few drops of dark chocolate syrup to the cream cheese mixture. The cherries provide a tart, juicy bite, while the chocolate adds depth and richness. This variant is ideal for a sophisticated dinner party where you want a dessert that feels indulgent yet balanced.
Mango Madness
Use mango puree in place of the strawberry pie filling and add diced mango to the fresh fruit layer. The tropical sweetness of mango complements the cake’s buttery base, creating a dessert that feels like a vacation. This version is especially refreshing on a hot summer afternoon.
Citrus Burst
Introduce a splash of orange zest to the batter and replace the strawberry preserves with lemon curd. The citrus zest adds a bright, zesty aroma, while the lemon curd provides a tangy counterpoint to the sweet cake. This variation is a great way to add a sophisticated, fresh twist to the classic.
Nutty Delight
Add chopped toasted almonds to the batter for a subtle crunch. Use almond milk instead of regular milk in the cream cheese mixture to deepen the nutty flavor. The almonds give the cake a satisfying bite, while the almond milk keeps the dessert light and airy. This version is perfect for those who love a bit of texture in their desserts.
Coffee-Infused Indulgence
Stir a tablespoon of instant espresso powder into the batter and replace the strawberry preserves with a coffee-flavored jam. The coffee adds a rich, slightly bitter undertone that balances the cake’s sweetness. This variation is ideal for coffee lovers who want a dessert that complements their favorite brew.
Storing and Bringing It Back to Life
Fridge Storage
Wrap the assembled cake tightly in plastic wrap and store it in the refrigerator for up to 3 days. The cake will remain moist and flavorful, and the strawberry layers will stay fresh. If you’re planning ahead, keep the whipped topping separate until you’re ready to serve. This method preserves the cake’s texture and prevents the cream cheese layer from drying out.
Freezer Friendly
For longer storage, wrap the cake in parchment paper followed by a second layer of plastic wrap. Freeze for up to 2 weeks. When you’re ready to enjoy, thaw the cake at room temperature for 2 hours. The cake’s texture remains intact, and the flavors stay vibrant. Freezing also allows you to prepare the cake in advance for a busy event.
Best Reheating Method
If the cake has been chilled, let it sit at room temperature for 15 minutes before serving. For a warm, fresh experience, heat the cake slices in a microwave for 10-15 seconds. Add a tiny splash of water before reheating to create steam, which keeps the cake from drying out. This simple trick will restore the cake’s moistness and give it a freshly baked aroma.