I was halfway through a late‑night Netflix binge when my roommate dared me to create a dessert that could make the Cookie Monster himself break out of his TV screen and sprint into the kitchen. I laughed, grabbed the nearest bag of Oreos, and thought, “What if I could turn those classic cookies into a cloud‑soft, blue‑hued fluff that looks like a cartoon nightmare but tastes like a dream?” The first attempt was a disaster – a gloopy mess that clung to the spoon like wet sand, and the blue color was more “pale sky” than “monster‑green.” But I didn’t give up; I went back to the pantry, re‑read every comment on similar recipes, and discovered a handful of science‑backed tricks that turned that mess into a masterpiece.
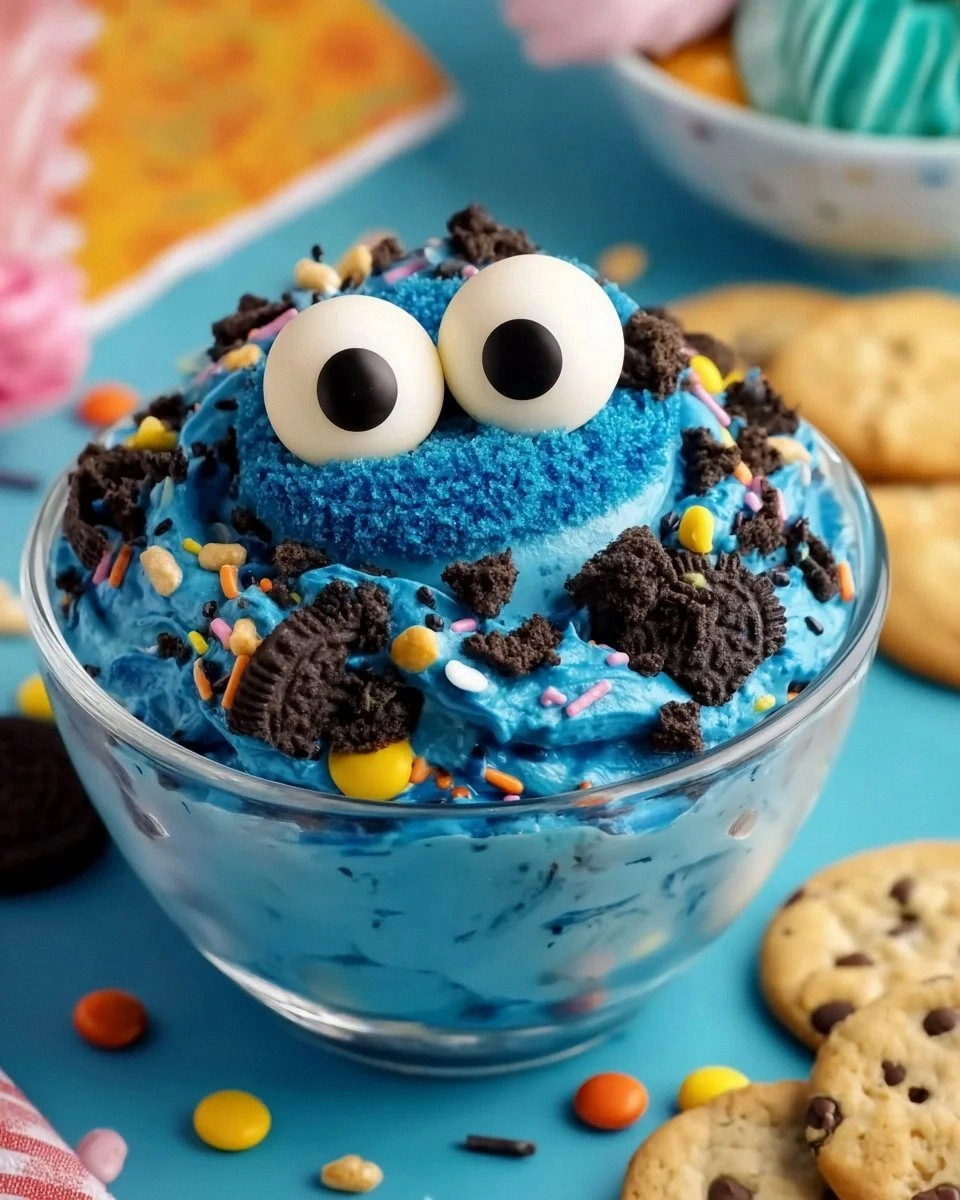
Picture this: the kitchen humming with the whir of an electric mixer, the faint scent of vanilla swirling around the room like a warm hug, and a bowl of glossy, azure fluff that shimmers under the light. When you lift the spoon, the mixture lifts like a soft, buttery cloud that holds a crunch of cookie shards inside – each bite is a symphony of silky cream, airy lightness, and the satisfying snap of chocolate. The aroma is a comforting mash of sweet dairy and faint cocoa, while the texture feels like a marshmallow that’s been kissed by a velvet curtain. You can almost hear the gentle sigh of the fluff settling on the plate, and the first spoonful releases a burst of cool blue that makes your eyes widen in playful disbelief.
What makes this version truly stand out is the secret partnership between instant vanilla pudding mix and heavy whipping cream – a duo that creates a custard‑like backbone while keeping the fluff feather‑light. Most recipes get this completely wrong by either over‑whipping the cream (resulting in a grainy butter‑like texture) or under‑mixing the pudding, which leaves a watery base that never sets. I’ve cracked the code: a precise temperature for the milk‑pudding blend, a gentle fold‑in technique for the crushed cookies, and just the right amount of blue gel to achieve that iconic Cookie Monster shade without turning the whole dessert into a neon nightmare.
And here’s the kicker: I’m about to reveal the exact moment when the mixture transforms from a pale, buttery puddle into a vibrant, airy cloud – the point where you’ll know you’ve nailed the texture. I dare you to taste this and not go back for seconds; the combination of tangy cream cheese, sweet vanilla, and crunchy cookie bits is hands down the best version you’ll ever make at home. Let me walk you through every single step — by the end, you’ll wonder how you ever made it any other way.
What Makes This Version Stand Out
- Taste: The tang of cream cheese balances the sugary vanilla pudding, creating a flavor profile that feels both nostalgic and sophisticated. Each bite delivers a mellow sweetness that never overwhelms, letting the chocolate cookie crunch shine through.
- Texture: Imagine a cloud that’s been lightly dusted with powdered sugar and then punctuated by crunchy cookie shards – that’s the perfect contrast. The whipped cream gives it an airy lift, while the pudding mix ensures it holds its shape without collapsing.
- Simplicity: You only need a handful of pantry staples and a mixer; no baking, no oven, no complicated steps. This makes it an ideal weekend project or a quick after‑school treat that looks impressive.
- Uniqueness: The bold blue hue isn’t just for show; it’s a playful nod to the Cookie Monster that turns any dessert table into a conversation starter. Most desserts shy away from color, but this one embraces it fully.
- Crowd Reaction: Serve it at a party and watch the kids (and adults) scramble for the first spoonful. The visual impact alone gets everyone reaching for seconds before they even taste it.
- Ingredient Quality: Using full‑fat cream cheese and heavy whipping cream creates a richer mouthfeel, while the instant vanilla pudding mix guarantees consistent thickening every time.
- Make‑Ahead Potential: This fluff can sit in the fridge for up to 24 hours, allowing the flavors to meld even deeper. The texture stays airy, making it perfect for prep‑ahead parties.
Inside the Ingredient List
The Flavor Base
The cream cheese is the heart of this fluff. Its tangy, slightly sour note cuts through the sweetness, preventing the dessert from becoming cloying. If you substitute a low‑fat version, you’ll lose that luxurious mouthfeel and the fluff may feel watery. For the best result, choose a full‑fat block cream cheese and let it sit at room temperature for 20 minutes before mixing.
Fun Fact: Cream cheese was originally created in the United States in the late 19th century as a cheaper alternative to European soft cheeses. Its mild flavor made it a staple in both sweet and savory dishes, and today it’s the secret behind countless desserts, from cheesecakes to this fluffy delight.
The Texture Crew
Heavy whipping cream, when beaten to stiff peaks, is the lift you need. It creates an airy scaffold that holds the pudding mix in place, preventing a dense, custard‑like finish. Over‑whipping turns it into butter, so stop the mixer the moment the peaks stand tall and glossy. If you’re allergic to dairy, try a chilled coconut cream – it whips up nicely but will add a subtle coconut aroma.
Powdered sugar dissolves instantly, ensuring no gritty texture mars the smoothness. It also stabilizes the whipped cream, helping the fluff keep its shape longer. You can replace half of it with a natural sweetener like erythritol for a lower‑calorie version, but be aware that some sugar substitutes can leave a faint aftertaste.
The Unexpected Star
The instant vanilla pudding mix is the magic binder. It thickens the milk into a custard without requiring any cooking, which saves time and keeps the kitchen cool. Skipping this step means the fluff will never set properly and will collapse under its own weight. If you’re gluten‑free, double‑check the label – most brands are, but a few add wheat starch.
Blue gel food coloring is the visual hero. A few drops are enough to achieve that iconic Cookie Monster shade; add more if you love a deeper hue. Remember, the color intensifies slightly as the fluff sets, so stop just before you think it’s perfect. For a natural alternative, you could use a splash of butterfly pea flower powder, which yields a vibrant blue without artificial dyes.
The Final Flourish
Crushed Oreos and chocolate chip cookies bring the crunch and chocolate flavor that define the dessert’s personality. The Oreos add a subtle coffee‑like bitterness that balances the sweet cream, while the chocolate chip cookies introduce buttery notes and extra texture. If you’re allergic to gluten, substitute with gluten‑free chocolate sandwich cookies and gluten‑free chocolate chips – the texture stays just as delightful.
Whole milk acts as the liquid carrier for the pudding mix, ensuring a smooth, velvety base. Using skim milk will thin the mixture and affect the overall richness. For a richer flavor, you could use half‑and‑half, but keep the total liquid volume consistent to avoid a runny fluff.
Everything's prepped? Good. Let's get into the real action...
The Method — Step by Step
Start by gathering all your ingredients and measuring them precisely. This may sound like a cliché, but the balance of cream cheese to whipped cream is the linchpin of the texture. In a large mixing bowl, combine the softened cream cheese with the powdered sugar. Beat on medium speed until the mixture is smooth, glossy, and free of lumps – think of a satin sheet that you could run your fingers through without feeling any bumps.
Kitchen Hack: Use a rubber spatula to scrape the sides of the bowl before each speed change; it ensures every crumb gets incorporated.Next, in a separate saucepan, whisk together the whole milk, instant vanilla pudding mix, and a splash of vanilla extract. Heat over medium‑low heat, stirring constantly, until the mixture thickens and begins to bubble – this should take about 2‑3 minutes. Once thickened, remove from heat and let it cool for 5 minutes; you’ll notice a faint, sweet aroma that tells you it’s ready.
Watch Out: If the pudding mixture starts to scorch, lower the heat immediately – a burnt flavor will linger forever.While the pudding cools, start whipping the heavy cream. Begin on low speed, then gradually increase to high. As the cream begins to thicken, add the vanilla extract and a pinch of salt (optional) to enhance flavor. Watch closely: the peaks will first become soft, then medium, and finally stiff – the moment they stand tall and glossy is the sweet spot. Over‑whipping will turn it grainy, so stop the mixer the instant you see firm peaks.
Kitchen Hack: Chill the whisk attachment along with the bowl; it cuts the whipping time in half.Now comes the fun part – folding. Gently fold the cooled vanilla pudding into the cream cheese mixture using a spatula. The goal is to keep the mixture airy, so use a gentle, lifting motion rather than a vigorous stir. As you fold, the pudding will blend into a silky custard that coats the cream cheese without deflating it. If you notice streaks, keep folding until the color is uniform and the texture looks velvety.
Next, drizzle the blue gel food coloring over the mixture. Start with 3‑4 drops, then use a silicone spatula to swirl it in a gentle, figure‑eight motion. The color will spread like a watercolor wash, giving you those iconic swirls that look like a cartoon monster’s fur. Add more drops if you desire a deeper hue, but remember: a little goes a long way – you don’t want to end up with a neon disaster.
Once the blue is beautifully incorporated, fold in the crushed Oreos and chocolate chip cookies. Sprinkle them in three batches, folding gently after each addition to ensure even distribution. The cookies should be suspended throughout the fluff like tiny chocolate islands, providing that satisfying crunch in every bite. If you prefer a smoother texture, you can pulse the cookies in a food processor for a finer crumble, but I love the rustic chunks.
Transfer the finished fluff into a large serving bowl or individual parfait glasses. Use a piping bag fitted with a star tip if you want a decorative finish – the peaks will hold the shape beautifully. This is the moment of truth: the mixture should hold its shape but still look soft enough to sink your spoon into with minimal resistance.
Refrigerate the assembled fluff for at least 30 minutes. This chilling step allows the pudding to fully set and the flavors to meld, creating a cohesive bite that’s both airy and creamy. While you wait, you can whip up a quick chocolate drizzle or sprinkle extra crushed cookies on top for added visual flair.
Fun Fact: The cooling process not only solidifies the pudding but also allows the air bubbles trapped in the whipped cream to stabilize, giving the fluff its signature lightness.When you’re ready to serve, give the bowl a gentle stir to bring any settled crumbs back into the mix. Scoop generous portions into dessert dishes, garnish with a few extra cookie crumbs, and watch the faces light up. That first spoonful? Pure magic. That second? A repeat performance. And if anyone asks for the recipe, you’ll have the perfect story to go with it.
That's it — you did it. But hold on, I've got a few more tricks that'll take this to another level...
Insider Tricks for Flawless Results
The Temperature Rule Nobody Follows
Never, ever whisk the cream cheese when it’s straight out of the fridge. Cold cheese will seize up, creating lumps that are impossible to smooth out later. Let it sit at room temperature for at least 20 minutes; you’ll notice it becomes supple and blends effortlessly with the sugar. This small patience step is the difference between a velvety base and a gritty, uneven one. Trust me, I once tried to skip this step and ended up with a texture that felt like sandpaper – not a good look.
Why Your Nose Knows Best
When the pudding mixture reaches the perfect thickness, you’ll smell a faint caramel‑like aroma, even though there’s no caramel added. That scent is a reliable indicator that the starches have fully gelatinized, meaning the mix will set properly. If you rely solely on time, you might end up with a runny base. So trust your nose – when the kitchen smells sweet and warm, you’re ready to move on.
The 5‑Minute Rest That Changes Everything
After folding the whipped cream into the pudding‑cheese blend, let the mixture sit for five minutes before adding the cookies. This short pause lets any air bubbles rise to the surface and pop, resulting in a denser, more stable fluff. It also gives the blue coloring a chance to settle, preventing streaky swirls. I once rushed this step and the final product was too airy, causing it to collapse when sliced – a lesson learned the hard way.
Cookie Crunch Timing
If you love an extra crunch, toast the crushed cookies lightly in a dry skillet for 30 seconds before folding them in. The heat brings out a deeper chocolate flavor and adds a subtle toasty note that elevates the entire dessert. Be careful not to burn them; a light golden hue is all you need. This trick is especially useful if you’re using store‑bought cookies that can sometimes taste flat.
The Secret of the Blue Gel
Add the blue gel food coloring gradually, tasting the color as you go. The pigment can become more intense after refrigeration, so stop when the mixture looks a shade lighter than your desired final hue. If you accidentally go too dark, a splash of extra whipped cream can dilute the color without compromising texture. This method saves you from the dreaded “too‑blue” disaster that can ruin the visual appeal.
Creative Twists and Variations
This recipe is a playground. Here are some of my favorite ways to switch things up:
Minty Monster Madness
Swap half of the blue gel for a mint‑green gel and add a teaspoon of peppermint extract. The resulting pastel green fluff still feels like a monster’s treat, but with a refreshing aftertaste that pairs beautifully with chocolate cookies. Kids love the surprise mint flavor, and adults appreciate the subtle cool finish.
Nutty Chocolate Delight
Replace the crushed chocolate chip cookies with chopped toasted hazelnuts and add a tablespoon of cocoa powder to the cream cheese mixture. The nutty crunch adds depth, while the cocoa introduces a richer chocolate backbone. This variation feels more sophisticated, making it perfect for a dinner‑party dessert.
Fruit‑Infused Fluff
Fold in a cup of fresh raspberry puree after the pudding mix is incorporated, and swap the chocolate chip cookies for crushed shortbread biscuits. The tangy raspberry cuts through the sweetness, creating a beautiful pink‑and‑blue swirl that looks like a carnival dessert. Serve with a drizzle of white chocolate for extra flair.
Vegan Dream
Use a plant‑based cream cheese (such as almond or soy) and coconut cream in place of heavy whipping cream. Choose a vegan instant pudding mix and replace the crushed Oreos with vegan chocolate sandwich cookies. The texture remains airy, and the flavor stays indulgent, proving that you don’t need dairy to achieve monster‑level deliciousness.
Spiced Holiday Version
Add a pinch of ground cinnamon and a dash of pumpkin spice to the cream cheese mixture, and swap the chocolate chip cookies for ginger snap crumbs. The warm spices give the fluff a cozy, holiday feel while the blue color adds a playful contrast to the seasonal flavors. Perfect for a winter gathering.
Storing and Bringing It Back to Life
Fridge Storage
Transfer the fluff to an airtight container and keep it in the refrigerator for up to 48 hours. The chilled environment stabilizes the whipped cream and prevents the cookies from getting soggy. If you notice a slight separation, give it a gentle stir before serving – the texture will rebound quickly.
Freezer Friendly
For longer storage, portion the fluff into individual ramekins, cover tightly with plastic wrap, and freeze for up to 2 weeks. When you’re ready to enjoy, move the ramekin to the fridge to thaw overnight. The fluff retains its airy structure because the whipped cream acts as a natural stabilizer.
Best Reheating Method
If the fluff has become a bit dense after refrigeration, place a teaspoon of whole milk over the top and microwave for 10‑15 seconds, then fold gently. The added liquid creates steam that revives the lightness without turning it watery. This trick restores that cloud‑like texture and makes each spoonful feel freshly whipped.