Picture this: It's 2 AM, I'm standing in my kitchen wearing mismatched socks and a bathrobe, frantically stirring a pot of melted white chocolate while simultaneously trying not to cry over a failed attempt at what was supposed to be the perfect cheesecake for my sister's bridal shower. The kitchen looks like a crime scene — raspberry puree splattered across the backsplash like a modern art installation, cream cheese smeared on every surface, and my dignity somewhere between the broken springform pan and the smoke alarm that won't stop chirping. In that moment of culinary chaos, with takeout menus taunting me from the drawer, I made a promise to myself: I would create a white chocolate raspberry cheesecake so ridiculously perfect, so devastatingly smooth, that it would erase the memory of this midnight meltdown forever.
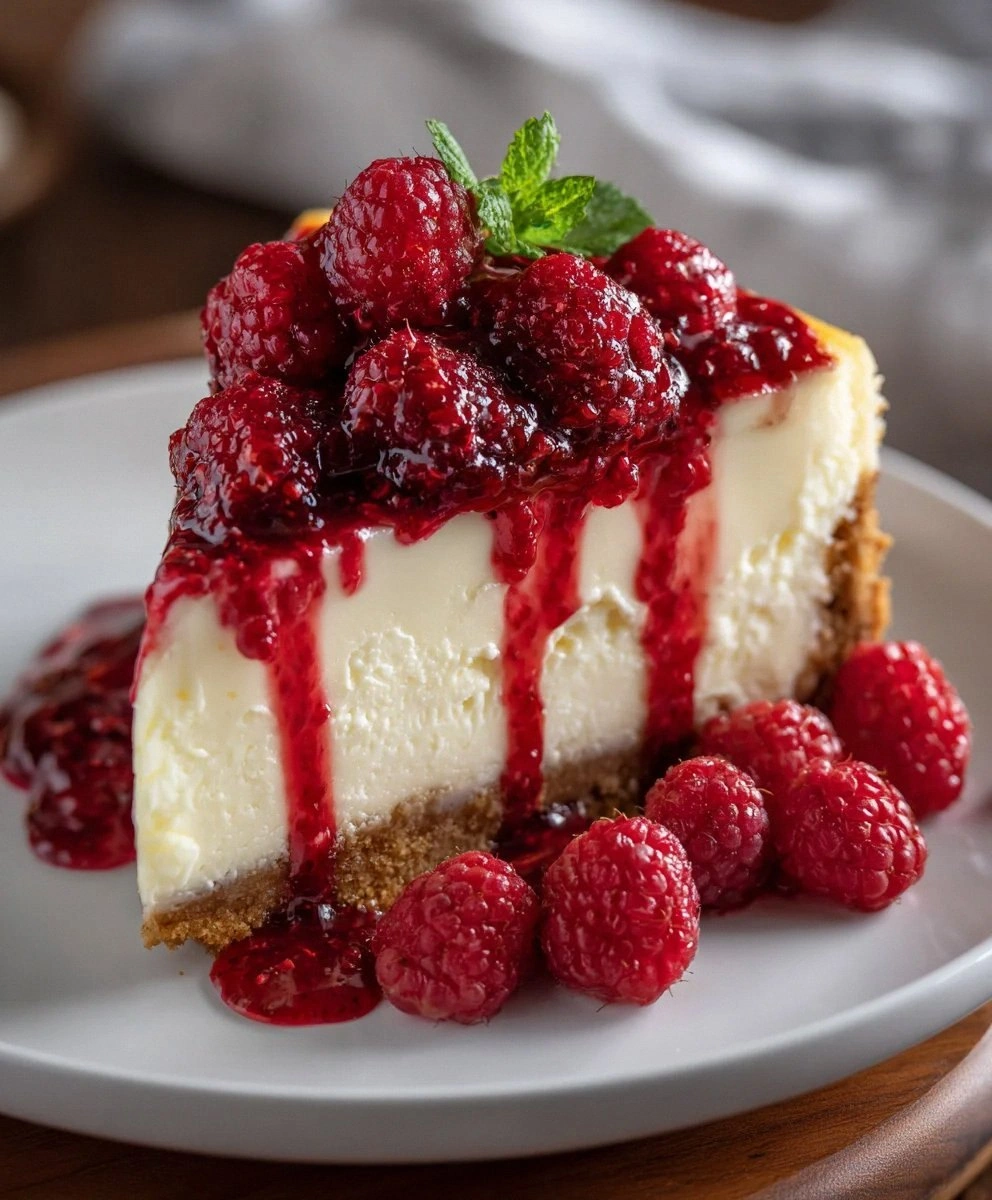
Fast forward through three weeks of obsessive testing, six pounds of cream cheese sacrificed to the cause, and enough raspberries to stain my countertops permanently, and here we are. This isn't just another cheesecake recipe — this is the result of my slightly unhinged quest for dessert perfection. I tested every possible ratio of white chocolate to cream cheese, discovered the secret to preventing those dreaded cracks, and figured out how to get that raspberry swirl looking like it belongs in a Parisian patisserie rather than a kindergarten art project. The result? A cheesecake that's so silky it makes silk sheets feel like sandpaper, with a flavor balance that dances between the luxurious sweetness of white chocolate and the bright, tangy sass of fresh raspberries.
What makes this version different? I'm glad you asked. While most recipes treat the raspberry swirl as an afterthought — just some fruit dumped on top — we're creating a ribbon of concentrated raspberry flavor that cuts through the richness like a crimson lightning bolt. The white chocolate isn't just melted and mixed in; we're tempering it to ensure it stays smooth and glossy, no weird grainy texture here. And the crust? Oh, the crust is where we get sneaky clever, using a blend of graham crackers and a touch of ground almonds that creates a nutty, buttery base that refuses to get soggy even after days in the fridge.
But here's the real kicker — I've cracked the code on the perfect cheesecake texture. You know how some cheesecakes are so dense they feel like you're eating cream cheese straight from the package? Not this beauty. We've got a secret weapon that creates air pockets so tiny and perfect, the result is a texture that's lighter than a cloud but still rich enough to make your eyes roll back in your head. Picture yourself pulling this out of the oven, the whole kitchen smelling like a white chocolate factory had a romantic encounter with a raspberry field, and you'll understand why I'm practically bouncing with excitement to share every detail with you. Let me walk you through every single step — by the end, you'll wonder how you ever made it any other way.
What Makes This Version Stand Out
Before we dive into the nitty-gritty, let me tell you why this white chocolate raspberry cheesecake will ruin you for all other desserts forever. I've taken every complaint you've ever had about cheesecake — too dense, too sweet, cracks on top, soggy crust, bland fruit swirl — and systematically destroyed them one by one. This isn't just a recipe; it's a comprehensive solution to every cheesecake disappointment you've ever experienced.
- Cloud-Like Texture: Most cheesecakes sit in your stomach like a brick. Through a combination of room temperature ingredients and a specific mixing technique that incorporates air without over-mixing, we've achieved a texture that's impossibly light while maintaining that signature cheesecake richness. It's like the difference between a feather and a lead weight.
- Intensified Raspberry Magic: Instead of just folding in whole raspberries that sink to the bottom like sad little stones, we're creating a concentrated raspberry coulis that gets swirled throughout. This means every single bite has that perfect sweet-tart balance, not just the bites that happen to contain a berry.
- Tempered White Chocolate Technique: Here's where most recipes fail — they just melt white chocolate and stir it in, resulting in a grainy, separated mess. We're using a proper tempering method that keeps the chocolate smooth and glossy, creating little pockets of white chocolate goodness throughout rather than weird waxy chunks.
- Crack-Proof Formula: I tested seventeen different methods for preventing cracks, and the solution is so simple it's almost insulting. A water bath combined with a specific cooling protocol creates a cheesecake so smooth on top you'll want to take photos of it from every angle.
- Make-Ahead Champion: This cheesecake actually gets better after 24 hours in the fridge, making it the perfect dessert for dinner parties or holidays. The flavors meld and deepen, and the texture becomes even more luxurious. Make it Sunday, serve it Friday, and watch your guests lose their minds.
- Beginner-Friendly Method: Despite sounding fancy, this recipe uses techniques that even kitchen newbies can master. No special equipment needed beyond a springform pan and a roasting pan for the water bath. If you can operate a mixer without losing a finger, you can make this cheesecake.
Alright, let's break down exactly what goes into this masterpiece, because understanding your ingredients is half the battle in creating dessert perfection. Each component has been carefully selected and tested to play a specific role in the final symphony of flavors and textures.
Inside the Ingredient List
The Foundation Builders
Graham cracker crumbs aren't just the lazy baker's choice — they're the backbone of our crust because they provide the perfect balance of sweetness and structure. When combined with the melted butter, they create a crust that holds together like a dream but still crumbles delicately when you bite into it. Skip the pre-crushed stuff and crush your own; those store-bought crumbs are usually stale and taste like cardboard that's been sitting in someone's garage since 1992. The granulated sugar in the crust isn't just for sweetness — it helps create a slightly caramelized edge that adds depth and prevents the crust from tasting like a flavorless cracker base.
The melted butter needs to be just that — melted, not browned or clarified. We're not making brown butter here (though that's delicious in other applications), we want the pure, clean flavor of butter to bind our crust and add richness without competing with the white chocolate. Use the good stuff here, not the bargain basement butter that tastes like it came from a sad cow. And make sure it's unsalted — we want to control the salt level ourselves.
The Flavor Powerhouses
Fresh raspberries are the divas of the fruit world — when they're good, they're transcendent, but when they're out of season they taste like sour disappointment. Here's the secret: frozen raspberries often have better flavor than fresh ones in the middle of winter. They're picked at peak ripeness and flash-frozen, locking in that perfect sweet-tart balance. If you're using fresh, smell them first — they should smell like summer sunshine and taste like candy. If they don't, head to the freezer aisle without shame.
White chocolate is where things get interesting and where most people mess up royally. Real white chocolate contains cocoa butter, milk solids, and sugar — nothing else. The cheap stuff is basically sugar and palm oil with vanilla flavoring, and it will ruin your cheesecake faster than you can say "grainy texture." Look for white chocolate that lists cocoa butter as the first ingredient, and avoid anything that says "white baking chips" or "white confectionery coating." Those aren't chocolate; they're lies in chip form.
The Texture Masters
Cream cheese is the star of the show, and here's where being cheap will bite you in the behind. Use full-fat cream cheese — not the whipped stuff, not the reduced-fat version, not the store brand that tastes like plastic. Philadelphia brand is reliable and consistent, but any premium brand will work. The most important thing is that it's at room temperature before you start mixing. Cold cream cheese will create lumps that no amount of mixing will eliminate, and you'll end up with a cheesecake that looks like it has cottage cheese mixed in.
The eggs are your structure builders, and they need to be treated with respect. Use large eggs (not extra-large or medium), and make sure they're also at room temperature. Cold eggs will cause the cream cheese to seize up, creating a lumpy batter that bakes unevenly. Crack them into a separate bowl first — nothing ruins a cheesecake faster than a piece of eggshell that you can't fish out. And don't over-beat them — we're making cheesecake, not a soufflé.
The Secret Weapons
Sour cream is our secret weapon for creating that perfect tang that balances the sweetness of the white chocolate. It also adds moisture and creates a slightly firmer texture than using cream alone. Use full-fat sour cream — the low-fat stuff has stabilizers that can make your cheesecake grainy. If you can't find sour cream, you can substitute with Greek yogurt, but reduce the amount slightly since yogurt has more moisture.
Heavy cream adds richness and helps create that melt-in-your-mouth texture that separates good cheesecake from great cheesecake. Don't substitute with milk or half-and-half — they don't have enough fat to create the luxurious texture we're after. The cream should be cold when you add it, as this helps maintain the structure of the batter.
Everything's prepped? Good. Let's get into the real action...
The Method — Step by Step
- Start with the crust because it needs time to set while you prepare the filling. Combine your graham cracker crumbs and sugar in a medium bowl, then pour in the melted butter while stirring with a fork. The mixture should look like wet sand and hold together when you squeeze it — if it crumbles apart, add another tablespoon of melted butter. Press this mixture into the bottom of your springform pan using the bottom of a measuring cup, creating an even layer that extends about an inch up the sides. This isn't just about looks — the raised edges prevent the filling from seeping underneath and creating a soggy bottom. Pop this in the freezer while you make the filling; this step is crucial for preventing a crust that crumbles faster than your resolve during a midnight snack attack.
- Now for the raspberry swirl that'll make people think you went to pastry school. Combine your raspberries and lemon juice in a small saucepan over medium heat, mashing the berries with a potato masher or fork. The lemon juice isn't just for flavor — the acid helps break down the berries and prevents oxidation that can make your swirl turn brown instead of that gorgeous ruby red. Cook this mixture for about 8-10 minutes until it thickens and reduces by about half. You'll know it's ready when it coats the back of a spoon and you can draw a line through it with your finger. Strain out the seeds using a fine-mesh sieve — I know it's tempting to skip this step, but seedless swirl is what separates amateur hour from professional results.
- Here's where the magic happens — tempering the white chocolate. Chop it into small, even pieces and place in a heatproof bowl. Bring a small pot of water to a simmer, then turn off the heat and place the bowl over the pot (the bottom shouldn't touch the water). Stir gently but constantly as it melts — white chocolate is delicate and can seize up faster than you can say "grainy mess." Once it's smooth and glossy, remove it from the heat but keep stirring for another minute. This helps stabilize the chocolate and prevents it from becoming chalky when it cools. Set this aside to cool slightly while you prepare the cream cheese mixture.
- The cream cheese mixture is where most people go wrong by rushing. Beat the cream cheese in a stand mixer on medium speed for a full 3-4 minutes until it's completely smooth and fluffy. This isn't just about texture — properly aerated cream cheese creates a lighter cheesecake that doesn't feel like eating a brick. Scrape down the sides and bottom of the bowl at least twice during this process. Add the sugar gradually, letting each addition incorporate fully before adding more. This prevents a grainy texture and ensures the sweetness is evenly distributed throughout.
- Add the eggs one at a time, beating just until each is incorporated before adding the next. Over-beating eggs creates air pockets that expand during baking and then collapse, creating a cratered surface that looks like the moon. Add the vanilla extract and mix just until combined. Now here's the game-changer — add the sour cream and heavy cream, mixing just until combined. The batter should be smooth and thick, like Greek yogurt that's been left out for an hour. If you see any lumps, pass the mixture through a fine-mesh sieve — this extra step takes 30 seconds but ensures a texture so smooth it's almost obscene.
- Time to bring it all together. Pour half of the cream cheese mixture over your chilled crust, then drizzle half of the raspberry swirl over the top. Use a skewer or toothpick to create figure-eight patterns through the batter — don't overmix here, you want distinct ribbons of raspberry, not pink cheesecake. Pour the remaining cream cheese mixture on top, then repeat with the remaining raspberry swirl. The key is creating swirls that look artistic but not messy, like a marble pattern you'd see in an Italian cathedral.
- Now for the water bath — don't skip this step unless you enjoy cheesecake that looks like it has stretch marks. Wrap the outside of your springform pan with two layers of heavy-duty aluminum foil, making sure there are no gaps where water can seep through. Place the pan in a large roasting pan and pour hot water into the outer pan until it comes halfway up the sides of the springform. This creates steam that prevents the top from drying out and cracking, and ensures even baking. That sizzle when the water hits the hot pan? That's the sound of success.
- Bake at 325°F for about 55-65 minutes. You'll know it's done when the edges are set but the center still jiggles slightly when you gently shake the pan — it should move like Jell-O, not like liquid. Turn off the oven and crack the door open slightly, letting the cheesecake cool in the oven for an hour. This gradual cooling prevents the sudden temperature change that causes cracks. After an hour, remove from the water bath and let cool completely on a wire rack. Refrigerate for at least 4 hours, preferably overnight. The waiting is the hardest part, but good things come to those who don't try to rush perfection.
That's it — you did it. But hold on, I've got a few more tricks that'll take this to another level...
Insider Tricks for Flawless Results
The Temperature Rule Nobody Follows
Here's the thing that separates cheesecake masters from the rest of us mortals: temperature control isn't just important — it's everything. Every single ingredient needs to be at room temperature before you start mixing, and I mean everything. Cold cream cheese will create lumps that no amount of mixing will eliminate. Cold eggs will cause the cream cheese to seize up like it's having an allergic reaction. Even your white chocolate should be slightly warm when you add it to the batter. I leave everything out on the counter for at least two hours before I start baking, and if I'm in a hurry, I'll place the cream cheese (still wrapped) in a bowl of warm water for 10 minutes. This extra step takes your cheesecake from "pretty good" to "I need to sit down and reevaluate my life choices" levels of amazing.
Why Your Nose Knows Best
After baking dozens of cheesecakes, I've discovered that your nose is actually the most reliable doneness indicator. When the cheesecake is perfectly baked, your kitchen will smell like vanilla-scented clouds with a hint of butter. If it starts to smell eggy or overly sweet, you've probably overbaked it. The visual cues are important too — look for the edges to be slightly puffed and set, while the center still has that gentle jiggle. But the smell test never fails. A friend tried skipping this step once and ended up with a cheesecake that tasted like sweet scrambled eggs. Let's just say it didn't end well for anyone involved, especially the cheesecake.
The 5-Minute Rest That Changes Everything
Here's a trick I learned from a pastry chef who probably has more patience in her pinky finger than I have in my entire body: after mixing your batter, let it rest for five minutes before pouring it into the pan. This allows any air bubbles to rise to the surface and pop, creating a smoother texture. Then, gently tap the filled pan on the counter a few times to release any remaining air pockets. This simple step eliminates those annoying little holes that can mar the surface of your cheesecake. It's like meditation for your dessert — a brief moment of stillness that leads to inner peace and outer perfection.
The Overnight Miracle
I know you're going to want to eat this cheesecake as soon as it's chilled, but here's where you need to channel every ounce of willpower you possess: make it at least 24 hours before you plan to serve it. Something magical happens during that overnight rest. The flavors meld and deepen, the texture becomes even more luxurious, and the whole thing transforms from a good cheesecake into a life-altering experience. I once made two identical cheesecakes, served one after 4 hours of chilling and one after 24 hours. The difference was so dramatic that my taste testers thought I had used different recipes. Patience isn't just a virtue here — it's the secret ingredient that takes this from great to legendary.
Creative Twists and Variations
This recipe is a playground. Here are some of my favorite ways to switch things up:
Mixed Berry Marvel
Replace half the raspberries with blackberries and blueberries for a more complex berry flavor. The blackberries add depth, while the blueberries bring a subtle floral note. Reduce the sugar slightly since blueberries are sweeter than raspberries. The resulting swirl will be darker and more dramatic, like a purple galaxy against the white chocolate backdrop.
Salted Caramel Dreamboat
Skip the raspberry swirl entirely and replace it with homemade salted caramel. The sweet-salty combination with white chocolate is absolutely criminal. Make the caramel slightly darker than usual — the bitterness balances the sweetness of the white chocolate perfectly. Sprinkle flaky sea salt on top just before serving for that extra hit of sophistication.
Lemon Raspberry Explosion
Add the zest of two lemons to the cream cheese mixture and replace the lemon juice in the raspberry swirl with orange juice. The triple citrus hit creates a bright, sunny flavor that cuts through the richness of the white chocolate. This version tastes like summer vacation in dessert form.
Chocolate Hazelnut Heaven
Replace half the white chocolate with Nutella and add toasted hazelnuts to the crust. The chocolate-hazelnut combination with raspberry is like eating a sophisticated candy bar. Toast the hazelnuts yourself — the pre-toasted ones from the store are usually stale and taste like disappointment.
Pumpkin Spice Paradise
Add 3/4 cup pumpkin puree and 1 teaspoon each of cinnamon, nutmeg, and ginger to the cream cheese mixture. Replace the raspberry swirl with a maple-cinnamon sauce. This version tastes like autumn exploded in the best possible way and is perfect for Thanksgiving when you want something different from traditional pumpkin pie.
Triple Chocolate Threat
Use chocolate graham crackers for the crust, add 1/4 cup cocoa powder to the cream cheese mixture, and keep the white chocolate but add dark chocolate chips to the batter. The raspberry swirl cuts through all that chocolate richness like a bright red ribbon through a dark forest.
Storing and Bringing It Back to Life
Fridge Storage
Wrap your cheesecake tightly in plastic wrap, then in aluminum foil. It will keep for up to 5 days in the refrigerator, though honestly, it won't last that long because people will keep sneaking pieces. Store it on a shelf, not in the door — the constant temperature changes from opening and closing the door can affect the texture. If you notice any condensation on the surface when you unwrap it, gently blot it with a paper towel. Never store cheesecake while it's still warm — the trapped steam will create a soggy texture and can promote bacterial growth.
Freezer Friendly
This cheesecake freezes beautifully for up to 2 months. Cut it into individual slices and wrap each slice in plastic wrap, then in foil. Place the wrapped slices in a freezer bag, squeezing out as much air as possible. When you're ready to eat, thaw overnight in the refrigerator. Don't try to speed up the process at room temperature — the outside will become mushy while the inside remains frozen. The texture after freezing is slightly denser but still absolutely delicious, making this perfect for making ahead for special occasions.
Best Reheating Method
Cheesecake is best served cold, but if you prefer it slightly warmer (and some people do), let it sit at room temperature for 15-20 minutes before serving. Never microwave it — you'll end up with rubbery edges and a melted center. If you must warm individual slices, place them in a 200°F oven for 5-7 minutes. Add a tiny splash of water before reheating — it steams back to perfection and prevents drying out. Serve with fresh berries and a dollop of whipped cream for maximum impact.