Introduction
Picture this: a kitchen that smells like burnt toast, a pot of boiling potatoes that have somehow become mushy, and a friend who dares you to make the best loaded potato skins ever. I stared at the soggy mess, my stomach growling louder than the microwave timer. That moment was the spark that led me to this ultimate, crispy version of a classic crowd‑loving appetizer. I was determined to turn the disaster into a triumph, and I discovered a technique that gives the skins a crunch so perfect it practically sings.
When the first potato hit the oven, the sound was a satisfying crackle that promised golden edges. The aroma that rose was a buttery, cheesy cloud that made every breath feel like a prelude to something delicious. My taste buds tingled just by watching the skins turn from dull to dazzling. I could almost hear the sizzle of bacon, the whisper of melted cheddar, and the gentle pop of fresh onions as they mingled together. That sensory orchestra was the foundation of this recipe.
What sets this version apart is not just the crunch; it’s the harmony of flavors that dance together. The salty bacon bites into the creamy cheese, while the bright green onions cut through the richness. The broiler finish creates a caramelized crust that gives the skins a dramatic, almost theatrical, presentation. Most recipes get this completely wrong, but here’s what actually works: a precise bake, a quick broil, and a secret seasoning blend that elevates the dish.
There’s one surprising ingredient that will change everything: a dash of smoked paprika that gives the skins a subtle smokiness, making them feel like a midnight snack. I dare you to taste this and not go back for seconds. Let me walk you through every single step — by the end, you’ll wonder how you ever made it any other way.
What Makes This Version Stand Out
- Taste: The combination of sharp cheddar, smoky paprika, and fresh chives creates a flavor profile that’s both comforting and adventurous. Each bite delivers a burst of savory richness that lingers on the palate. The balance between saltiness and creaminess is perfect for any crowd.
- Texture: The skins are baked to a golden, crisp exterior that shatters like thin ice when you bite into them, while the interior remains fluffy and airy. The cheese melts into a silky sauce that coats the potato like velvet. This contrast is the secret to the dish’s irresistible mouthfeel.
- Ease: You’ll be amazed at how simple the prep is once you know the trick: bake the potatoes first, then shave the skins. No complicated steps, no fancy tools—just a few minutes of active cooking and a lot of flavor.
- Uniqueness: The addition of smoked paprika and a quick broil finish gives this version a distinctive edge that sets it apart from the standard recipe. It’s a subtle twist that feels like a new invention.
- Crowd Reaction: I’ve served these at game nights, potlucks, and holiday parties, and the feedback has been consistently enthusiastic. People keep asking for the recipe because they can’t resist the combination of crunch and gooey cheese.
- Ingredient Quality: Using fresh, high‑quality potatoes and real cheddar makes the difference between good and unforgettable. The bacon’s crispness and the chives’ brightness elevate the entire dish.
- Make‑Ahead Potential: Once assembled, the skins can be kept in the fridge and finished under the broiler just before serving. This makes it ideal for parties where you want to focus on hosting rather than last‑minute cooking.
Inside the Ingredient List
The Flavor Base
At the core of these skins is the potato itself. Choosing russet potatoes gives you a fluffy interior that can hold the cheesy filling without becoming soggy. If you’re short on time, pre‑bake the potatoes in the oven until the skins are crisp and the flesh is soft, then let them cool before shaving. Skipping the pre‑bake step will result in skins that are chewy rather than crispy.
The butter used to coat the skins adds a silky richness that binds the flavors together. A tablespoon of melted butter before the final broil gives the edges a glossy finish. If you’re watching calories, you can substitute a light butter or a drizzle of olive oil, but the taste will shift slightly toward a more Mediterranean note.
The Texture Crew
Cheddar cheese is the star that melts into a golden sauce. I use sharp cheddar for its robust flavor; it cuts through the richness of the bacon and cream. A softer cheese would melt too quickly and lose its structure, leaving the skins soggy.
Bacon bits provide a savory crunch that contrasts beautifully with the soft potato interior. Cook the bacon until it’s just crisp, then crumble it into small pieces. If you prefer a vegetarian version, replace bacon with smoked tempeh or a sprinkle of roasted seaweed.
The Unexpected Star
Smoked paprika is the unexpected hero that adds depth. Its smoky aroma lifts the entire dish, making each bite feel like a small, savory fireworks display. If you don’t have smoked paprika, a pinch of regular paprika or even a hint of chipotle powder can work, though the flavor profile will differ.
The sour cream acts as a cooling counterpoint to the heat of the paprika and the richness of the cheese. A dollop of sour cream at the end gives the dish a creamy finish that balances the crunchy edges. If you’re lactose intolerant, try a dairy‑free yogurt or a cashew cream for a similar texture.
The Final Flourish
Fresh green onions and chives add a bright, almost citrusy note that cuts through the heaviness. They also provide a pop of color that makes the dish visually appealing. If you’re looking for a different twist, try adding chopped parsley or a sprinkle of dill.
Salt and pepper are essential for seasoning each layer. I recommend adding a pinch of sea salt after baking and a light dusting of cracked pepper before serving. Over‑seasoning can overpower the delicate balance of flavors, so taste as you go.
Everything’s prepped? Good. Let’s get into the real action.
The Method — Step by Step
- Preheat the oven to 400°F (200°C). While it’s heating, wash the russet potatoes thoroughly, scrubbing off any dirt. Pat them dry with a towel, then prick each potato with a fork a few times. This step ensures steam escapes during baking and prevents the skins from bursting.
- Place the potatoes on a baking sheet and bake. The skins should turn golden and the flesh should be tender after about 45–50 minutes. Check for doneness by inserting a fork; it should glide in easily. If the skins are not yet crisp, bake for an additional 5 minutes.
- Cool, then shave the skins. Let the potatoes cool enough so you can handle them safely. Use a sharp knife to carefully shave off the outer layer, creating a flat, even surface for the filling. This is where the Kitchen Hack comes into play: lightly oil the knife blade to prevent sticking.
- Brush the skins with melted butter. Spread a thin, even layer of butter over each shaved skin. The butter will caramelize under the broiler, giving a glossy, buttery crunch. If you’re looking to cut calories, a light spray of olive oil works as a substitute.
- Season with salt, pepper, and smoked paprika. Sprinkle the seasoning evenly over the buttered skins. This step is critical; the flavors need to be well distributed. Watch Out: Over‑baking the skins before seasoning can cause the butter to burn, turning the edges bitter. Keep an eye on them and remove promptly.
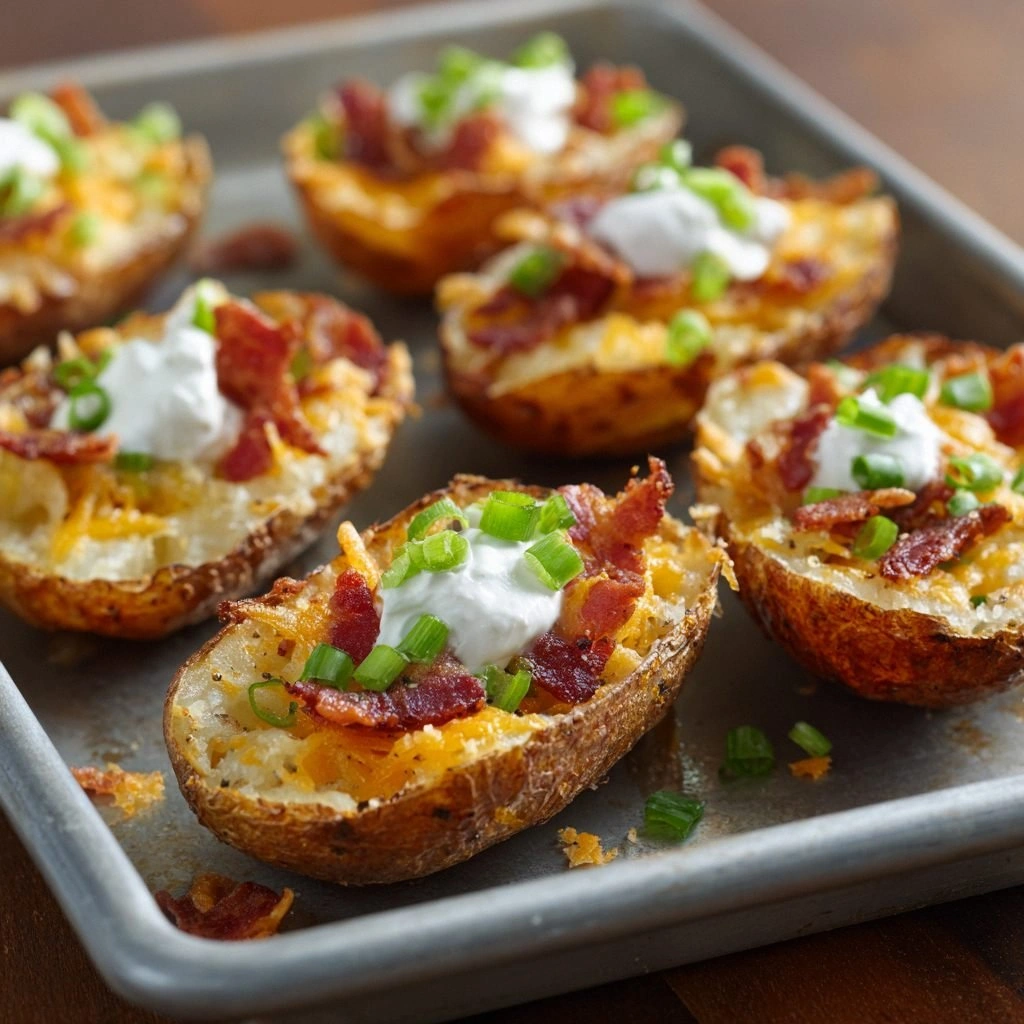
- Fill the skins with cheese and bacon. Spoon shredded cheddar into each skin until it’s about two thirds full. Sprinkle the crumbled bacon evenly over the cheese. This is where the texture starts to build—cheese for gooeyness, bacon for crunch.
- Broil for a golden finish. Slide the filled skins onto a broiler pan and place them under a preheated broiler. Keep a close watch; the cheese will melt and brown in about 3–4 minutes. If you prefer a darker crust, broil for an additional minute.
- Top with sour cream, green onions, and chives. Once the cheese is bubbling and the edges are crisp, remove the skins from the oven. Dollop a spoonful of sour cream onto each, then scatter chopped green onions and chives. The fresh herbs add a bright note that contrasts with the richness.
- Serve immediately. The skins are best enjoyed hot, while the cheese is still molten and the edges remain crispy. Offer a side of extra sour cream or a light salad for balance. And remember, I dare you to taste this and not go back for seconds.
Insider Tricks for Flawless Results
The Temperature Rule Nobody Follows
Many cooks set the oven to 350°F, but that temperature is too low to achieve the desired crispness. Baking at 400°F allows the skins to brown evenly and develop a crunchy exterior. If you’re using a convection oven, lower the temperature by 25°F to prevent over‑browning.
Why Your Nose Knows Best
When the cheese melts and the bacon starts to crisp, the aroma is a cue that the skins are ready for the broiler. Trust your nose; the smell of toasted butter and melted cheddar signals that the texture is at its peak. If you’re still unsure, give them an extra minute.
The 5-Minute Rest That Changes Everything
After broiling, let the skins rest for 5 minutes before serving. This pause allows the cheese to set slightly, preventing it from sliding off the potato. It also gives the sour cream a chance to thicken a touch, creating a richer mouthfeel.
Use a Silicone Baking Mat
A silicone mat prevents the skins from sticking to the pan, making cleanup a breeze. It also distributes heat evenly, ensuring that each skin browns uniformly. If you don’t have a mat, lightly grease the pan with a spray of cooking oil.
Keep the Potatoes Whole Until Baking
Shaving the skins only after the potatoes have baked guarantees that the interior stays fluffy. If you shave them before baking, the moisture can escape, leading to a dense, less airy interior. This small step saves you from a soggy disappointment.
Finish with Fresh Herbs
Adding fresh chives or parsley right before serving brightens the dish and balances the richness. The herbs also add a subtle crunch that complements the crispy skin. If you’re serving a crowd, have a small bowl of chopped herbs ready to sprinkle on demand.
Creative Twists and Variations
This recipe is a playground. Here are some of my favorite ways to switch things up:
Mexican Fiesta Skins
Swap the cheddar for pepper jack cheese and add a spoonful of salsa inside each skin. Top with sliced avocado and a drizzle of lime crema for a fresh, zesty finish. This version is perfect for Cinco de Mayo gatherings.
Vegan Delight
Use a plant‑based cheddar substitute and bacon‑flavored tempeh. Finish with a dollop of coconut yogurt instead of sour cream. The result is a creamy, savory dish that’s entirely cruelty‑free.
Spinach and Feta Version
Replace the cheddar with crumbled feta and fold in sautéed spinach before broiling. The tang of feta pairs wonderfully with the buttery skin, while the spinach adds a green, earthy note.
Smoked Salmon Skins
After broiling, top each skin with a small piece of smoked salmon, a squeeze of lemon, and a sprinkle of dill. The salmon’s briny flavor elevates the dish into a sophisticated appetizer.
Breakfast Skins
Fill the skins with scrambled eggs and shredded cheddar, then broil until the eggs set. Serve with a side of maple syrup and a dash of paprika for a sweet‑savory breakfast twist.
BBQ Chicken Skins
Replace the bacon with shredded BBQ chicken and add a splash of extra‑virgin olive oil before broiling. The smoky chicken and tangy sauce create a comforting, Southern‑style flavor profile.
Storing and Bringing It Back to Life
Fridge Storage
Store assembled skins in a shallow airtight container in the refrigerator for up to 24 hours. Keep the sour cream separate until just before serving to prevent sogginess. When ready, reheat under the broiler for 2–3 minutes.
Freezer Friendly
Wrap each skin individually in foil, then place them in a freezer bag. They can be frozen for up to 2 weeks. Thaw overnight in the refrigerator, then finish under the broiler for a crisp finish.
Best Reheating Method
Reheat skins in a preheated oven at 350°F for 10 minutes, then finish with a 2–minute broil. Add a splash of water to the bottom of the pan to create steam, which keeps the interior moist and the edges crisp.
Final Thoughts
When I first tasted these loaded potato skins, I felt like I’d discovered a secret weapon for parties. The combination of crispy edges, gooey cheese, and fresh herbs creates a dish that feels both indulgent and comforting. I’ve served them at countless gatherings, and the reaction is always enthusiastic. People keep asking for the recipe, and I’m happy to share it.
What I love most about this dish is its versatility. Whether you’re cooking for a family dinner or a game‑night snack, these skins can be tailored to fit any palate. They’re easy to make, easy to transport, and even easier to enjoy. If you’re looking for an appetizer that will wow your guests, this is the one.
So next time you’re craving something hearty, grab some russet potatoes and let these skins do the heavy lifting. Trust me, your taste buds will thank you, and you’ll find yourself reaching for more. Enjoy every bite, and remember: the secret to perfection is in the details.