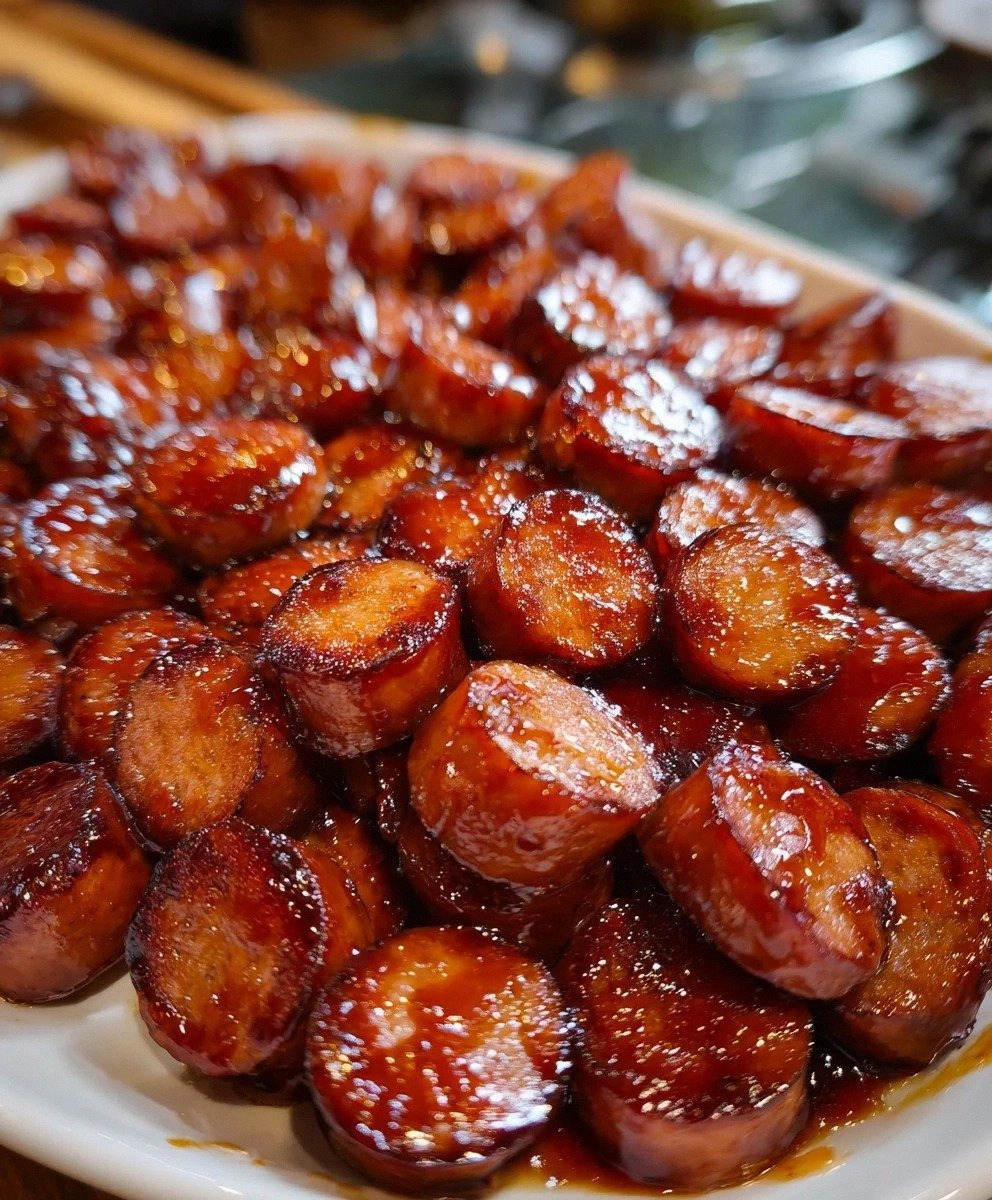
Last Saturday, my cousin dared me to "just whip up something snacky" for the playoff game. I had exactly twenty minutes before kickoff, a half-eaten loaf of sandwich bread, and a pack of smoked sausage that was giving me side-eye every time I opened the fridge. Thirty minutes later the living room smelled like a backyard barbecue, the platter was empty, and three grown men were fighting over the last sticky, caramelized nub at the bottom of the bowl. That, my friends, is how these BBQ sausage bites were born—out of pure panic, minimal groceries, and the primal need to feed loud sports fans.
I've made them seventeen times since that day, tweaking, tasting, burning my tongue like an impatient dragon, and quietly refusing to share the "last bite" privilege with anyone. They're the kind of appetizer that elbows other snacks off the table: little smoky coins that crisp on the edges while the barbecue sauce reduces into a glossy, finger-licking lacquer. Picture the edges blistering like late-summer marshmallows, the sauce bubbling until it turns into a sticky mahogany glaze, and the aroma—oh, the aroma—hugging every corner of the house like a nosy neighbor.
Most recipes you'll find online treat sausage bites as an afterthought: slice, dump sauce, microwave, done. Sacrilege. What you actually want is a two-stage cooking process that renders the fat first, then caramelizes the sugars so every bite tastes like it came off a smoker rather than out of a dorm-room microwave. Trust me, once you taste the difference you'll never go back to the sad, flabby hockey-puck version again. Ready for the game-changer? Let's build this flavor bomb together, one sizzling slice at a time.
What Makes This Version Stand Out
- Smoke-First Philosophy: We sear the coins in a ripping-hot skillet before the sauce ever comes near them, unlocking a smoky fond that will rock your world.
- Two-Temperature Finish: A quick blast on high heat for char, then a gentle simmer to glaze—no burnt sugar, no raw sauce, just glossy perfection.
- One-Skillet Wonder: Entire recipe happens in a single pan, meaning fewer dishes and more couch time. If you've ever struggled with sheet-pan sausage that steams instead of browns, you're not alone—and I've got the fix.
- Customizable Sweet Heat: Start with any barbecue sauce you love, then doctor it up in the pan. Want Nashville hot? Add cayenne. Carolina mustard? Stir in a spoon of Dijon. Kansas City sweet? A drizzle of honey does the trick.
- Make-Ahead MVP: You can pre-slice and par-cook the sausage earlier in the day; finish with sauce ten minutes before guests arrive, and you'll look like a culinary wizard.
- Kid-Approved, Adult-Adored: My eight-year-old nephew calls them "meat candy," while my spice-loving book-club friends beg for the hot-honey variation. Crowd-pleaser status: officially cemented.
Alright, let's break down exactly what goes into this masterpiece and why each component matters more than you think.
Inside the Ingredient List
The Flavor Base
Smoked sausage is the undisputed star here, and quality matters. I reach for skinless smoked sausage because it slices cleanly, crisps faster, and carries a deeper smoke ring flavor than its link-cased cousin. If all you have on hand is kielbasa or andouille, feel free to swap—just know that andouille will crank up the heat and kielbasa will be milder. Avoid fresh sausage; we need the pre-cooked convenience so we can focus on texture and glaze rather than worrying about raw pork timings. Buy the best you can afford; these bites are so simple that every ingredient has to pull its weight.
The Sauce That Does the Heavy Lifting
Barbecue sauce is where personality shines. Use a sauce you would happily lick off a spoon—if it's bland from the bottle, it'll be bland in the pan. I keep a couple of styles on standby: a brown-sugar molasses version for sweet crowds and a tangy vinegar-pepper one for people who like bite. If you're feeling ambitious, swirl in a spoonful of peach preserves, a dash of liquid smoke, or a knob of butter for extra gloss. The sugars in the sauce will concentrate and cling to each coin like edible tacky glue, so pick a flavor profile you crave at midnight.
The Aromatic Posse
Onion powder, garlic powder, and a whisper of smoked paprika amplify the meaty depth without stealing the show. Fresh garlic burns in the high-heat phase, so stick with powders here. A pinch of kosher salt wakes everything up, but go easy at first—many barbecue sauces arrive pre-salted. If you like a pop of acid, keep a lime wedge nearby for a cheeky squeeze at the end; it slices through the richness like a laser.
The Final Flourish
Chopped parsley or green onion adds color, but I'm not above showering on sesame seeds or crushed chicharrones for crunch. Want to get fancy? A drizzle of hot honey right before serving gives you that Nashville-hot-chicken vibe without deep-frying your kitchen in oil. The goal is contrast—something fresh or crispy to play against the soft sticky meat candy underneath.
Everything's prepped? Good. Let's get into the real action...
The Method — Step by Step
- Start by cutting the sausage into ½-inch coins on the bias. A diagonal cut maximizes surface area for browning and looks fancier than straight hockey pucks. If your sausage is extra soft, pop it in the freezer for ten minutes; cold fat slices cleaner than room-temp fat. Aim for uniform thickness so every piece cooks at the same rate. Don't pile them up yet—we need breathing room in the skillet.
- Heat a wide skillet (cast iron if you've got it) over medium-high heat for two full minutes. You want the surface screaming hot but not smoking like a tire fire. Swirl in a teaspoon of neutral oil—just enough to prevent sticking, not so much that we fry the sausage. The goal is dry-heat contact, not deep-fat jacuzzi. Listen for that immediate sizzle when the first coin hits the pan; that's the sound of flavor being born.
- Lay the sausage disks in a single layer, leaving a little space around each. Crowding causes steam, steam causes sadness. Let them sizzle undisturbed for 90 seconds; this builds the golden crust that makes you want to high-five yourself. When the edges start to curl and caramelize like toasted marshmallows, flip each piece with tongs. If some stick, give them another 15 seconds—protein releases when it's ready.
- Once both sides sport leopard spotting, drain off any excess fat. You want just a thin sheen left; too much grease will hijack the sauce later. Reduce heat to medium and clear a small circle in the center of the pan. Pour in your barbecue sauce—about ½ cup per 12 oz sausage—and let it sit for 20 seconds so the bottom heats quickly. Stir to coat every piece in glossy crimson goodness.
- Keep the sauce at a perky simmer, not a volcanic boil. You should see lazy bubbles blip like hot lava. Stir every 30 seconds so sugars don't scorch. As the sauce reduces, it'll cling tighter and turn from ketchup-bright to mahogany-moody. This takes roughly five minutes, but your nose and eyes are better timers than the clock.
- When the sauce coats the back of a spoon like thin caramel, sprinkle in your spice trio—onion powder, garlic powder, and smoked paprika. Stir well; the powder absorbs fat and thickens the glaze. Taste a cooled slice: it should taste balanced, sweet, tangy, smoky. Need more heat? Add cayenne a pinch at a time. Need brightness? A quick spritz of apple-cider vinegar wakes everything up.
- Remove from heat and let the pan rest for two minutes. Residual steam continues to tighten the glaze without risking burnt sugar. Transfer to a serving bowl, shower with parsley or green onion, and serve with toothpicks or mini slider buns. The bites will stay sticky and tender for at least 30 minutes at room temp—perfect for grazing during the game.
- If you need a double batch, wipe the pan between rounds to prevent blackened flecks from tainting the next sauce. The fond (those brown bits) is delicious, but too much build-up equals bitterness. A quick rinse under hot water and you're back in business.
That's it—you did it. But hold on, I've got a few more tricks that'll take this to another level...
Insider Tricks for Flawless Results
The Temperature Rule Nobody Follows
Cast iron retains heat like a bank vault, so drop your burner to medium the moment you add sauce. High heat evaporates liquid too fast, leaving sticky tar that no amount of scrubbing will forgive. If you're using thin non-stick, keep it at medium-high because those pans bleed heat faster than a screen door on a submarine. Your ears are a great gauge: you want a soft sizzle, not a crackling snap.
Why Your Nose Knows Best
When the aroma shifts from raw tomato-vinegar to deep smoky barbecue, you're 30 seconds from perfect glaze. If you smell caramel popcorn, you're already on the edge—pull the pan off and let residual heat finish the job. I once ignored this signal, and the sauce turned into black glass that even a chisel couldn't remove. Trust your senses; they went to culinary school while you were binge-watching cooking shows.
The 5-Minute Rest That Changes Everything
Resting sounds optional, but it's the difference between saucy and shellacked. Let the bites sit in the pan, off heat, for five minutes; the glaze thickens and clings like spray paint. Transfer too early and the sauce slides off into a puddle, leaving naked sausage behind. A friend tried skipping this step once—let's just say it didn't end well, and I still get texts complaining about "saucy soup."
Double-Glaze for Sticky Immortality
Want movie-theater-level gloss? After the initial glaze, return the pan to low heat, add another tablespoon of sauce, and stir for 30 seconds. This second coat goes on thinner and dries to a mirror finish that photographs like a champ. Warning: you will double your finger-licking quotient, so keep napkins on standby.
Creative Twists and Variations
This recipe is a playground. Here are some of my favorite ways to switch things up:
Hawaiian Luau Bites
Stir in a tablespoon of pineapple juice and a handful of diced bell pepper during the final glaze. The fruit sugars turbo-charge the caramelization, while the peppers add island color. Top with toasted coconut flakes for crunch that transports you straight to Oahu—no plane ticket required.
Buffalo Fusion
Replace half the barbecue sauce with Frank's RedHot, then add a pat of butter for that wing-shop sheen. Finish with crumbled blue cheese and celery seed. It's the edible equivalent of wearing sweats to a fancy party—comfortable, bold, and completely unapologetic.
Maple Bourbon Swank
Deglaze the pan with a shot of bourbon before adding sauce, then swap in maple-sweetened barbecue. The alcohol cooks off, leaving vanilla-oak complexity that tastes like you spent hours smoking meat in a log cabin. Great for date night when you want to impress without breaking a sweat.
Asian Zing
Mix your sauce with a spoon of gochujang, rice vinegar, and sesame oil. Garnish with sesame seeds and scallion threads. The fermented chili adds umami depth, and the sesame perfume will have neighbors knocking on your door asking if you're running a secret restaurant.
Breakfast Bites Benedict
Skip the barbecue sauce entirely and toss the seared coins in maple syrup mixed with a touch of Dijon. Serve over mini waffles with a poached quail egg on top. Brunch just found its new mascot, and mimosas are practically mandatory.
Storing and Bringing It Back to Life
Fridge Storage
Pack cooled bites into a lidded container with a tight seal; they will keep four days without texture drama. Line the bottom with a paper towel to trap condensation so the glaze stays sticky, not slimy. Reheat within that window for best flavor—after day four, the smoke taste starts to fade and the sausage gets that leftover funk.
Freezer Friendly
Flash-freeze individual pieces on a parchment-lined sheet for two hours, then toss into a zip bag. They won't clump, so you can grab a handful for late-night cravings. Freeze up to two months; beyond that ice crystals wreak havoc on texture. Label the bag or risk mysterious meat roulette six months from now.
Best Reheating Method
Skip the microwave unless you like rubber. Warm in a dry skillet over medium heat, shaking often until just heated through—about four minutes. Add a tiny splash of water before covering with a lid; it steams back to perfection without drying. If you're in a rush, a 350°F oven for eight minutes works, but the skillet keeps the edges crisp.