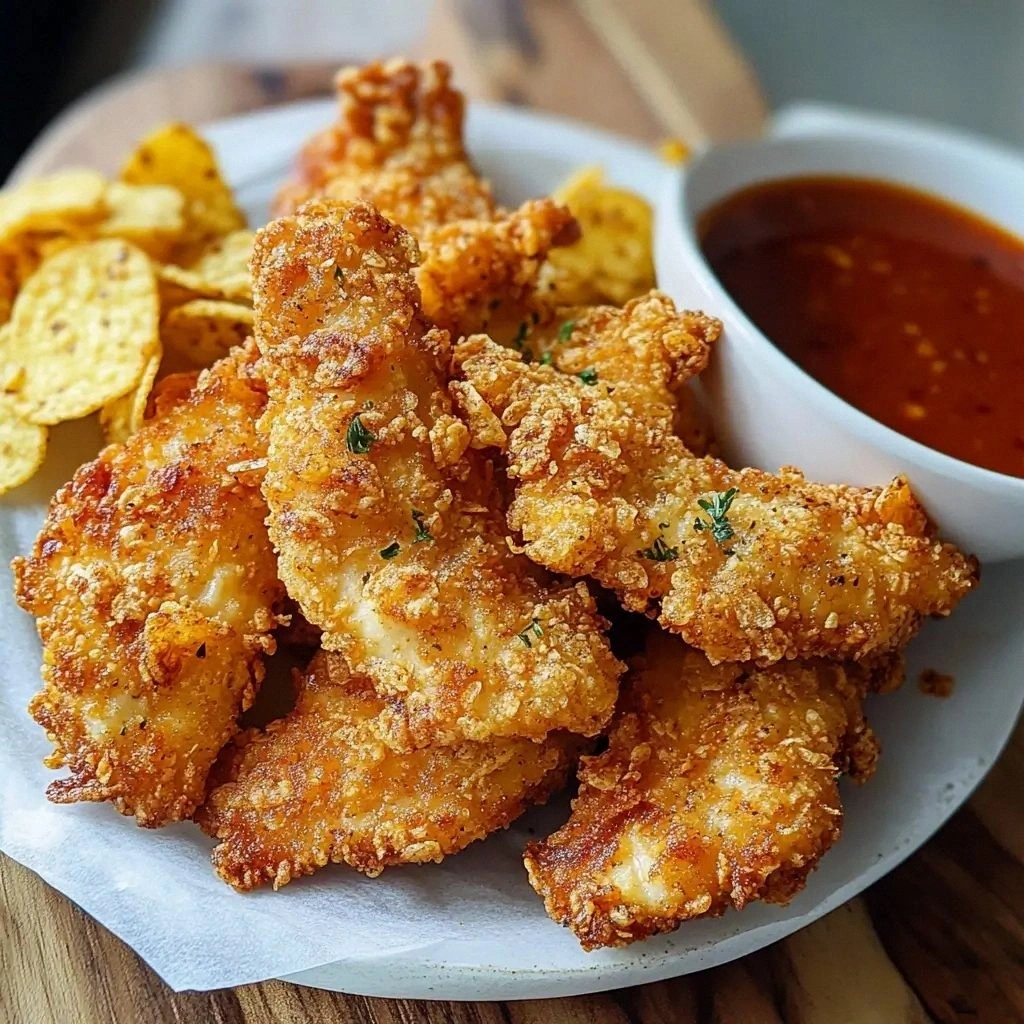
I remember the night I was trying to salvage a disastrous dinner for my friends. A batch of plain fried chicken had turned out soggy, greasy, and, frankly, a culinary crime. My kitchen was a mess of crumbled crumbs and an oven that sputtered like a tired engine. I stared at the tray, feeling the heat of disappointment. Then, like a lightbulb in a blackout, I thought, “What if I could turn those tired chicken tenders into a crunchy, flavor‑bombed masterpiece?”
That moment turned into a culinary obsession. I scoured every recipe, every forum, every Pinterest board, and I kept coming back to the same idea: coat chicken tenders in potato chips, add a cheese‑laden breadcrumb mix, and bake until the edges crackle like thin ice. The aroma that hit my nose when the chips toasted was electric, a buttery, salty scent that promised a crunchy texture that would melt in your mouth. The sound of the sizzling batter was music to my ears, a rhythm that made my heart beat faster than a drum solo.
Fast forward to today, and I’m sharing the ultimate version of this dish, a recipe that has earned the title “Potato Chip Chicken Tenders Re.” It’s not just a tweak; it’s a revolution. The secret lies in the combination of potato chips, cheddar, and a secret spice blend that gives the coating a depth of flavor you won’t find in store‑bought nuggets. The result? A golden, buttery crust that shatters with every bite, revealing a juicy, tender chicken inside.
I dare you to taste this and not go back for seconds. Picture yourself pulling this out of the oven, the whole kitchen smelling incredible, and watching your friends’ eyes widen as they take their first bite. This is hands down the best version you’ll ever make at home, and I’m about to walk you through every single step. By the end, you’ll wonder how you ever made it any other way.
What Makes This Version Stand Out
- Crunch: The potato chips create a multi‑layered crunch that’s more complex than standard breadcrumbs. Each bite delivers a satisfying snap that echoes the original chip flavor.
- Cheddar Infusion: Adding shredded cheddar to the coating gives the tenders a creamy, melty interior that balances the crisp exterior.
- Smoky Heat: A pinch of smoked paprika and cayenne pepper adds a subtle smokiness and a gentle kick that keeps the dish from feeling flat.
- Quick Prep: The entire process takes less than an hour, making it perfect for busy weeknights or spontaneous game‑night gatherings.
- Make‑Ahead Friendly: You can assemble the tenders and refrigerate them for up to 24 hours before baking, saving you time on the day of the event.
- Kid‑Friendly: The mild flavors and crispy texture make it a hit with the little ones, while the bold spices satisfy the adults.
- Versatile Sauce Pairing: Serve with honey mustard, ranch, or a spicy aioli – the coating holds up to any dip without soaking through.
- Healthy Twist: By using whole‑grain panko and a minimal amount of oil, you keep the calorie count down while still delivering a satisfying crunch.
Alright, let's break down exactly what goes into this masterpiece...
Inside the Ingredient List
The Flavor Base
At the heart of this recipe is the seasoned chicken. The chicken tenders are seasoned with a blend of salt, pepper, garlic powder, and smoked paprika. This simple seasoning ensures that the meat itself is flavorful, so the coating doesn’t need to compensate. If you skip the seasoning, the tenders will taste bland and the coating will be the sole source of flavor, which is a missed opportunity for depth.
When selecting chicken tenders, choose pieces that are uniform in size so they cook evenly. Thinner pieces will crisp up faster, while thicker ones may need a little extra time in the oven. If you’re using bone‑in tenders, trim any excess fat to keep the coating from becoming soggy.
A good rule of thumb is to marinate the chicken for at least 15 minutes in the spice mix. This allows the flavors to penetrate the meat, giving you a juicy interior that contrasts beautifully with the crunchy exterior. If you’re in a hurry, a quick rub before coating will still yield great results.
The Texture Crew
Crushed potato chips are the star of the texture crew. They provide a buttery, slightly sweet crunch that’s reminiscent of a classic chip snack. The chips should be finely crushed to create a smooth coating that sticks to the chicken without clumping.
Panko breadcrumbs add an airy, airy texture that lightens the coating. The panko’s larger crumbs create pockets of air that keep the coating from becoming too dense. If you prefer a denser crunch, replace panko with regular breadcrumbs or even crushed crackers.
Shredded cheddar cheese is the gooey element that melts into the coating as it bakes. The cheese adds a creamy richness that balances the salty chips. If you’re lactose intolerant, try a dairy‑free cheddar alternative; the results will still be impressive.
The Unexpected Star
A splash of melted butter is the unexpected star that brings everything together. The butter adds a silky sheen to the coating and helps the chips brown evenly. If you’re watching calories, swap the butter for a small amount of olive oil; it will still deliver a beautiful golden crust.
Eggs act as a binder, ensuring the coating adheres to the chicken. Two large eggs provide the right consistency – too many eggs will make the coating soggy, too few will cause it to fall apart. If you’re avoiding eggs, a splash of buttermilk or a commercial egg replacer will work in a pinch.
Milk, in small amounts, adds moisture to the batter, preventing it from drying out during baking. A half cup of milk is enough to keep the coating supple without diluting the flavor. If you’re vegan, coconut milk is a suitable alternative.
Everything's prepped? Good. Let's get into the real action...
The Method — Step by Step
- Preheat your oven to 425°F (220°C). Line a baking sheet with parchment paper to prevent sticking and to make cleanup a breeze. This high temperature ensures a crisp exterior while keeping the interior juicy.
- In a large bowl, whisk together the two eggs, half a cup of milk, and the melted butter until fully combined. This wet mixture will act as the glue that binds the crunchy coating to the chicken.
- In a separate shallow dish, combine the crushed potato chips, panko breadcrumbs, shredded cheddar, smoked paprika, cayenne pepper, garlic powder, salt, and black pepper. Stir until all ingredients are evenly distributed. The dry mix should have a uniform texture.
- Pat the chicken tenders dry with paper towels. This step removes excess moisture, allowing the coating to adhere better and preventing sogginess.
- Dip each chicken tender into the egg mixture, ensuring a full coating. Let the excess drip back into the bowl; this prevents a thick, heavy batter.
- Transfer the coated tenders to the dry mix. Press gently to press the coating onto the chicken. This step is crucial for a uniform crust that will bake evenly.
- Arrange the coated tenders on the prepared baking sheet, leaving a small gap between each piece. This spacing allows hot air to circulate and ensures even browning.
- Drizzle a light coat of olive oil over the tenders. The oil helps the coating achieve a golden, buttery finish. Use a pastry brush for an even spread.
- Bake for 20–25 minutes, flipping the tenders halfway through. The edges should pull away from the parchment and the coating should be a deep amber color. The internal temperature should reach 165°F (74°C).
- Remove from the oven and let the tenders rest for 5 minutes. This allows the juices to redistribute, ensuring every bite stays moist and flavorful.
That's it — you did it. But hold on, I've got a few more tricks that'll take this to another level...
Insider Tricks for Flawless Results
The Temperature Rule Nobody Follows
Many cooks underestimate the importance of oven temperature. Baking at 425°F ensures a blistering crust while the inside stays moist. If you lower the temperature, the coating will bake slowly and may become soggy. Keep the oven rack in the middle to allow even heat distribution.
Why Your Nose Knows Best
The smell of the coating browning is your cue that the tenders are nearly ready. A nutty, buttery aroma means the butter and chips are caramelizing. If the smell feels too mild, give them a few more minutes; if it's too strong, pull them out to avoid burning.
The 5-Minute Rest That Changes Everything
Resting the tenders after baking is essential for juiciness. The juices redistribute throughout the meat, preventing a dry bite. Skip this step and you’ll end up with a slightly chewy texture that feels undercooked.
The Secret of a Shattering Crunch
Pressing the coating onto the chicken with your hands ensures an even layer. A loose coating will clump and create uneven bites. The pressure also helps the coating adhere better, preventing it from falling off during flipping.
The Dip That Elevates Flavor
A homemade aioli or honey mustard can elevate this dish from good to unforgettable. Mix mayo with a splash of lemon juice and a pinch of paprika for a zesty aioli. The creamy dip complements the crunchy coating and adds a fresh contrast.
Creative Twists and Variations
This recipe is a playground. Here are some of my favorite ways to switch things up:
Spicy Sriracha Crunch
Swap the smoked paprika for sriracha powder and add a drizzle of sriracha to the wet mix. The result is a fiery, tangy coating that pairs well with a cooling yogurt dip.
Herb‑Infused Delight
Add fresh chopped rosemary and thyme to the dry mix. The earthy herbs elevate the flavor profile, making it perfect for a summer barbecue.
Cheesy Parmesan Upgrade
Replace the cheddar with grated Parmesan for a nutty, salty crust. This variation is ideal for a more sophisticated appetizer spread.
Gluten‑Free Option
Use gluten‑free flour and panko in place of the regular versions. The texture remains crisp, and the dish stays safe for those with celiac disease.
Vegan Version
Swap the chicken for marinated tofu strips and use a plant‑based cheese alternative. The coating still crisps beautifully, and the tofu absorbs the flavors wonderfully.
Breakfast Bites
Serve the tenders with a side of maple syrup or a dollop of cinnamon‑spiced yogurt for a sweet‑savory breakfast treat. The crunchy coating pairs surprisingly well with sweet flavors.
Storing and Bringing It Back to Life
Fridge Storage
Store leftovers in an airtight container in the refrigerator for up to 3 days. The coating will stay crisp if you reheat it in a toaster oven or air fryer for 3–4 minutes at 350°F.
Freezer Friendly
Freeze the baked tenders on a parchment‑lined tray before transferring them to a freezer bag. They can be kept for up to 2 months. Reheat in a preheated oven at 375°F for 10 minutes.
Best Reheating Method
Add a tiny splash of water to a skillet before reheating; the steam keeps the coating from drying out. Heat on medium until the tenders are hot and the coating is crisp again.