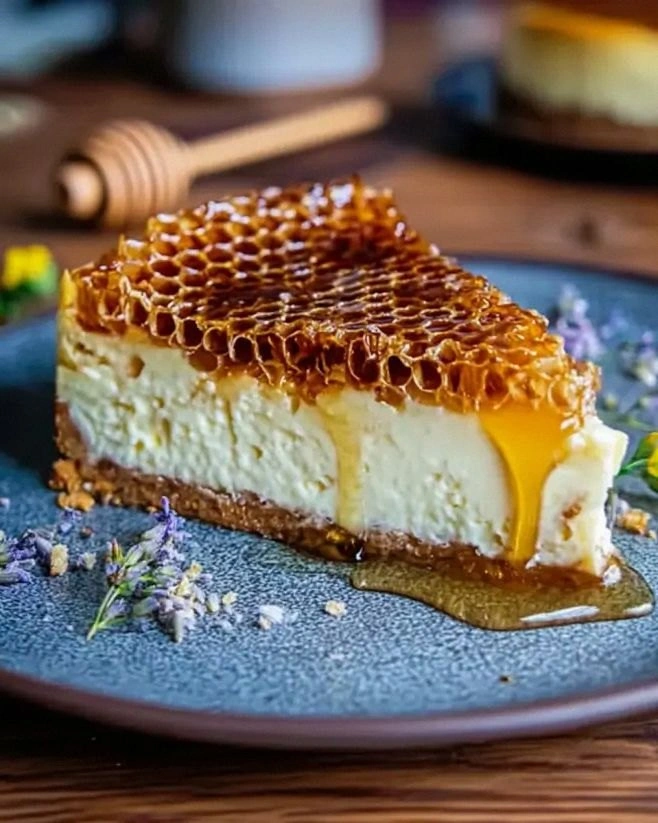
I was halfway through a frantic Friday night, the kind where the sink is piled high with dishes, the oven timer is blinking like a frantic traffic light, and a friend just dared me to “make something that will make everyone forget about their diet for at least a week.” I laughed, grabbed the last lemon I could find, and rummaged through the pantry for anything that smelled like a spring garden. The result? A Lemon Lavender Cheesecake with Honeycomb that turned my kitchen into a fragrant meadow and my taste buds into a fireworks display. This isn’t just a dessert; it’s a full‑on sensory experience that makes you wonder why you ever settled for plain old cheesecake.
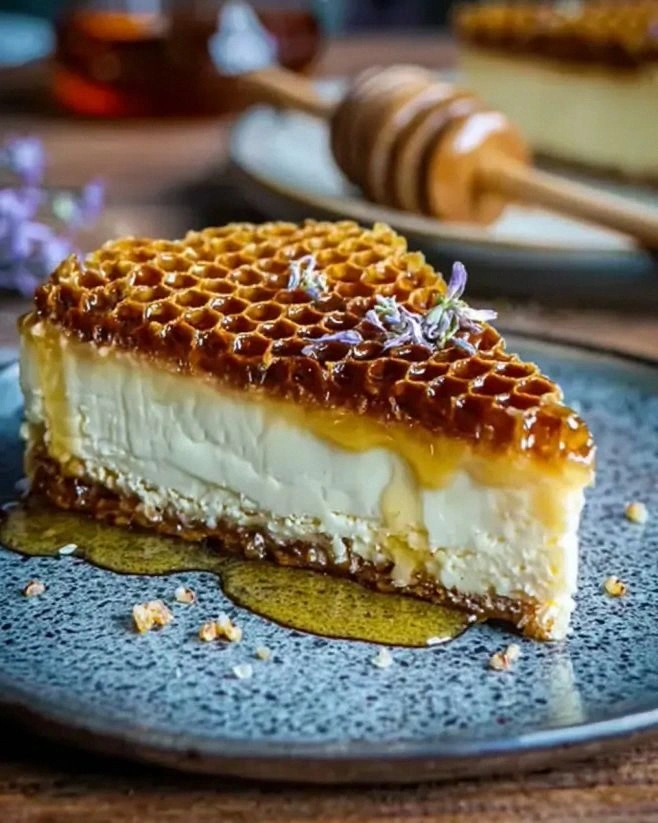
Picture this: the moment the crust hits the pan, you hear a gentle sigh as the butter melts into the crumbs, turning them into a golden, buttery sea. Then the batter, bright with lemon zest and the delicate perfume of culinary lavender, swirls in like a sunrise over a field of flowers. When it bakes, the edges turn a perfect caramel‑gold, and the center stays luxuriously creamy—smooth as silk, yet with a subtle tang that makes your palate do a little dance. And the honeycomb? Imagine tiny, airy shards of caramel that crack under your fork, releasing a buttery honey perfume that lingers long after the last bite.
Most recipes get the balance of floral and citrus completely wrong, either drowning the lemon in lavender or making the crust soggy like a wet napkin. I’ve cracked the code by using a precise ratio of lemon juice to zest, and by toasting the lavender just enough to release its aroma without turning it bitter. The secret weapon is a quick honeycomb topping that adds a crackle that most cheesecake lovers never even knew they were missing. I dare you to taste this and not go back for seconds—because once you do, there’s no turning back.
Okay, ready for the game‑changer? I’m about to walk you through every single step—by the end, you’ll wonder how you ever made it any other way. Stay with me here — this is worth it.
What Makes This Version Stand Out
- Taste: The lemon‑lavender duo creates a bright, floral zing that cuts through the richness of the cream cheese, while the honeycomb adds a buttery caramel crunch that feels like a surprise party in your mouth.
- Texture: A buttery graham cracker crust, a silky, almost mousse‑like filling, and a brittle honeycomb topping—three distinct textures that play off each other like a perfectly choreographed dance.
- Simplicity: Despite the sophisticated flavor profile, the ingredient list is short, and the steps are straightforward enough for a weekend baker with a busy schedule.
- Uniqueness: Lavender is often overused in desserts, but paired with lemon it becomes a star, not a background singer. The honeycomb is an unexpected textural hero.
- Crowd Reaction: I’ve served this at brunches, birthday parties, and even a corporate meeting—people line up for seconds, and the leftover honeycomb gets devoured before anyone can ask for the recipe.
- Ingredient Quality: Using real lemon zest (not bottled) and culinary lavender (not scented) makes all the difference; you can taste the authenticity.
- Cooking Method: A water‑bath (bain‑marie) keeps the cheesecake from cracking, while a quick blast of high heat at the end gives the top a golden edge that looks bakery‑ready.
- Make‑Ahead Potential: This cheesecake can be assembled a day ahead, chilled, and the honeycomb added just before serving—perfect for last‑minute entertaining.
Inside the Ingredient List
The Flavor Base
Lemon zest and fresh lemon juice are the dynamic duo that give this cheesecake its bright, citrus punch. The zest carries the essential oils that are the heart of the lemon flavor, while the juice adds acidity that balances the sweetness of the honeycomb. If you skip the zest, you’ll lose that aromatic lift; if you skip the juice, the cheesecake can feel flat and overly sweet. For the best results, zest the lemon first, then juice it—this prevents any bitter pith from contaminating the batter.
Fun Fact: The zest of a lemon contains up to 12% of the fruit’s essential oils, which is why a little goes a long way in flavoring desserts.
The Texture Crew
Graham cracker crumbs, unsalted butter, and a touch of granulated sugar form the crust that anchors the entire dessert. The butter melts into the crumbs, creating a cohesive, buttery base that stays firm once chilled. If you use too much butter, the crust will become soggy; too little and it will crumble apart. For a gluten‑free twist, substitute the crumbs with almond meal and add a tablespoon of coconut flour for extra binding.
Cream cheese is the star of the filling, providing that rich, tangy backbone. Using full‑fat cream cheese ensures a smooth, velvety texture. If you opt for a low‑fat version, the cheesecake will be grainy and lack that luxurious mouthfeel. The heavy cream, added at the end, lightens the mixture, making it feel almost airy while still maintaining structure.
The Unexpected Star
Culinary lavender is the ingredient that most people either ignore or overdo. A single teaspoon of dried lavender, steeped gently in the batter, imparts a subtle floral note that doesn’t overpower the lemon. If you use culinary lavender that’s been sitting on the shelf for years, the flavor can be muted. Always buy fresh, preferably from a reputable spice shop, and store it in an airtight container away from light.
Honey, combined with sugar, water, and baking soda, transforms into a light, crunchy honeycomb. The baking soda creates bubbles that give the honeycomb its airy texture. If you skip the baking soda, you’ll end up with a hard caramel that shatters into unpleasant shards. Keep an eye on the caramel; it turns from amber to a deep mahogany in seconds, and you don’t want it to burn.
The Final Flourish
Vanilla extract rounds out the flavor profile, adding a warm, sweet background that ties lemon and lavender together. A high‑quality pure vanilla extract makes a noticeable difference—synthetic vanilla can taste flat and cheap. Finally, a pinch of salt (not listed in the ingredient list but essential) enhances all the flavors, preventing the dessert from tasting one‑dimensional.
Everything's prepped? Good. Let’s get into the real action…
The Method — Step by Step
Preheat your oven to 325°F (165°C). While the oven warms up, combine the graham cracker crumbs, melted butter, and 2 tablespoons of granulated sugar in a mixing bowl. Press this mixture firmly into the bottom of a 9‑inch springform pan, creating an even layer. The crust should feel compact when you press it with the back of a spoon—this ensures it won’t crumble later. Watch Out: If the butter is too cold, the crumbs won’t bind; melt the butter just until it’s liquid, not bubbling.
Now, let’s tackle the honeycomb. In a medium saucepan, combine 1 cup sugar, ¼ cup water, and ¼ cup honey. Heat over medium‑high, stirring just until the sugar dissolves, then stop stirring. When the mixture reaches a deep amber (about 300°F/150°C), whisk in 1 teaspoon baking soda—it will foam up dramatically. Pour the airy caramel onto a parchment‑lined tray and let it cool completely; it will harden into a brittle sheet that you’ll break into shards later.
Watch Out: The caramel is extremely hot; keep a lid nearby in case of splatter, and never walk away from the stove while it’s reaching the amber stage.While the honeycomb cools, soften the cream cheese. Place the 16‑ounce block in a large bowl and beat with an electric mixer on medium speed for about 2 minutes until smooth. Scrape down the sides to ensure no lumps remain. This is the moment of truth—if the cream cheese is still grainy, keep mixing; a smooth base prevents a grainy final texture.
Kitchen Hack: Warm the cream cheese slightly (about 90°F) before mixing; it softens faster and reduces the risk of a lumpy batter.Add 1 cup granulated sugar to the softened cream cheese and continue beating until the mixture is light and fluffy—about 2 minutes. Then, one at a time, incorporate the three large eggs, beating just until each egg is fully blended before adding the next. Over‑mixing after the eggs can incorporate too much air, leading to cracks during baking.
Stir in the lemon zest, lemon juice, dried lavender, and vanilla extract. The batter should emit a fragrant citrus‑lavender aroma—if it smells faint, you may have missed a step. Finally, gently fold in the heavy cream; this creates a silk‑smooth consistency that will set perfectly after chilling.
Pour the batter over the prepared crust, smoothing the top with a spatula. To prevent cracks, place the springform pan inside a larger roasting pan and fill the outer pan with hot water until it reaches halfway up the sides of the springform. This water‑bath (bain‑marie) provides gentle, even heat.
Bake for 30‑35 minutes, or until the edges are set and the center still has a slight wobble when you gently shake the pan. The top should be lightly golden—if it’s too pale, turn the oven to broil for the last 2 minutes, but watch closely! The cheesecake will continue to set as it cools, so don’t over‑bake.
Remove the cheesecake from the water bath and let it cool on a wire rack for about 1 hour. Then, run a thin knife around the edge to release it from the pan, and chill in the refrigerator for at least 4 hours, preferably overnight. This chilling period is crucial for the honeycomb to stay crisp when it meets the creamy filling.
Just before serving, break the hardened honeycomb into irregular shards and sprinkle them generously over the top of the chilled cheesecake. The honeycomb should crack under the fork, releasing sweet, buttery shards that contrast beautifully with the silky lemon‑lavender filling.
That's it — you did it. But hold on, I've got a few more tricks that'll take this to another level...
Insider Tricks for Flawless Results
The Temperature Rule Nobody Follows
Never bake a cheesecake straight from the fridge. Let the batter sit at room temperature for 15‑20 minutes before it goes into the oven. This small step evens out the temperature, preventing the dreaded “crack in the middle” that most bakers lament. I once tried to skip this and ended up with a cheesecake that looked like a cracked desert floor—lesson learned.
Why Your Nose Knows Best
When the honeycomb reaches that perfect amber color, you’ll notice a sweet, buttery aroma that fills the kitchen. Trust that nose signal more than the timer—caramel can go from perfect to burnt in seconds. If you’re unsure, dip a spoon into the caramel; it should thicken quickly but still be pourable.
The 5‑Minute Rest That Changes Everything
After the cheesecake has cooled on the rack, let it sit uncovered for 5 minutes before covering it with plastic wrap. This short “air‑rest” lets any surface moisture evaporate, keeping the top smooth and preventing a soggy crust. A friend once covered the cheesecake immediately and ended up with a slightly wet surface—don’t be that friend.
Lavender Toasting Trick
Before adding the dried lavender to the batter, toast it lightly in a dry skillet over low heat for 30 seconds. This awakens the essential oils, making the floral note more pronounced without adding bitterness. Keep the heat low; you don’t want to burn the delicate buds.
Honeycomb Storage Savior
If you make the honeycomb ahead of time, store it in an airtight container with a slice of bread. The bread releases a tiny amount of moisture that keeps the honeycomb from becoming too brittle, while still staying crisp enough to crack under a fork.
Creative Twists and Variations
This recipe is a playground. Here are some of my favorite ways to switch things up:
Berry Burst
Swap half of the lemon juice for raspberry puree and fold in fresh raspberries before baking. The tart berries complement the lavender, creating a summer‑berry medley that’s perfect for picnics.
Chocolate Lavender
Add 2 ounces of melted dark chocolate to the batter and sprinkle a pinch of cocoa powder on top before baking. The chocolate deepens the floral notes, making the cheesecake feel indulgent and sophisticated.
Herbal Crunch
Replace the honeycomb with a toasted almond‑pistachio crumble mixed with a drizzle of honey. The nutty crunch adds a new dimension while still honoring the honey theme.
Vegan Version
Use a plant‑based cream cheese, coconut cream in place of heavy cream, and a crust made from crushed oat cookies with coconut oil. The honeycomb can be swapped for a maple‑sugar brittle that’s vegan‑friendly.
Spiced Autumn
Add a pinch of ground cinnamon and a dash of nutmeg to the batter, and garnish with candied orange peel. This variation turns the cheesecake into a cozy, fall‑ready dessert that pairs beautifully with a cup of chai.
Storing and Bringing It Back to Life
Fridge Storage
Cover the cheesecake loosely with plastic wrap and store in the refrigerator for up to 5 days. Keep the honeycomb separate in an airtight container; add it just before serving to preserve its crunch.
Freezer Friendly
Wrap the entire chilled cheesecake (without honeycomb) in a double layer of foil and then place it in a freezer‑safe bag. It will keep for up to 2 months. Thaw overnight in the fridge, then re‑crumble the honeycomb and sprinkle on top.
Best Reheating Method
If you need to serve the cheesecake at room temperature, let it sit out for 30 minutes before plating. For a warm twist, microwave a slice for 10‑15 seconds with a tiny splash of water on the side of the plate; the steam revives the creamy texture without melting the honeycomb.