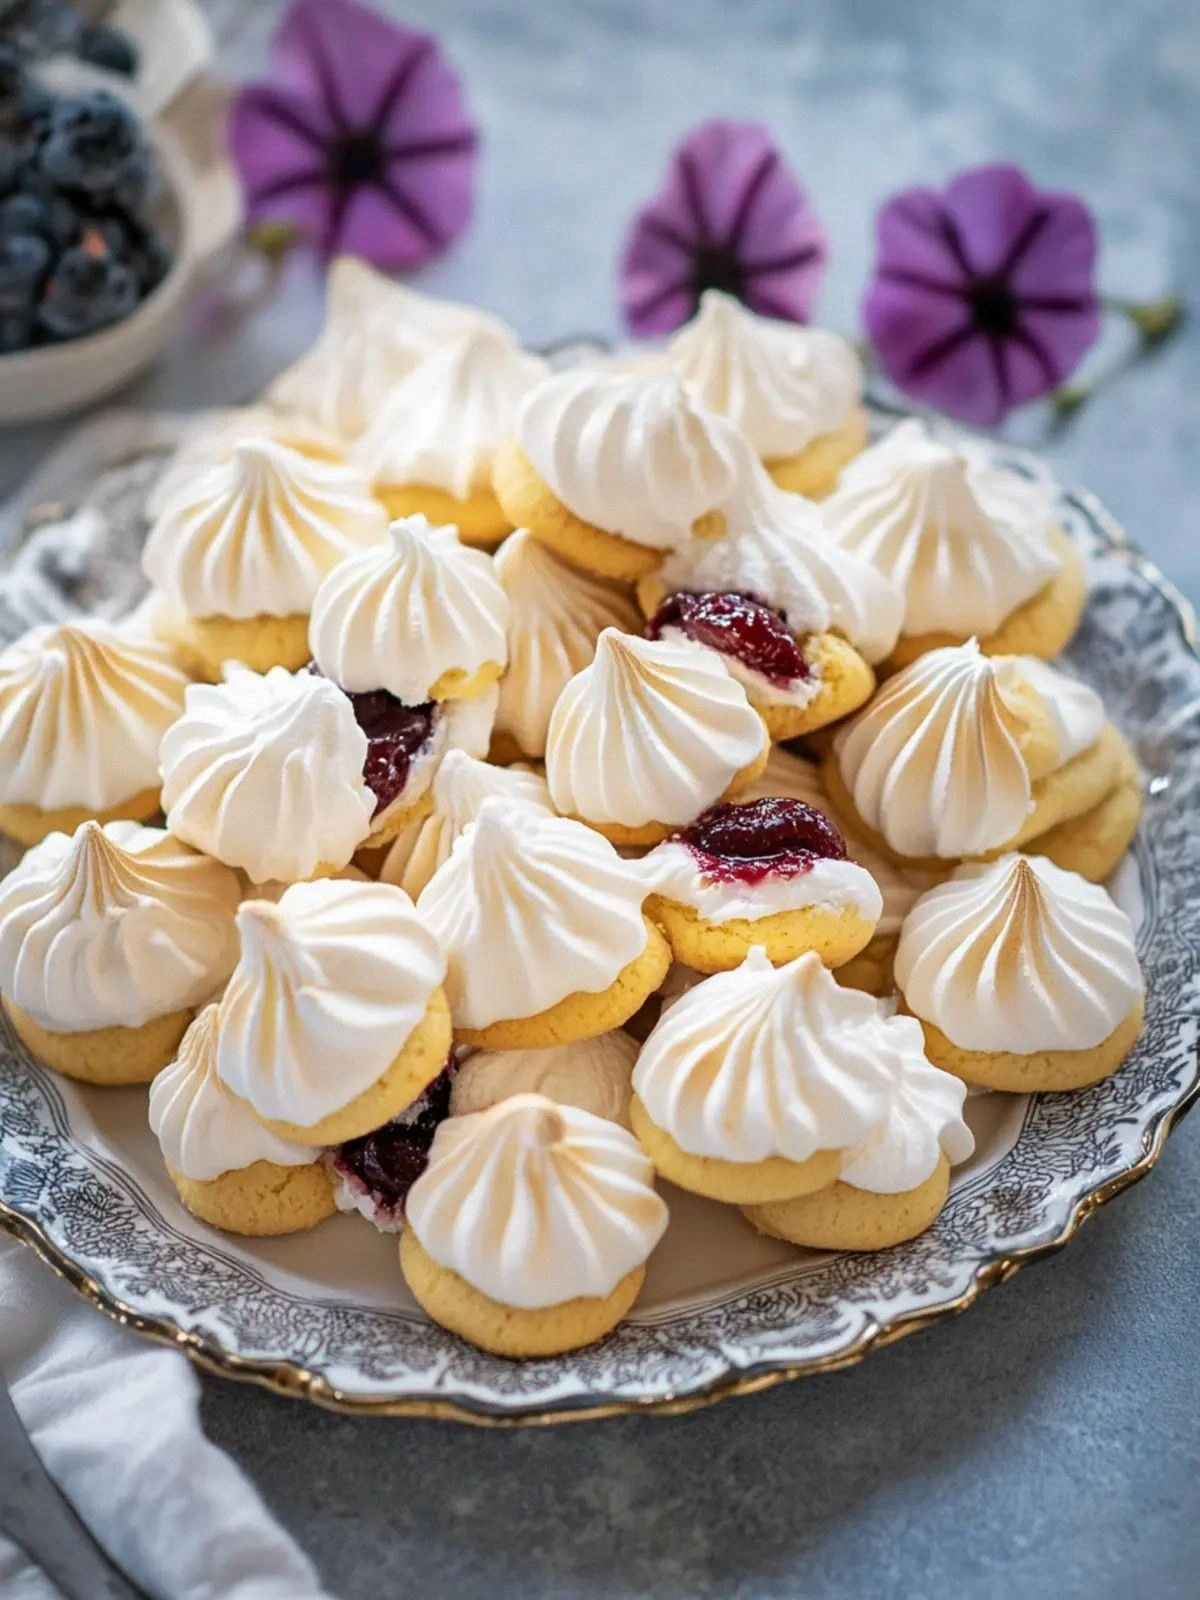
When I first tried to make a meringue, I ended up with a fluffy, airy cloud that looked more like a failed souffle than a cookie. I was left staring at a bowl of whipped egg whites that had turned into a sticky, unappetizing mess, and my kitchen smelled like burnt sugar. That night, I googled “best jam-filled meringue” and found a recipe that promised something more than a simple confection. It promised a buttery, crisp exterior, a gooey jam center, and a finish that lingers on the tongue like a secret whispered at midnight.
I decided to give it a shot, armed with a jar of Wilde Rose jam and a whisk that had seen better days. The moment the butter melted into a golden pool, the kitchen filled with a buttery aroma that made my eyes water in anticipation. I could hear the gentle hiss as the sugar dissolved, and the silence after that was almost sacred. The first bite was a revelation: a crackling crust that gave way to a silky meringue interior, topped with a burst of fruity jam that tingled the palate. I was hooked, and I knew I had found the ultimate version of a dessert that most people think of as a simple treat.
What sets this recipe apart is not just the combination of textures but the deliberate layering of flavors and the meticulous balance of sweetness. It’s hands down the best version you’ll ever make at home because it takes a humble meringue and turns it into a showstopper. I dare you to taste this and not go back for seconds. The secret is in the precise ratio of butter to flour, the timing of when you fold the egg yolks, and the choice of jam that adds a tart counterpoint to the buttery richness.
Picture yourself pulling these cookies out of the oven, the whole kitchen smelling incredible, and seeing the golden edges that shatter like thin ice when you bite into them. The anticipation is almost too much to bear, but I promise you: by the end of this post, you’ll wonder how you ever made it any other way. Let me walk you through every single step, from the first whisk to the final dusting of powdered sugar.
What Makes This Version Stand Out
- Flavor Depth: The combination of butter and jam creates a layered taste that evolves from sweet to tart, keeping the palate engaged throughout.
- Texture Contrast: The outer shell is crisp and buttery, while the interior is airy, almost like a cloud, and the jam center offers a juicy surprise.
- Simple Technique: No need for specialized equipment—just a standard mixer, a clean bowl, and a good whisk.
- Ingredient Quality: Using real butter and high-quality jam ensures the final product has a depth of flavor that store-bought versions lack.
- Make‑Ahead Friendly: Once baked, these cookies can be stored in an airtight container for up to a week, and they even freeze well.
- Visual Appeal: The golden-brown edges and the glossy jam center make for a stunning presentation, perfect for impressing guests.
- Versatility: Swap the jam for chocolate ganache, citrus curd, or a nut butter for a completely different experience.
- Time Efficiency: The total active time is under 45 minutes, making it a quick indulgence after dinner.
Alright, let’s break down exactly what goes into this masterpiece…
Inside the Ingredient List
The Flavor Base
All-Purpose Flour: Flour is the backbone of the cookie, providing structure and preventing the butter from overpowering the delicate meringue. It absorbs excess moisture and creates a stable matrix that holds the jam in place. If you skip flour, the cookies will collapse, resulting in a soggy mess that can’t hold the jam.
Unsalted Butter: Butter is the star of the show, contributing a rich, velvety taste and a golden crust that crisps to perfection. Using unsalted butter gives you full control over the salt level, ensuring the sweetness of the jam isn’t drowned out. If you use salted butter, the cookies will taste overly salty, masking the delicate fruit flavors.
The Texture Crew
Egg Yolks: Yolks add body and a subtle richness that balances the airy meringue. They also help emulsify the butter, creating a silky mixture that coats the flour evenly. Removing yolks would make the dough too dry and crumbly, leading to brittle cookies.
Egg Whites: Whipped egg whites form the meringue that gives the cookies their signature lift and crisp edges. They trap air, creating a light interior that contrasts with the buttery exterior. If you don’t whip the whites until stiff peaks form, the cookies will be dense and heavy.
The Unexpected Star
Granulated Sugar: Sugar not only sweetens but also helps stabilize the meringue. It dissolves into the butter mixture, creating a smooth base that prevents the whites from separating. Skipping sugar will result in a raw, grainy texture that’s unpleasant to bite into.
The Final Flourish
Jam (Wilde Rose or Raspberry): The jam is the heart of the cookie, providing a burst of fruitiness that contrasts with the buttery, sweet meringue. It also adds a glossy sheen that makes the cookies look irresistible. If you use a jam that’s too watery, the cookies may become soggy; choose a thicker variety for the best results.
Everything’s prepped? Good. Let’s get into the real action…
The Method — Step by Step
- Preheat your oven to 325°F (165°C) and line two baking sheets with parchment paper. Let the sheets sit while you prepare the dough so you’re not scrambling for space. The oven temperature is crucial; too high and the cookies will burn before the jam sets.
- In a medium saucepan, melt the butter over low heat. Once it’s fully melted, whisk in the granulated sugar until the mixture turns a light amber color. This caramelization step adds a subtle nutty note that elevates the flavor profile.
- Remove the saucepan from heat and allow the butter-sugar mixture to cool to 110°F (43°C). This temperature ensures the egg yolks won’t scramble when added. If you’re unsure, use a candy thermometer for precision.
- Beat the egg yolks in a separate bowl until they’re pale and slightly thickened. Then, slowly pour the yolks into the butter mixture, whisking continuously. This step creates a silky, homogeneous base that will hold the meringue together.
- Sift the flour into the butter-yolk mixture and fold it in gently using a spatula. The goal is to incorporate the flour without deflating the mixture. The dough should feel smooth and slightly sticky.
- Place the whisk attachment on a stand mixer and beat the egg whites on high speed until soft peaks form. Increase the speed to medium-high and continue until stiff peaks appear, and the whites hold their shape when the beaters are lifted. This creates the airy structure that will give the cookies their lift.
- Fold the beaten whites into the dough in three additions, using a gentle, sweeping motion. This careful folding retains the air bubbles, ensuring a light interior. Don’t rush; the process is worth the extra time.
- Spoon a heaping tablespoon of the dough onto the prepared baking sheets, leaving about 2 inches between each. Use a small spoon or your hands to shape the dough into a mound, then press a small well in the center to hold the jam. This well will be the pocket that keeps the jam from spilling.
- Bake for 25–28 minutes, or until the edges are golden brown and the centers are set. The cookies should emit a pleasant, toasty aroma. Avoid overbaking; you want the center to remain slightly soft for the jam.
- Remove from the oven and let the cookies cool on the sheet for 5 minutes before transferring them to a wire rack. This resting period allows the cookies to firm up and the jam to set inside.
- Fill each cookie with a generous spoonful of jam, then close the top with another mound of dough. Gently press to seal the edges, creating a pocket that holds the jam securely. The cookies are now ready for the final touch.
- Dust the finished cookies with powdered sugar for a sweet, decorative finish. Serve immediately or store in an airtight container for up to a week.
That’s it — you did it. But hold on, I’ve got a few more tricks that’ll take this to another level.
Insider Tricks for Flawless Results
The Temperature Rule Nobody Follows
Many bakers bake at 350°F, but the lower 325°F gives the cookies a slower rise and a more even bake. This prevents the edges from burning while the center stays soft. I’ve seen friends bake at 375°F and end up with burnt tops and raw middles. The trick is to set a timer for 25 minutes and check the cookies at the 23-minute mark.
Why Your Nose Knows Best
Smell the dough as it cools; a faint caramel scent indicates the sugar has caramelized properly. If the aroma is flat, you may need to let the butter-sugar mixture cool a bit longer before adding the yolks. Your nose is a reliable indicator of the right stage.
The 5-Minute Rest That Changes Everything
Letting the cookies rest on the sheet for 5 minutes before transferring them to a rack allows the internal jam to set. If you move them too quickly, the jam can shift, causing uneven distribution. This brief pause also helps the cookie structure firm up, resulting in a crispier bite.
Use a Stand Mixer for Consistency
While a hand whisk can work, a stand mixer ensures the whites are beaten to the perfect stiffness every time. This consistency eliminates the risk of under-whipped or over-whipped whites that can lead to dense or airy cookies.
Keep the Piping Bag Clean
If you use a piping bag to fill the cookies, wipe the tip with a damp cloth between each cookie. This prevents jam from drying on the tip and clogging it, which could lead to uneven filling.
Storing Tips for Long-Term Freshness
Store the cookies in a single layer inside an airtight container. If you need to stack them, place parchment paper between layers to prevent sticking. This keeps the cookies crisp and prevents the jam from seeping into the dough.
Creative Twists and Variations
This recipe is a playground. Here are some of my favorite ways to switch things up:
Chocolate Ganache Surprise
Swap the jam for a rich chocolate ganache. Prepare the ganache by heating cream until it just boils, then pour over chopped dark chocolate. The result is a decadent, chocolatey version that pairs beautifully with a glass of stout.
Citrus Curds Delight
Use lemon or orange curd instead of jam. The tartness cuts through the buttery richness and adds a bright, refreshing note. It’s especially good for brunch or as a sweet contrast to savory dishes.
Nutty Almond Butter
Replace the jam with almond butter for a nutty, protein-packed twist. The almond butter adds a subtle crunch and a deep, roasted flavor that complements the meringue.
Herb-Infused Honey
Infuse honey with rosemary or thyme, then use it as the filling. The herbal notes create a savory-sweet balance that’s unexpected and delicious.
Spiced Apple Compote
Cook apples with cinnamon, nutmeg, and a splash of brandy for a warm, spiced compote. This variation feels like a holiday treat and works well with pumpkin spice coffee.
Berry Medley Mix
Combine strawberries, blueberries, and raspberries in a quick simmer to create a mixed berry filling. The variety of flavors makes each bite a new experience.
Storing and Bringing It Back to Life
Fridge Storage
Place the cookies in a single layer inside an airtight container. Store them in the refrigerator for up to 5 days. The cold environment preserves the crispness of the crust while keeping the jam fresh.
Freezer Friendly
Wrap each cookie individually in parchment paper and then place them in a freezer bag. They’ll stay fresh for up to 3 months. When you’re ready to eat, let them thaw at room temperature for 30 minutes.
Best Reheating Method
To revive frozen cookies, preheat your oven to 300°F (150°C) and bake for 8–10 minutes. Add a tiny splash of water to the bottom of the pan before baking; it steams the cookies back to perfection, restoring that airy interior.