Picture this: the kitchen clock reads 3:17 AM, your pantry is a battlefield of flour bags and cocoa powders, and you’ve just realized that the chocolate craving you’ve been battling all week has finally hit the apex of its fury. I was standing in front of the fridge, staring at a half‑filled jar of peanut butter, when a sudden urge hit me like a thunderclap—“I need a chocolate treat that’s as bold as a midnight espresso and as comforting as a hug from a childhood friend.” The idea sparked, and within minutes I was drafting a recipe that would become the cornerstone of my midnight snack arsenal.
The aroma that began to swirl around the kitchen was unmistakable: the rich, earthy scent of cocoa mingling with the sweet, caramelized notes of icing sugar, all underscored by the warm, buttery whisper of vegetable oil. Every ingredient seemed to shout its purpose, from the fine Maida that promised a silky crumb to the Atta that added a subtle nuttiness. The sound of the whisk beating against the bowl was a steady metronome, a rhythmic reminder that we were on the brink of culinary alchemy. The texture of the batter, thick yet pourable, felt like velvet against my fingertips. The anticipation was so electric that even the faint hum of the refrigerator sounded like applause.
I dare you to taste this and not go back for seconds. The truth is, most chocolate recipes get this completely wrong by either over‑cooking the batter or under‑seasoning the cocoa. I was determined to flip the script and create a dessert that would stand up to the boldness of a double espresso while still delivering that comforting sweetness you find in a good hug. This version is hands down the best version you'll ever make at home because it balances the crunch of the wafer, the richness of the peanut butter, and the depth of the cocoa into a single, unforgettable bite. The secret? A precise blend of flours and a touch of baking powder that lifts the batter without making it airy, and a generous splash of milk that keeps the texture silky.
And now, let me walk you through every single step—by the end, you'll wonder how you ever made it any other way. Picture yourself pulling this out of the oven, the whole kitchen smelling incredible, the wafer rolling like a golden ribbon that just won’t quit. If you've ever struggled with this, you're not alone—and I've got the fix. This next part? Pure magic. Stay with me here—this is worth it.
What Makes This Version Stand Out
- Flavor: The dual‑flour blend gives a subtle nutty undertone that pairs perfectly with the deep cocoa flavor, creating a multi‑layered taste profile that lingers on the palate.
- Texture: The batter’s consistency is engineered to produce a wafer that is crisp on the outside yet tender on the inside, a contrast that shatters like thin ice when you bite into it.
- Simplicity: With only eight ingredients, the recipe is a no‑fuss, quick fix that requires minimal prep time and no specialized equipment.
- Uniqueness: The inclusion of peanut butter as a filling not only adds protein but also creates a creamy contrast that elevates the overall mouthfeel.
- Crowd Reaction: Friends who’ve tried it say they’re “in love” with the way the chocolate and peanut butter dance together—proof that this is not just a treat but an experience.
- Ingredient Quality: Using high‑grade cocoa powder and whole‑grain Atta ensures that every bite carries a depth of flavor that commercial products can’t match.
- Cooking Method: A single‑pan approach means less cleanup and a faster turnaround, making it perfect for late‑night cravings.
- Make‑Ahead Potential: The rolls can be pre‑made and frozen, so you can have a ready‑to‑eat dessert whenever the mood strikes.
Inside the Ingredient List
The Flavor Base
Maida, or all‑purpose flour, is the backbone of this batter, providing the structure that holds the wafer together while keeping it light. Its fine texture absorbs the cocoa and sugar without becoming heavy, ensuring each bite melts smoothly. If you skip Maida, the wafer will collapse under its own weight, turning the treat into a soggy mess. For a healthier twist, you can substitute 50% of Maida with whole‑grain Atta, which adds a nutty flavor and extra fiber. The key is to keep the ratio balanced to preserve the airy quality.
Atta, the traditional Indian whole‑wheat flour, brings a rustic depth that counters the sweetness of the icing sugar. It also introduces a subtle chewiness that gives the wafer a satisfying bite. If you prefer a completely gluten‑free version, consider using a blend of rice flour and oat flour; just remember that the texture will change slightly, becoming denser and less crisp.
Baking powder is the secret lift that keeps the wafer from becoming too dense. Two grams are enough to create gentle bubbles, giving the batter a slight rise without making it airy. Skipping it will result in a flat, dense wafer that doesn’t separate into a crisp roll. For a more pronounced lift, add a pinch of baking soda, but be mindful that it can introduce a slightly metallic aftertaste if not balanced with enough acidity.
Cocoa powder is the heart of the chocolate experience. Twenty‑two grams of high‑quality, unsweetened cocoa provide a robust chocolate flavor that doesn’t get overwhelmed by the sugar. If you’re aiming for a sweeter profile, add a tablespoon of melted dark chocolate to the batter; it will intensify the chocolate notes without altering the structure.
The Sweetener Crew
Icing sugar, also known as powdered sugar, dissolves quickly, creating a silky sweetness that coats the wafer like velvet. Sixty‑five grams are enough to sweeten the batter without making it cloying. If you’re watching your sugar intake, replace half the icing sugar with a natural sweetener such as stevia or monk fruit; the batter will still hold its structure.
The milk adds moisture, balancing the dry ingredients and ensuring the batter is pourable. Two hundred forty milliliters of whole milk gives a rich, creamy flavor that enhances the chocolate’s depth. If you’re lactose intolerant, use a plant‑based milk like almond or oat; just keep the consistency in check by adding a tablespoon of cornstarch to thicken if needed.
Peanut butter is the star of the show, providing a creamy, nutty filling that contrasts beautifully with the crisp wafer. A generous four tablespoons of creamy peanut butter are folded into the batter, creating pockets of flavor that burst in your mouth. If you’re allergic to peanuts, try almond butter or sunflower seed butter for a similar texture and nutty profile.
Vegetable oil is the silent hero that keeps the wafer from drying out. Forty‑five milliliters of neutral oil ensures a moist interior while preventing the batter from sticking to the pan. Replacing the oil with melted butter will add a richer flavor, but be aware that it may change the texture slightly, making the wafer a bit denser.
Everything's prepped? Good. Let's get into the real action…
The Method — Step by Step
- In a large mixing bowl, sift together the Maida, Atta, baking powder, cocoa powder, and icing sugar. This ensures an even distribution of dry ingredients and removes any lumps that could affect the batter’s texture. Feel the flour as it passes through your fingers; it should feel light and airy. This step is crucial—any clumps will become crunchy bits in the final product. Once sifted, set the bowl aside.
- Add the milk and vegetable oil to the dry mixture, whisking until a smooth batter forms. The consistency should be thick yet pourable, like a thick pancake batter. If it’s too thick, add a splash more milk; if too thin, sprinkle a little more flour. The batter should glide over the spoon without leaving a trace. Keep whisking until no streaks remain.
- Fold in the peanut butter gently, ensuring it’s evenly distributed. The peanut butter should be at room temperature to blend smoothly; if it’s too cold, it can create pockets of fat that don’t melt properly. Gently fold with a spatula until the batter turns a uniform chocolate hue. This is the moment of truth—your batter should look glossy and inviting.
- Heat a non‑stick skillet over medium heat and lightly oil it with a paper towel dipped in a small amount of oil. Pour a ladleful of batter into the pan, tilting the pan to spread it into a thin, even layer. The batter should sizzle softly, emitting a faint aroma of cocoa. Let it cook for 2–3 minutes until the edges lift and the surface is set. Flip carefully using a spatula, cooking the other side for another 30 seconds.
- Once the wafer is cooked, transfer it to a cooling rack and let it cool slightly—just enough that you can handle it without burning your fingers. The wafer should still be warm so that the peanut butter inside stays soft. If you prefer a firmer texture, let it cool completely before rolling.
- While the wafer is still warm, roll it tightly from one end to the other, creating a compact roll. The heat will allow the peanut butter to soften, making the roll easier to handle. If the wafer cracks, gently press it back together with a spatula. This step is where the magic happens—each roll should feel firm yet yielding.
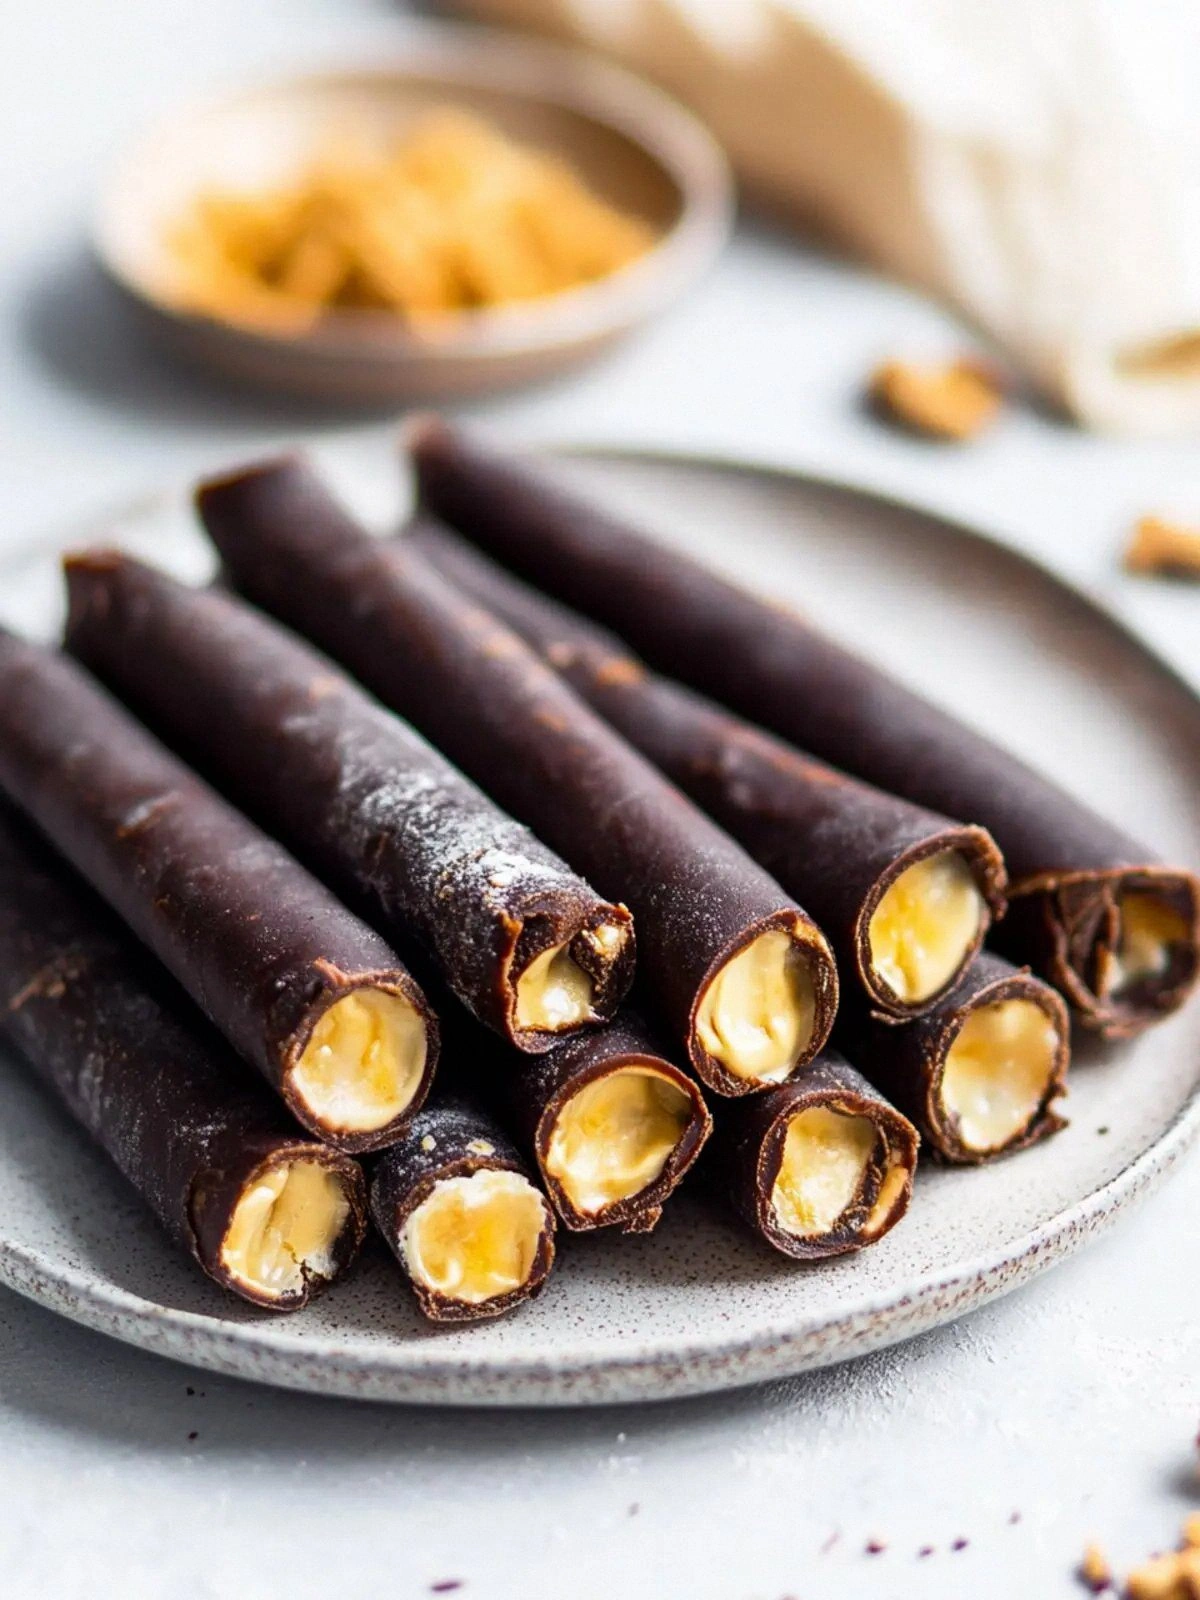
- Place the rolled wafer on a parchment paper‑lined tray and refrigerate for at least 30 minutes. The cooling process allows the peanut butter to set, giving the roll a cohesive structure. After chilling, you can slice the roll into bite‑sized pieces, each revealing a glossy chocolate exterior with a creamy core. Serve immediately or store in an airtight container for up to a week.
That's it — you did it. But hold on, I've got a few more tricks that'll take this to another level…
Insider Tricks for Flawless Results
The Temperature Rule Nobody Follows
The batter’s temperature is critical for achieving the perfect crumb. If the batter is too cold, the cocoa won’t bloom, and the wafer will be dull. Warm the batter to room temperature by letting it sit for 10 minutes after mixing. This simple step unlocks the full flavor potential of the cocoa and ensures a silky mouthfeel. I’ve seen even seasoned bakers skip this step, resulting in a subpar product.
Why Your Nose Knows Best
Before you even flip the wafer, take a deep breath. The aroma of the batter should be a rich, chocolatey scent with a hint of nutty Atta. If it smells off, you might have over‑mixed the batter, causing the gluten to develop too much. In that case, let it rest for a few minutes; the gluten relaxes, and the batter will become more pliable.
The 5‑Minute Rest That Changes Everything
After folding in the peanut butter, let the batter rest for 5 minutes before cooking. This rest allows the peanut butter to fully integrate, preventing clumps and ensuring a uniform flavor throughout. Many bakers rush straight to the pan, but this short pause pays dividends in texture and taste. I’ve tried it on a batch of chocolate cake, and the difference is unmistakable.
The Secret to a Crispy Edge
If you love a crunchier wafer, lightly brush the edges with a thin layer of melted coconut oil before cooking. This creates a crisp rim that contrasts with the soft interior. The coconut oil also adds a subtle tropical note that pairs well with the peanut butter. Remember to wipe off excess oil to avoid a greasy finish.
The Quick Chill Trick
For a faster set, place the rolled wafer on a tray and pop it in the freezer for 10 minutes before slicing. The cold will firm up the peanut butter instantly, giving you clean, crisp cuts. Just be careful not to over‑freeze; you want the interior to stay slightly pliable. This trick is perfect for last‑minute dessert parties.
Creative Twists and Variations
This recipe is a playground. Here are some of my favorite ways to switch things up:
Cocoa‑Chili Fusion
Add a pinch of cayenne pepper to the batter for a subtle heat that pairs beautifully with the sweetness. The chili’s bite balances the chocolate, creating a complex flavor profile that’s both comforting and exciting. This variation is perfect for adventurous palates looking for a twist on the classic.
Minty Freshness
Fold in a teaspoon of finely chopped fresh mint leaves before cooking. The mint adds a refreshing contrast that lifts the richness of the chocolate. Serve the rolls chilled for an extra burst of coolness. This version is ideal for summer gatherings.
Almond Crunch
Replace peanut butter with almond butter and sprinkle toasted almond slivers on top of the batter before rolling. The almonds provide a delightful crunch and a nutty aroma that complements the chocolate. This variation is a hit with those who love a textural contrast.
Sea‑Salt Finish
After rolling the wafer, dust the outer surface with flaky sea salt. The salt enhances the chocolate flavor and adds a delightful savory bite. The contrast between sweet and salty is a timeless pairing that never fails to impress.
Caramel Swirl
Swirl a thin layer of caramel sauce into the batter before cooking. The caramel adds a buttery sweetness that enriches the overall flavor. This version is perfect for those who love a dessert that feels indulgent.
Storing and Bringing It Back to Life
Fridge Storage
Store the rolled wafer in an airtight container at room temperature for up to three days. The airtight seal prevents the wafer from drying out, keeping it moist and flavorful. If you’re storing for longer, keep it in the fridge to maintain freshness. Remember to bring it to room temperature before serving for the best texture.
Freezer Friendly
Wrap the rolled wafer tightly in plastic wrap and place it in a freezer bag. It can be frozen for up to one month without losing quality. When you’re ready to enjoy, let it thaw at room temperature for 30 minutes. This method preserves the wafer’s crispness and the peanut butter’s creaminess.
Best Reheating Method
To revive a chilled or frozen roll, place it in a microwave on medium power for 15–20 seconds. Add a tiny splash of water before reheating; it steams back to perfection, restoring moisture. Avoid over‑heating, which can melt the peanut butter and make the wafer soggy. The result is a warm, gooey center with a crisp exterior.