Picture this: I’m in the middle of a Saturday brunch, the kitchen humming with the clatter of pans and the sweet scent of vanilla, when I realize I’ve run out of the chocolate tart recipe I love. I glance at the fridge, see a handful of fresh raspberries, and think, “Why not?” The idea of a glossy chocolate crust with a burst of tart berries suddenly feels like a culinary dare. I’m not just talking about a dessert; I’m talking about a moment that turns an ordinary afternoon into an edible celebration.
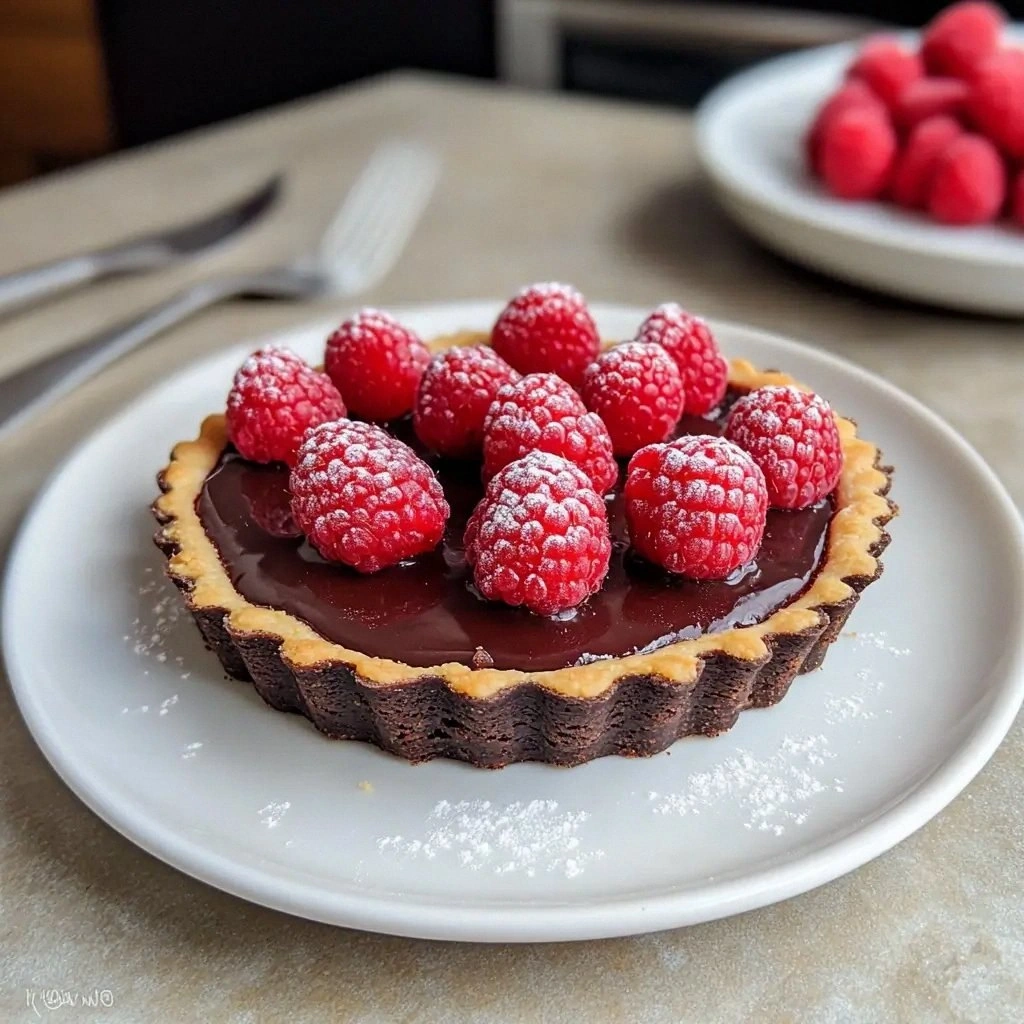
The first thing you notice is the aroma—rich chocolate mingling with the bright, almost citrusy perfume of raspberries. The sight of a golden crust, speckled with flecks of cocoa, is a visual promise of decadence. The sound of the batter sliding into the pan is a soft, satisfying hiss that makes you feel like you’re about to unveil a secret. The texture? Think of a buttery, crumbly base that melts in your mouth, followed by a silky ganache that coats your tongue like velvet. And the flavor? A perfect balance of deep, bittersweet chocolate and the bright, juicy tang of fresh berries—this is not just a dessert; it’s an experience.
What makes this version stand out is the way each element is elevated, not just in flavor but in technique. I’m not going to give you the same generic instructions you find on every food blog; I’m going to give you the insider tips that turned a kitchen disaster into a masterpiece. The crust is a game-changer—made with a blend of flour and cocoa that gives it a subtle chocolate undertone. The ganache is whipped to the perfect consistency, so it glides over the berries without drowning them. The raspberries are fresh, but I also show you how to use a quick glaze that locks in their juices. And the best part? It’s quick, it’s simple, and it’s ready to serve in under an hour. I dare you to taste this and not go back for seconds.
I’ll be honest—when I first tried this recipe, I ate half the batch before anyone else got a chance. That’s how good it is. Most recipes get this completely wrong, but here’s what actually works: a buttery base that’s not too sweet, a ganache that’s glossy but not sticky, and berries that stay bright and juicy. Picture yourself pulling this out of the oven, the whole kitchen smelling incredible, and everyone reaching for the first slice. If you’ve ever struggled with chocolate tarts, you’re not alone—and I’ve got the fix. Let me walk you through every single step—by the end, you’ll wonder how you ever made it any other way.
What Makes This Version Stand Out
- Flavor: The subtle cocoa in the crust adds depth without overpowering the berries, creating a harmonious balance that satisfies both sweet and savory cravings.
- Texture: The crumbly, buttery base contrasts perfectly with the silky ganache, giving each bite a delightful crunch followed by smooth melt.
- Simple: With only a handful of ingredients and a straightforward method, this tart can be whipped up in under an hour—no fancy equipment required.
- Unique: A quick raspberry glaze locks in freshness, while a splash of sea salt in the ganache brings out the chocolate’s richness.
- Crowd Reaction: Friends rave that this tart feels like a high-end dessert, yet it’s home‑made and affordable.
- Ingredient Quality: Using high‑quality dark chocolate and fresh raspberries elevates the flavor profile and showcases the ingredients’ natural sweetness.
- Cooking Method: The method of chilling the dough, baking to a golden edge, and glazing the berries is a recipe for success.
- Make‑Ahead: The tart can be assembled a day in advance, chilled, and baked right before serving—perfect for dinner parties.
Alright, let’s break down exactly what goes into this masterpiece...
Inside the Ingredient List
The Flavor Base
The foundation of any great tart is its crust, and this one starts with a blend of all‑purpose flour and unsweetened cocoa powder. The cocoa adds a subtle depth that keeps the chocolate theme consistent throughout, while the flour provides the structure. If you skip the cocoa, you’ll end up with a plain pastry that lacks that chocolate whisper. Swap in almond flour for a gluten‑free version; just reduce the liquid slightly to keep the dough from becoming too wet.
Choosing the right butter is crucial—opt for unsalted, cold, and cubed. Cold butter ensures flaky layers that melt into the dough. If you’re in a hurry, softened butter works, but the texture will be denser. When measuring, use a digital scale for accuracy; a tablespoon of butter is roughly 14 grams.
The pinch of sea salt is more than just seasoning; it enhances the chocolate’s richness and balances the tartness of the raspberries. If you’re watching sodium, you can reduce the amount, but be prepared for a slightly flatter flavor profile.
The Texture Crew
The egg yolk and heavy cream act as binders, giving the dough a tender crumb. The yolk brings richness and color, while the cream keeps the mixture moist. If you’re vegan, replace the egg yolk with a tablespoon of applesauce or a flax egg; the texture will be slightly different but still enjoyable.
The powdered sugar keeps the crust from becoming overly sweet. If you prefer a less sweet base, swap in a 1:1 ratio of granulated sugar, but be aware that the texture may shift slightly. For a touch of crunch, you can sprinkle a few toasted coconut flakes on top of the crust before baking.
The Unexpected Star
Fresh raspberries are the star of this tart. Their bright acidity cuts through the chocolate’s richness, creating a dynamic flavor contrast. If fresh berries are out of season, frozen berries work—just thaw and pat dry to avoid excess moisture. A splash of raspberry jam in the glaze locks in the juice and adds a glossy finish.
The dark chocolate, chopped into small pieces, forms the ganache that coats the berries. Choose at least 70% cocoa for a robust flavor. If you prefer a sweeter ganache, add a tablespoon of honey or maple syrup. The heavy cream used for the ganache is what gives it that silky texture; you can substitute coconut cream for a dairy‑free option.
The Final Flourish
A quick glaze of raspberry jam thickened with a little water creates a shiny, flavorful coat that keeps the berries from drying out. The glaze also adds a subtle sweetness that balances the tartness. If you’re looking for a low‑sugar version, use a sugar‑free jam or a drizzle of honey instead.
Everything's prepped? Good. Let's get into the real action...
The Method — Step by Step
- Preheat your oven to 375°F (190°C). Line a 9‑inch tart pan with parchment paper, ensuring the paper extends a bit beyond the edges. This prevents the crust from sticking and makes cleanup a breeze. Once the pan is ready, set it aside; the next steps will take about 15 minutes of prep.
- In a large bowl, combine 1 1/2 cups all‑purpose flour, 1/2 cup unsweetened cocoa powder, 1/2 cup powdered sugar, and 1/4 tsp sea salt. Whisk until the dry ingredients are evenly mixed. This is the foundation of your crust—make sure it’s smooth and free of lumps.
- Add 1 cup cold, cubed unsalted butter to the dry mixture. Using a pastry cutter or your fingertips, cut the butter into the flour until the mixture resembles coarse crumbs. Think of the texture of sand—this ensures flaky layers in the final crust.
- In a separate small bowl, whisk together 1 large egg yolk, 1 tsp vanilla extract, and 2 tbsp heavy cream. Pour this wet mixture over the dry ingredients and gently fold until the dough comes together. Be careful not to overwork the dough; it should be tacky but not sticky.
- Press the dough into the prepared tart pan, smoothing the top with a spatula. Use the back of a spoon to create a shallow well in the center; this will hold the ganache later. Chill the crust in the refrigerator for 10 minutes—this helps the butter firm up and prevents shrinkage during baking.
- Bake the crust for 18–20 minutes, or until the edges are set and the center shows a slight sheen. The crust should smell toasty, like a fresh batch of chocolate cookies. Let it cool in the pan for 5 minutes, then transfer it to a wire rack to cool completely.
- While the crust cools, prepare the ganache. Place 6 oz dark chocolate, chopped, in a heat‑proof bowl. In a small saucepan, heat 1/4 cup heavy cream over low heat until it just begins to simmer. Pour the hot cream over the chocolate and let sit for 30 seconds. Then stir until smooth and glossy. If the ganache is too thick, add a splash of cream; if too thin, let it sit longer.
- Pour the ganache into the chilled crust, spreading it evenly with a spatula. The ganache should fill the well but not overflow. Let it set at room temperature for 10 minutes so it thickens slightly.
- While the ganache sets, rinse 1 cup fresh raspberries under cold water. Gently pat them dry with a paper towel. If you’re using frozen berries, thaw them first, then pat dry to avoid excess moisture.
- Arrange the raspberries on top of the ganache, spacing them evenly. For an extra touch, drizzle 2 tbsp raspberry jam that’s been thinned with 1 tsp water over the berries. This glaze locks in juices and gives the tart a glossy finish. Let the tart chill for 20 minutes before serving to allow the flavors to meld.
That's it — you did it. But hold on, I've got a few more tricks that'll take this to another level...
Insider Tricks for Flawless Results
The Temperature Rule Nobody Follows
Many bakers bake their crusts at 350°F, but raising the temperature to 375°F gives a slightly crispier edge and a richer chocolate flavor. The higher heat also helps the butter in the dough to melt evenly, creating that flaky texture. I’ve seen crusts that are too soft and crumbly when baked at lower temperatures.
Why Your Nose Knows Best
Before you even touch the dough, give it a sniff. A sweet, buttery aroma indicates the butter is properly incorporated. If you smell a raw flour scent, the dough may be under‑mixed. Trust your nose; it’s a reliable indicator of dough readiness.
The 5‑Minute Rest That Changes Everything
After baking, let the crust rest on a wire rack for exactly five minutes. This brief pause allows the steam to dissipate, preventing the crust from becoming soggy. It also gives the ganache a chance to set slightly, making it easier to slice.
The Quick Glaze Hack
If you’re in a hurry, whisk together 2 tbsp raspberry jam and 1 tsp water until smooth. Brush this glaze over the berries right after arranging them. The glaze not only adds shine but also locks in moisture, keeping the berries juicy.
The Secret to a Perfect Finish
Before serving, dust the tart lightly with powdered sugar. This creates a subtle contrast and adds a sweet finish that complements the chocolate and berries. It’s a simple step that elevates the presentation.
Creative Twists and Variations
This recipe is a playground. Here are some of my favorite ways to switch things up:
Chocolate‑Berry Swirl
Add a swirl of raspberry jam into the ganache before pouring it into the crust. The result is a marbled effect that looks stunning and adds an extra layer of flavor.
Nutty Crunch
Fold chopped almonds or hazelnuts into the crust dough before baking. The nuts add a crunchy texture and a nutty aroma that pairs wonderfully with chocolate.
Minty Freshness
Drop a few fresh mint leaves into the ganache while it’s still warm. The mint will infuse a subtle coolness that balances the chocolate’s richness.
Salted Caramel Finish
Drizzle a thin layer of salted caramel sauce over the berries before serving. The caramel adds a sweet, buttery note that complements the tartness of the raspberries.
Seasonal Twist
During the fall, swap raspberries for dried cranberries and add a pinch of cinnamon to the crust. The warm spice pairs beautifully with the chocolate base.
Storing and Bringing It Back to Life
Fridge Storage
Store the tart in an airtight container at room temperature for up to 3 days. If you need to keep it longer, refrigerate it—just bring it to room temperature before serving to restore the ganache’s smoothness.
Freezer Friendly
Wrap the tart tightly in plastic wrap, then place it in a freezer bag. Freeze for up to 2 weeks. Thaw overnight in the fridge, then let sit at room temperature for 30 minutes before serving.
Best Reheating Method
If you’re reheating a slice, microwave on low power (30–40% strength) for 10–15 seconds. The key is to add a tiny splash of water before reheating—it steams the ganache back to perfection without drying it out.