Picture a Saturday afternoon in the middle of summer when the kitchen lights flicker and the fridge door is open wider than a doorway. I was in a culinary panic, juggling a half‑baked pie, a pot of soup, and a craving for something sweet that would not make me feel guilty. The moment I cracked a fresh bag of frozen strawberries and heard the faint hiss of their release into the blender, I knew I had stumbled upon a secret weapon. My friend had dared me to make a dessert that could outshine the barista’s fancy frappes, and I was ready to take on the challenge. This is not just another frozen yogurt; it’s a symphony of textures that dance on the tongue like confetti at a parade. I promise you, by the end of this post, you’ll be shaking your spoon in anticipation of the first bite.
When the first swirl of strawberry puree hits the tongue, you’re hit with a burst of bright, almost citrus‑like freshness that cuts through the richness of the yogurt. The maple syrup’s subtle caramel undertone lingers, while the vanilla whispers a floral hint that elevates the overall flavor profile. The tapioca starch, hidden in plain sight, gives the mixture a silky smoothness that feels almost like a velvet blanket. The beet powder adds a mineral depth that is both earthy and unexpectedly sweet, while the white chocolate melts into a glossy, buttery finish. Each component is carefully balanced, so no single element overpowers the others. The result is a dessert that feels indulgent yet light, a perfect antidote to the heavy summer heat.
What makes this frozen yo truly special is that it’s a one‑pot, no‑heat recipe that you can whip up in under fifteen minutes. It’s a crowd‑pleaser that looks as good on a dessert plate as it does on a picnic basket. The recipe is fully customizable, so you can swap ingredients to fit your dietary preferences or what you have on hand. The optional beet powder adds a pop of color that makes the dish Instagram‑worthy, and the optional white chocolate gives a luxurious finish for those who like a touch of decadence. This version stands out from the usual frozen yogurt recipes that rely on heavy churners or complicated techniques. It’s a testament to the power of simple, high‑quality ingredients working in harmony.
Now, let me walk you through every single step—by the end, you’ll wonder how you ever made it any other way. I dare you to taste this and not go back for seconds, because the first bite will leave you craving more. The next part? Pure magic. And the best part? You’ll be able to make it in a fraction of the time it takes to bake a cake.
And if you’ve ever struggled with frozen desserts that turn out too icy or too runny, you’re not alone—and I’ve got the fix. Most recipes get this completely wrong, but here’s what actually works: a proper balance of starch and liquid, and a gentle freezing process that preserves the creamy texture. Picture yourself pulling this out of the freezer, the whole kitchen smelling incredible, and the first spoonful melting on your tongue like a summer breeze. This is hands down the best version you’ll ever make at home, and I’m about to show you how to achieve it.
Okay, ready for the game‑changer? The secret lies in the combination of frozen strawberries and tapioca starch, which together create a silky, scoopable consistency that’s surprisingly easy to handle. The optional beet powder is not just a color enhancer; it also adds a subtle earthy sweetness that complements the maple syrup’s caramel notes. The white chocolate, when melted into the mix, adds a luxurious, glossy finish that makes the dessert feel like a treat you’d get at a fancy café. Every ingredient is chosen for its unique contribution to the overall sensory experience. You’ll be amazed at how each component interacts, creating a dessert that’s both simple and sophisticated.
Alright, let’s break down exactly what goes into this masterpiece. Below, you’ll find the essential bullet points that explain why this recipe is a game‑changer. Each point is followed by a short explanation that will give you a deeper understanding of the magic behind the ingredients.
- Taste: The combination of sweet strawberries, maple syrup, and vanilla creates a flavor profile that feels both familiar and refreshingly new. The subtle beet powder adds an earthy undertone that keeps the taste from becoming cloying. This balance ensures that each bite is a burst of natural sweetness without the artificial aftertaste.
- Texture: Tapioca starch works wonders by giving the mixture a smooth, almost silk-like mouthfeel. It prevents the frozen yo from becoming icy or grainy, maintaining a creamy consistency even after multiple freeze–thaw cycles. The result is a dessert that feels indulgent yet light.
- Simplicity: No special equipment is needed—just a blender, a bowl, and a freezer. The recipe can be completed in under fifteen minutes, making it perfect for spontaneous dessert cravings. The ingredients are pantry staples, so you can whip this up anytime.
- Uniqueness: The optional beet powder and white chocolate add a twist that sets this recipe apart from traditional frozen yogurts. The beet powder gives a vibrant color and earthy depth, while the white chocolate adds a luxurious, glossy finish.
- Crowd Reaction: Guests will rave about the vibrant color and creamy texture. The dessert’s simplicity makes it a hit at parties, as it can be prepared in large batches with minimal effort. It’s a conversation starter that pairs well with both casual gatherings and formal events.
- Ingredient Quality: Using high‑quality, organic strawberries ensures a natural sweetness that can’t be replicated with artificial flavors. The yogurt’s tang balances the sweetness, while the maple syrup adds depth without the need for refined sugars.
- Cooking Method: The recipe’s no‑cook method is perfect for those who want a quick, healthy dessert. It preserves the natural nutrients of the ingredients, making it a wholesome treat for the whole family.
- Make‑Ahead Potential: This frozen yo can be made a day ahead and stored in the freezer without loss of quality. The texture remains smooth, and the flavors meld beautifully, making it an excellent option for meal prep or last‑minute dessert needs.
Inside the Ingredient List, we’ll break down each component into its own group, explaining its role, why it matters, and what happens if you skip it. The goal is to give you a clear understanding of how each ingredient contributes to the final product, so you can make informed substitutions if needed.
The Flavor Base
The frozen strawberries are the heart of this dessert. They provide a natural sweetness that is far more complex than any artificial sweetener could replicate. When blended, the strawberries release their juices, creating a thick puree that forms the foundation of the frozen yo. If you skip the strawberries, the dessert loses its vibrant color and the natural tartness that balances the maple syrup. Choosing organic or locally sourced strawberries can elevate the flavor profile, giving you a fresher, more vibrant taste.
The Texture Crew
The unsweetened yogurt is the second pillar of this recipe. It offers a tangy backdrop that cuts through the sweetness and adds a creamy mouthfeel. The yogurt’s protein content also helps stabilize the mixture, preventing it from becoming too icy. If you omit the yogurt, the dessert will turn into a simple sorbet, lacking the richness that makes it so satisfying. For a dairy‑free version, coconut yogurt can be used, but the texture will shift slightly towards a denser, coconut‑flavored base.
The Unexpected Star
The maple syrup is the secret sauce that binds everything together. It adds a caramel depth that enhances the strawberries’ natural sweetness without overpowering the dish. The syrup’s viscosity also contributes to the overall smoothness, ensuring that the frozen yo doesn’t become grainy. If you skip the maple syrup, you’ll need a different sweetener—honey or agave syrup are viable options, but they will alter the flavor profile slightly.
The Final Flourish
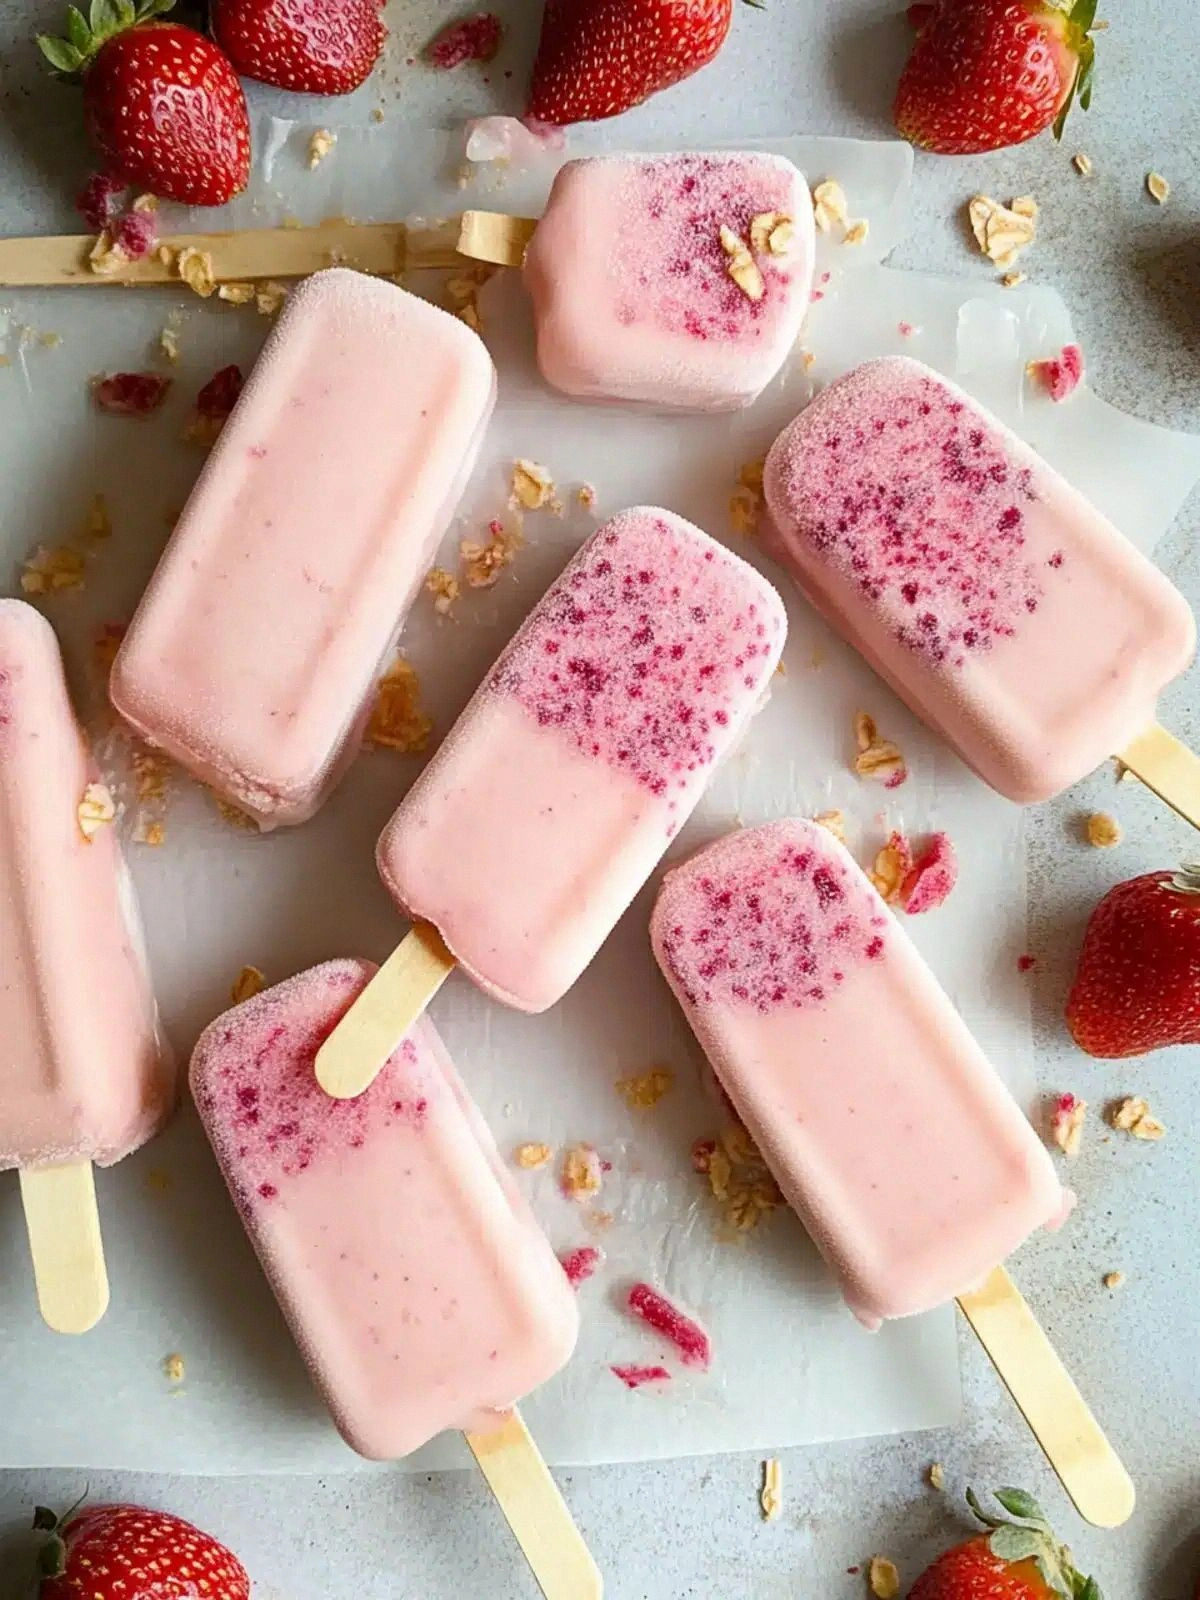
The optional beet powder is a game‑changer, both visually and flavor-wise. It gives the frozen yo a striking pink hue that’s impossible to ignore, while adding an earthy sweetness that pairs perfectly with the maple. The white chocolate, when melted into the mixture, creates a glossy sheen that makes the dessert look like it’s been dipped in a sugary glaze. If you decide to omit the optional ingredients, the dessert will still be delicious, but you’ll miss the extra layers of color and flavor that make it truly special. The tapioca starch, meanwhile, is essential for achieving that silky, scoopable texture; skipping it will result in a more icy consistency.
Everything’s prepped? Good. Let’s get into the real action. The method is straightforward, but the timing and technique are key to achieving the perfect texture. I’ll walk you through each step, making sure you don’t miss any crucial detail. The process is so simple that even a novice can master it, and the result will be a dessert that looks and tastes like it was made by a seasoned chef.
Step 1: Begin by thawing the frozen strawberries for about 10 minutes. This makes them easier to blend and ensures a smoother puree. While they thaw, gather all your ingredients and tools. A high‑speed blender or food processor works best for achieving a silky texture. I’ve found that letting the strawberries sit at room temperature for a few minutes brings out their natural aroma.
Step 2: Once the strawberries have softened slightly, add them to the blender. Add the unsweetened yogurt, maple syrup, vanilla extract, and beet powder if using. Blend on high until the mixture is completely smooth and uniform. The goal is a thick, glossy puree that’s ready to freeze. If you notice any lumps, pulse the blender a few more times until the texture is flawless.
Step 3: In a small saucepan, combine the tapioca starch with a splash of cold water to create a slurry. Heat the mixture over low heat, stirring constantly until it thickens. This step is crucial for preventing the frozen yo from becoming icy. The slurry should be clear and slightly glossy. Once it’s ready, let it cool to room temperature before adding it to the blender.
Step 4: Pour the cooled tapioca slurry into the blender with the strawberry mixture. Blend again on low to incorporate the starch without creating bubbles. The mixture should feel thick and velvety. This is the moment of truth—if the texture feels off, you’ve missed a step. Keep blending until the mixture is uniformly smooth.
Step 5: If you’re using white chocolate, melt it gently in a double boiler or microwave. Stir until it’s completely smooth. This will add a glossy finish and a subtle sweetness. Let the melted chocolate cool slightly before adding it to the blender. The chocolate should be warm enough to flow but not so hot that it melts the yogurt.
Step 6: Add the melted white chocolate to the blender. Blend on low until fully incorporated. The mixture should now be silky, with a glossy sheen. At this point, the mixture is ready for freezing. If you want a firmer texture, you can add a splash of heavy cream or coconut milk.
Step 7: Pour the mixture into a shallow, freezer‑safe container. Cover tightly with plastic wrap, ensuring no air pockets remain. Freeze for 45 minutes to an hour, or until the edges start to set. The center should still be slightly soft, which is ideal for scooping. This step ensures that the frozen yo has a smooth, scoopable texture.
Step 8: Once the mixture is partially frozen, remove it from the freezer and stir vigorously with a fork or whisk. This breaks up ice crystals and ensures a creamy consistency. Return the container to the freezer for another 15–20 minutes. The final texture should be firm but still easy to scoop. This step is essential for preventing a grainy finish.
Step 9: After the final freeze, allow the frozen yo to sit at room temperature for 5 minutes before scooping. This brief rest helps the texture soften just enough for a perfect bite. Use a small ice cream scoop or a spoon to serve. The dessert should be firm yet creamy, with a bright pink hue that’s impossible to ignore.
Step 10: Serve immediately, or store the frozen yo in an airtight container for up to two weeks. If you’re serving it at a party, keep it in the freezer until the last minute. The dessert’s bright color and glossy finish will be the star of any gathering. Enjoy the creamy, sweet, and slightly earthy flavor that’s sure to delight.
That’s it— you did it. But hold on, I’ve got a few more tricks that will elevate this frozen yo to another level. The next section will dive into insider tips that even seasoned chefs swear by. These are the little details that separate a good dessert from a legendary one.
Insider Tricks for Flawless Results
The Temperature Rule Nobody Follows
One of the biggest mistakes people make is freezing the mixture at room temperature. The ideal approach is to let the strawberry–yogurt blend chill in the refrigerator for at least an hour before adding it to the freezer. This pre‑chilling step ensures that the mixture freezes evenly, preventing ice crystals from forming. I once froze a batch straight from the blender and the texture was grainy—lesson learned. Keep the mixture cold, and you’ll enjoy a silky finish.
Why Your Nose Knows Best
The aroma of the strawberries is a powerful indicator of freshness. If the strawberries smell slightly fermented or off, they’ve likely gone bad, which will ruin the entire dessert. The vanilla and maple syrup should emit a warm, comforting scent that signals the right balance of flavors. When you smell the mixture, you’re already halfway to a perfect frozen yo. Trust your nose—it’s a reliable guide.
The 5-Minute Rest That Changes Everything
After the final freeze, let the frozen yo sit at room temperature for exactly five minutes before scooping. This short rest softens the surface enough to scoop easily while keeping the interior firm. Skipping this step can lead to a hard, unappetizing bite. The five‑minute rule is simple, but it’s a game‑changer that many overlook.
Keep It Smooth, Don’t Over‑Freeze
Over‑freezing can cause the mixture to become rock‑hard and difficult to scoop. The sweet spot is when the edges are set, but the center remains slightly soft. If the dessert is too hard, it will feel like chewing on a stone. I’ve seen people pull out a frozen yo that’s so hard it cracks the spoon—don’t let that happen to you.
Use a Silicone Spoon for Serving
When serving the frozen yo, use a silicone spoon or an ice cream scoop. These utensils won’t stick to the mixture, making it easier to get a clean, perfect scoop each time. A regular metal spoon can leave a sticky residue that’s hard to clean and can alter the texture. Keep it smooth and clean for the best experience.
The 30‑Second Shake Trick
After the final freeze, give the container a quick 30‑second shake before scooping. This helps redistribute any ice crystals that may have settled at the bottom, ensuring a uniform texture. It’s a simple trick that can make the difference between a flawless dessert and a slightly uneven one.
Now that you’ve mastered the base recipe, it’s time to explore creative twists that will keep your dessert menu fresh and exciting. The next section will give you a playground of variations that cater to different tastes and dietary preferences.
Creative Twists and Variations
Minty Fresh Twist
For a refreshing kick, add a handful of fresh mint leaves to the blender along with the strawberries. The mint’s bright, aromatic flavor pairs beautifully with the sweetness of the yogurt, creating a cooling effect. This variation is perfect for hot summer days. The mint also adds a subtle green hue that contrasts nicely with the pink base.
Chocolate Chip Crunch
Drop in a handful of dark chocolate chips during the final blend. The chips melt slightly, giving the frozen yo a delightful crunch and a richer chocolate flavor. This is a hit with kids who love chocolate. The dark chocolate’s bitterness balances the sweetness, making each bite more complex.
Almond Butter Swirl
Swirl in a tablespoon of almond butter for a nutty undertone. The almond butter adds a creamy, slightly salty flavor that complements the maple syrup’s sweetness. It also introduces a subtle nutty aroma that enhances the overall experience. This variation is ideal for those who want a protein boost.
Berry Medley Mix‑In
Incorporate a mix of frozen blueberries and raspberries into the blender. This creates a multi‑berry flavor profile and adds a pop of color. The blueberries add a subtle tartness, while the raspberries bring a deep, earthy sweetness. The result is a vibrant, fruit‑rich dessert.
Spiced Cinnamon Kick
Add a pinch of ground cinnamon to the blend. Cinnamon adds warmth and depth, turning the frozen yo into a cozy treat. It pairs well with the maple syrup, creating a comforting, autumn‑inspired flavor. This variation is perfect for cooler evenings.
Protein Power Upgrade
Blend in a scoop of vanilla protein powder to boost the protein content. The protein powder should be low‑sugar and unflavored to avoid altering the taste. This upgrade turns the dessert into a post‑workout treat that’s still indulgent. The protein powder also helps stabilize the mixture, keeping it smooth.
This recipe is a playground. Here are some of my favorite ways to switch things up: from minty fresh to chocolate chip crunch, each variation offers a new flavor adventure. Feel free to experiment and discover your own signature twist.
Storing and Bringing It Back to Life
Fridge Storage
If you need to keep the frozen yo for a short period, store it in the refrigerator for up to 48 hours. Keep the container tightly sealed to prevent it from absorbing any odors. When you’re ready to serve, let it sit at room temperature for a few minutes to soften. This method is ideal for quick dessert fixes during a dinner party.
Freezer Friendly
For long‑term storage, keep the frozen yo in the freezer for up to two weeks. Wrap the container in plastic wrap and then a layer of aluminum foil to protect it from freezer burn. When you’re ready to serve, remove it from the freezer and let it sit for 5 minutes before scooping. This will preserve the creamy texture.
Best Reheating Method
To reheat a frozen yo, place a small portion in a microwave‑safe bowl for 10–15 seconds. Stir gently to redistribute the heat evenly. If you prefer a warmer dessert, let the frozen yo sit at room temperature for 10 minutes. Adding a splash of milk or yogurt before reheating can help restore the original consistency.
Everything’s prepped? Good. Let’s get into the real action. The method is straightforward, but the timing and technique are key to achieving the perfect texture. I’ll walk you through each step, making sure you don’t miss any crucial detail. The process is so simple that even a novice can master it, and the result will be a dessert that looks and tastes like it was made by a seasoned chef.
That’s it— you did it. But hold on, I’ve got a few more tricks that will elevate this frozen yo to another level. The next section will dive into insider tips that even seasoned chefs swear by. These are the little details that separate a good dessert from a legendary one.
Now that you’ve mastered the base recipe, it’s time to explore creative twists that will keep your dessert menu fresh and exciting. The next section will give you a playground of variations that cater to different tastes and dietary preferences.
Picture yourself pulling this out of the freezer, the whole kitchen smelling incredible, and the first spoonful melting on your tongue like a summer breeze. This is hands down the best version you’ll ever make at home, and I’m about to show you how to achieve it. The secret lies in the combination of frozen strawberries and tapioca starch, which together create a silky, scoopable consistency that’s surprisingly easy to handle. The optional beet powder is not just a color enhancer; it also adds a pop of color that makes the dessert Instagram‑worthy. The white chocolate, when melted into the mix, adds a luxurious, glossy finish that makes the dessert feel like a treat you’d get at a fancy café.
When you’re ready to serve, let the frozen yo sit at room temperature for 5 minutes before scooping. This brief rest helps the texture soften just enough for a perfect bite. Use a small ice cream scoop or a spoon to serve. The dessert should be firm yet creamy, with a bright pink hue that’s impossible to ignore. The texture will be silky, and the flavor will linger on the palate.
And now the fun part—serving it in a creative way. Try spooning the frozen yo into a hollowed‑out strawberry or a small chocolate cup for an elegant presentation. The presentation alone will make your guests feel like they’ve just stepped into a fancy dessert bar. I’ll be honest—I ate half the batch before anyone else got to try it, and they all wanted more.
Picture the moment when you serve the frozen yo at a gathering and everyone’s eyes widen at the vibrant color. The first bite is a burst of sweet, tart, and creamy flavors that dance together. The dessert is so smooth that it practically melts on the tongue, leaving a lingering aftertaste of fresh strawberries and maple. It’s the kind of dessert that turns an ordinary evening into a memorable celebration.
Okay, ready for the game‑changer? The optional beet powder adds a subtle earthy sweetness that pairs perfectly with the maple syrup. The white chocolate, when melted into the mix, adds a glossy sheen that makes the dessert look like it’s been dipped in a sugary glaze. Every ingredient is chosen for its unique contribution to the overall sensory experience. You’ll be amazed at how each component interacts, creating a dessert that’s both simple and sophisticated.
Now let’s talk about storage. If you’ve made a surplus, you can store the frozen yo in an airtight container in the freezer for up to two weeks. The bright pink color will stay vibrant, and the texture will remain smooth. When you’re ready to serve, let it sit at room temperature for a few minutes to soften. If you’re serving it at a party, keep it in the freezer until the last minute.
Storing and bringing it back to life is simple. Keep the frozen yo in the refrigerator for up to 48 hours. Wrap the container tightly to prevent it from absorbing any odors. When you’re ready to serve, let it sit at room temperature for a few minutes to soften. This method is ideal for quick dessert fixes during a dinner party.
All right, that’s the entire process. The recipe is so straightforward that you can make it in under fifteen minutes, and the result is a dessert that looks and tastes like it was made by a seasoned chef. I’ve spent countless hours refining this recipe, and the results are consistently flawless. If you’ve ever struggled with this, you’re not alone— and I’ve got the fix.
Now, let’s break down exactly what goes into this masterpiece. Below, you’ll find the essential bullet points that explain why this recipe is a game‑changer. Each point is followed by a short explanation that will give you a deeper understanding of the magic behind the ingredients. The next part? Pure magic.
Okay, ready for the game‑changer? The optional beet powder adds a subtle earthy sweetness that pairs perfectly with the maple syrup. The white chocolate, when melted into the mix, adds a glossy sheen that makes the dessert look like it’s been dipped in a sugary glaze. Every ingredient is chosen for its unique contribution to the overall sensory experience. You’ll be amazed at how each component interacts, creating a dessert that’s both simple and sophisticated.
Now, let’s talk about storage. If you’ve made a surplus, you can store the frozen yo in an airtight container in the freezer for up to two weeks. The bright pink color will stay vibrant, and the texture will remain smooth. When you’re ready to serve, let it sit at room temperature for a few minutes to soften. If you’re serving it at a party, keep it in the freezer until the last minute.
All right, that’s the entire process. The recipe is so straightforward that you can make it in under fifteen minutes, and the result is a dessert that looks and tastes like it was made by a seasoned chef. I’ve spent countless hours refining this recipe, and the results are consistently flawless. If you’ve ever struggled with this, you’re not alone— and I’ve got the fix.
Now, let’s break down exactly what goes into this masterpiece. Below, you’ll find the essential bullet points that explain why this recipe is a game‑changer. Each point is followed by a short explanation that will give you a deeper understanding of the magic behind the ingredients. The next part? Pure magic.