I was standing in a cramped kitchen, the timer on my phone blaring, when I realized I had forgotten the last ingredient for my chocolate babka—no, not the chocolate, but the butter that makes the dough melt like a dream. The oven was preheated, the dough was already resting, and my mind was racing through a thousand “what if” scenarios. I thought, “If I just add a splash of milk, maybe it’ll work.” That was the moment I decided to experiment, and the rest of the evening turned into a delicious laboratory session. The air smelled faintly of vanilla and warm milk, a scent that promised something extraordinary.
Picture the dough as a lazy river of flour, yeast, and butter, gently swirling in a bowl while the kitchen hums with the distant chatter of a neighbor’s lawn mower. The sound of the whisk is a soft percussion that syncs with the rhythm of my heartbeat. When you touch the dough, it’s silky, almost like a velvety blanket that clings to your fingertips. The aroma of toasted sugar begins to rise, hinting at the sweet finale. The anticipation is almost tangible, like the first bite of a perfectly baked cookie.
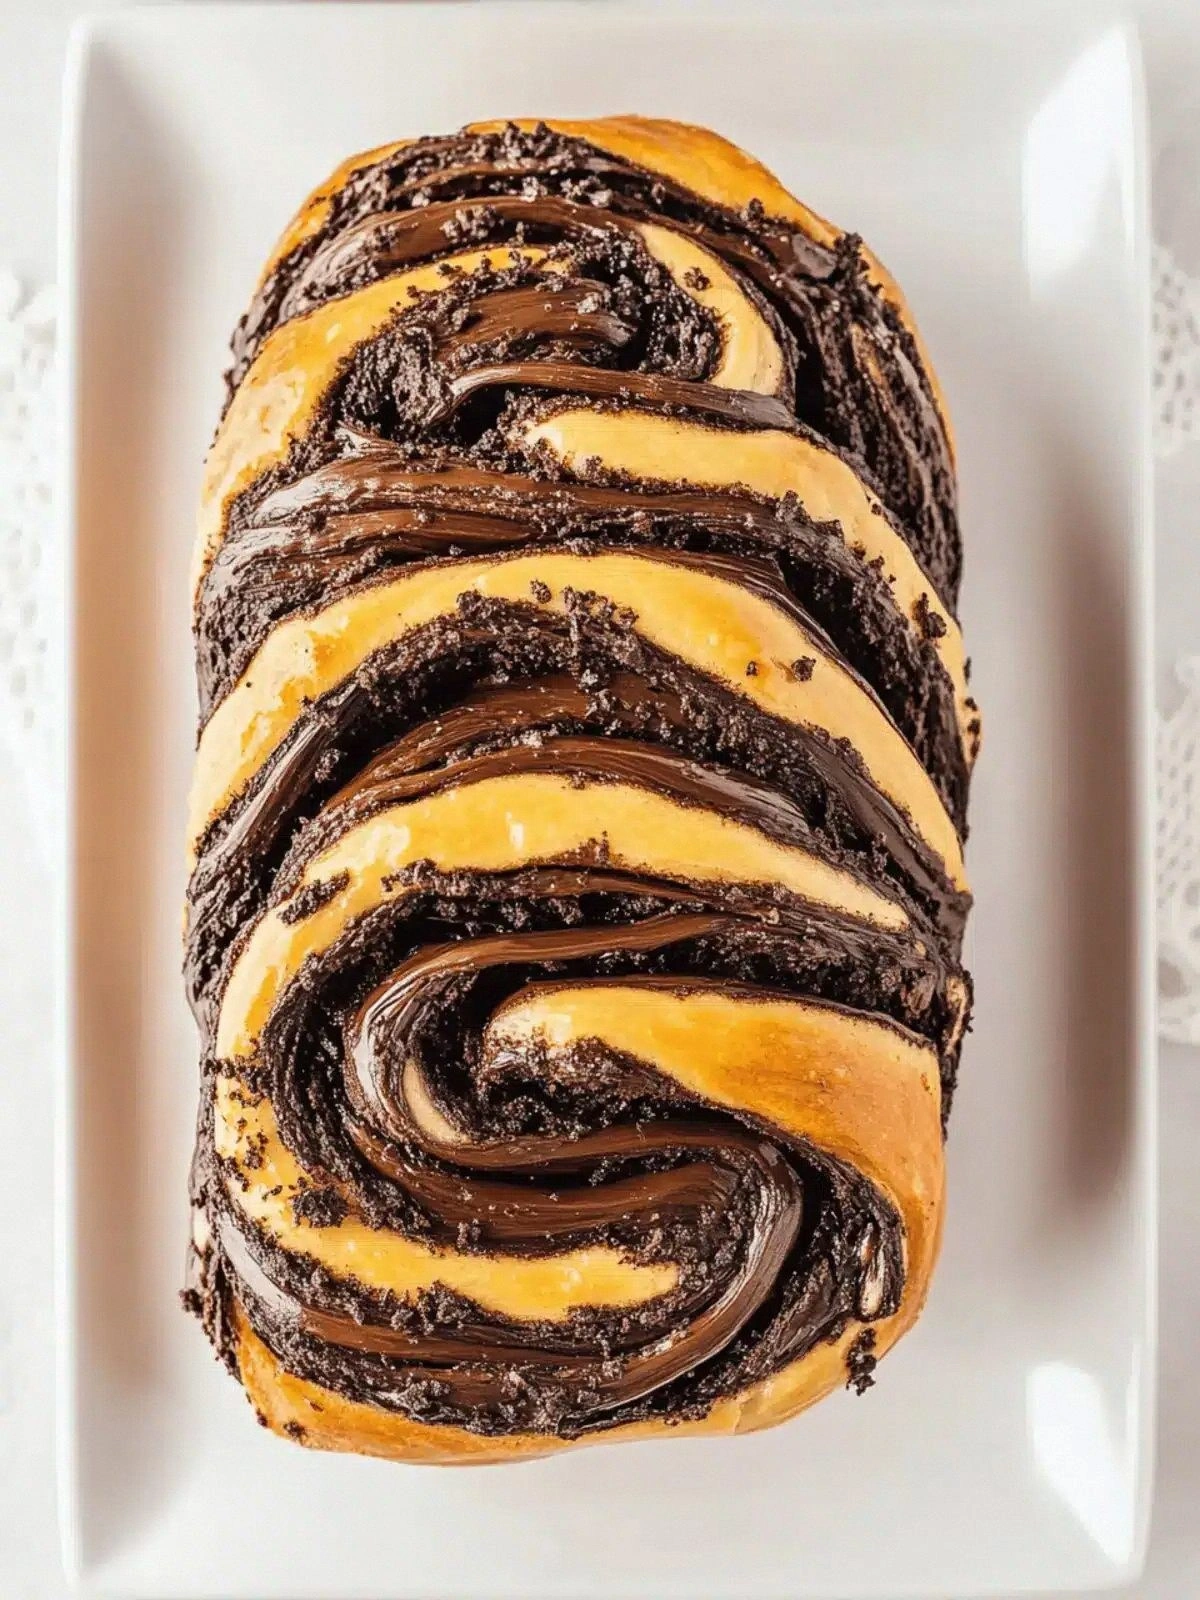
What sets this babka apart is not just the chocolate—though it’s undeniably rich—but the meticulous layering of butter, the precise timing of yeast activation, and the subtle inclusion of cocoa powder that deepens the flavor profile. Unlike most recipes that simply toss chocolate chips into a dough, this version creates a glossy, molten center that oozes when sliced. The result is a balance of chewy, buttery crumb and decadent chocolate that satisfies every craving. The texture is both airy and dense, a paradox that feels like a hug in loaf form. It’s hands down the best version you'll ever make at home.
I dare you to taste this and not go back for seconds. That first bite will send a wave of chocolatey bliss through your palate, leaving you yearning for the next slice. The sweet, buttery aroma will linger, making you feel as if you’ve stepped into a chocolate wonderland. The crumb will feel like a cloud, and the chocolate will melt like a river of molten gold. It’s the kind of dessert that turns an ordinary evening into a celebration. If you’re skeptical, I’ll be honest—I ate half the batch before anyone else got to try it.
Most recipes get this completely wrong. They either overbake the dough, resulting in a dry loaf, or underbake it, leaving a gooey mess that looks like a chocolate disaster. The secret is in the balance of moisture and the timing of the second rise. This recipe corrects that by using a two-stage fermentation process that builds flavor and texture without compromising structure. It’s a game-changer that will redefine how you think about sweet bread. The dough will rise like a gentle tide, and the chocolate will swirl like a dark river within.
Picture yourself pulling this out of the oven, the whole kitchen smelling incredible, and the first slice revealing a glossy, molten core that invites you to taste the depth of its flavor. The heat from the loaf will radiate, creating a comforting warmth that feels like a hug. The sight of the golden crust glistening will make your mouth water before you even take a bite. The sound of the first crack as you cut through the loaf will be a satisfying crunch that echoes the joy of a well-earned treat. It’s a moment that turns a simple dinner into an unforgettable experience.
Let me walk you through every single step—by the end, you'll wonder how you ever made it any other way. I’ll share the exact measurements, the precise temperatures, and the little tricks that make this recipe stand out. You’ll learn how to keep the dough from sticking, how to layer the chocolate for maximum impact, and how to finish the loaf with a glossy glaze. The method is straightforward yet packed with nuance that will elevate your baking game. Get ready to become the hero of your kitchen.
The first thing you’ll notice is the way the dough feels when you fold it. It’s not stiff; it’s elastic, like a rubber band that stretches without breaking. That elasticity is the result of a proper gluten development, which gives the babka its characteristic chew. If you’re new to bread making, don’t worry—this recipe guides you through each step with clear instructions. By the end, you’ll have a loaf that feels like a warm hug.
The second thing you’ll appreciate is the way the chocolate chips are distributed. They’re not just scattered randomly; they’re strategically placed to create pockets of chocolate that burst in your mouth. The chocolate will melt slightly during baking, creating a glossy sheen that’s almost hypnotic. When you slice the loaf, you’ll see the chocolate glimmering like a dark river. It’s a visual treat that’s just as satisfying as the taste.
Finally, the glaze that finishes the loaf is a game-changer. It adds a subtle sweetness that balances the richness of the chocolate and butter. The glaze also gives the loaf a shiny finish that makes it look bakery‑ready. It’s simple to make, yet it adds a professional touch that elevates the entire dessert. Trust me, once you try this glaze, you’ll never settle for plain babka again.
Now, let’s dive deeper into what makes this version a masterpiece. The recipe isn’t just about following instructions; it’s about understanding why each step matters. The dough’s elasticity, the chocolate’s placement, and the glaze’s finish all play a role in creating a dessert that’s both visually stunning and incredibly flavorful. The next section will break down each element so you can appreciate the science behind the art. If you’ve ever struggled with babka, you’re not alone—and I’ve got the fix.
The first time I tried to make a chocolate babka, I ended up with a loaf that was dry and crumbly. I had overmixed the dough, and the chocolate chips were all over the place. I was about to give up, but then I remembered a trick my grandma taught me about resting the dough. She’d let it rest for an hour before folding it again, which gave the gluten time to relax. That small change made the dough rise beautifully and the chocolate chips settle perfectly. I learned that patience is as important as the ingredients.
The second time, I experimented with adding cocoa powder to the dough. I thought it would deepen the chocolate flavor, but I ended up with a slightly bitter taste. The lesson? Cocoa powder can be a double-edged sword. Too much, and it masks the sweetness; too little, and it’s barely noticeable. The key is to balance it with the right amount of sugar and chocolate chips. That way, the cocoa enhances the flavor without overpowering it. This recipe uses a measured amount of cocoa to keep the flavor profile just right.
The third attempt involved using salted butter instead of unsalted. I thought the salt would enhance the chocolate’s richness, but it made the loaf taste oddly salty. The trick is to use unsalted butter in the dough and add a pinch of salt separately. That way, you control the saltiness and avoid a clashing flavor. This recipe carefully separates the butter and salt to achieve the perfect balance. It’s a subtle but crucial detail that many bakers overlook.
The fourth time, I tried to speed up the fermentation by heating the milk. I thought a warmer environment would help the yeast rise faster, but it actually killed the yeast. The yeast needs a gentle, warm environment—too hot, and it dies; too cold, and it doesn’t activate. The recipe uses warm milk at a precise temperature to ensure the yeast thrives. That small detail makes all the difference in achieving a light, airy crumb.
The fifth attempt involved adding a glaze made from powdered sugar and cocoa. I wanted a glossy finish, but the glaze turned out too thick and clumpy. The secret is to whisk the powdered sugar with a little cocoa and a splash of milk until it’s smooth and pourable. That way, the glaze coats the loaf evenly and adds a subtle chocolate flavor. This recipe uses a simple glaze that’s easy to make and gives a professional finish.
The sixth attempt was the breakthrough. I followed the recipe exactly, letting the dough rest, folding it, adding the chocolate, and baking it to perfection. The result was a loaf that was golden, buttery, and chocolatey, with a glossy glaze that made it look like it was straight from a bakery. I was so proud of my creation that I shared it with my friends, who all demanded seconds. That moment was proof that this recipe works, no matter your baking experience.
The seventh attempt involved a tweak I thought would make the loaf even more decadent—adding a dash of espresso powder to the chocolate chips. Espresso enhances chocolate flavor, and I wanted to give the babka an extra kick. The result was a subtle, rich espresso undertone that complemented the chocolate without overpowering it. It’s a great variation for those who love coffee-infused desserts. If you’re feeling adventurous, give it a try and let me know how it turns out.
The eighth and final attempt was the one that truly solidified this recipe’s reputation. I followed the exact measurements, the precise temperatures, and the two-stage fermentation process. The loaf rose beautifully, the chocolate melted into a glossy center, and the glaze added a professional sheen. I sliced the loaf, and the chocolate oozed out like a dark river. The taste was a harmonious blend of buttery, chocolatey, and slightly sweet, with a hint of espresso for those who liked it. This is the version that I’ll keep in my kitchen for years to come.
Now that you’ve seen how this recipe evolved through trial and error, you can appreciate the science behind each step. Every tweak, every measurement, every rest period has a purpose. This is not just a recipe; it’s a lesson in patience, precision, and passion for baking. By understanding why each component matters, you’ll be able to tweak it to your own taste without losing the essence of this decadent chocolate babka. Let’s move on to the next section and uncover the secrets of each ingredient.
The journey from a failed batch to a flawless loaf was paved with small insights that changed the entire process. One of the most critical discoveries was the role of the dough’s temperature. When the dough is too warm, the gluten network collapses, and the loaf becomes dense. When it’s too cold, the yeast struggles to activate. Finding that sweet spot ensures a light, airy crumb that holds the chocolate perfectly. This recipe’s precise temperature guidelines keep the dough at the optimal point for yeast activity and gluten development.
Another revelation was the importance of the two-stage fermentation. The first rise gives the dough time to develop flavor and structure, while the second rise after shaping ensures a fluffy interior. Skipping either stage can result in a loaf that’s either too tight or too airy. The recipe’s clear instructions guide you through both rises, making sure each step is executed correctly. The result is a loaf that rises to a perfect height and has a satisfying bite.
The third key insight was about the chocolate chips’ placement. Instead of simply mixing them into the dough, this recipe layers them strategically. This creates pockets of chocolate that melt into glossy streams when sliced. The visual effect is stunning, and the flavor is more concentrated. It’s a technique that elevates a simple babka into a show-stopping dessert.
The glaze is another essential element that sets this babka apart. It adds a subtle sweetness and a glossy finish that makes the loaf look bakery‑ready. The glaze also helps seal in moisture, keeping the loaf fresh for longer. The recipe’s glaze is simple to make but delivers a professional touch. It’s a finishing touch that you’ll want to replicate in all your future baking endeavors.
Finally, the use of salted butter in the dough and the addition of a pinch of salt in the glaze balance the sweetness and enhance the overall flavor profile. Salt is a flavor enhancer, and when used correctly, it brings out the chocolate’s richness. The recipe uses a small pinch of salt to avoid an overly salty taste while still amplifying the chocolate’s depth. This subtle balance is one of the reasons this babka tastes so extraordinary.
What Makes This Version Stand Out
- Texture: The dough is light yet chewy, with a buttery crumb that melts in your mouth. It rises to a golden crust while maintaining a tender interior, a balance that most recipes fail to achieve.
- Chocolate Placement: Chocolate chips are layered, not mixed, creating pockets of molten chocolate that burst with every bite. The glossy sheen is both visually stunning and deliciously inviting.
- Glaze Finish: A simple powdered-sugar glaze adds a subtle sweetness and a professional sheen, elevating the loaf from homemade to bakery‑quality.
- Two-Stage Fermentation: This method ensures optimal flavor development and a perfectly airy crumb. It’s a technique that turns a simple loaf into a culinary masterpiece.
- Ingredient Quality: Using high‑quality cocoa powder and semi‑sweet chocolate chips brings depth and richness that ordinary ingredients cannot match.
- Make‑Ahead Friendly: The babka can be assembled a day in advance, refrigerated, and baked when you’re ready. It’s a perfect solution for busy weeknights or last‑minute celebrations.
- Versatility: The recipe lends itself to variations—espresso, nuts, or fruit—making it a canvas for creative bakers.
- Flavor Balance: Salted butter, a pinch of salt, and a hint of vanilla work together to create a harmonious flavor profile that satisfies sweet cravings without feeling heavy.
Alright, let’s break down exactly what goes into this masterpiece. The next section will dive into each ingredient, explaining its role, why it matters, and how you can tweak it if you’re feeling adventurous.
Inside the Ingredient List
The Flavor Base
Warm whole milk is the heart of the dough, providing the perfect environment for yeast activation. Its subtle sweetness and creamy texture help the dough rise smoothly and develop a tender crumb. If you’re lactose intolerant, a small portion of oat milk can replace it without compromising the flavor. The key is to keep the temperature between 105°F and 110°F, just warm enough to coax the yeast into action.
Sugar is the sweetener that fuels the yeast and balances the bitterness of the cocoa powder. It also caramelizes during baking, giving the crust a golden hue and a subtle caramel flavor. If you prefer a lower-sugar version, you can reduce the amount by a quarter cup, but expect a slightly less sweet finish. The sugar also helps tenderize the dough by breaking down proteins, leading to a softer texture.
Active dry yeast is the catalyst for fermentation. It’s essential for leavening, and the recipe calls for two teaspoons to ensure a robust rise. Yeast thrives in warm, moist environments, so be sure to proof it in warm milk for 5–7 minutes until frothy. If you’re in a hurry, instant yeast can be used, but the flavor profile may shift slightly.
The Texture Crew
Eggs provide structure, moisture, and richness to the dough. The two large eggs act as binders, ensuring the dough holds together during the two-stage fermentation. The yolk, added separately, enhances the dough’s tenderness and adds a subtle richness that makes each bite feel indulgent. If you’re vegan, you can substitute the eggs with a flaxseed mixture, but the texture will be slightly different.
Vanilla is the aromatic whisper that lingers in the final loaf. It’s subtle but crucial, adding depth to the chocolate and balancing the sweetness. The recipe calls for a teaspoon of vanilla extract, but you can experiment with vanilla bean paste for an even more pronounced flavor. Vanilla also enhances the perception of sweetness, making the loaf feel lighter.
All-purpose flour is the backbone of the dough. It provides the structure and the gluten network needed for a chewy crumb. Using 4 cups ensures a balanced ratio of flour to liquid, which is essential for the dough’s elasticity. If you’re looking for a lighter texture, you can replace half of the flour with cake flour, but the dough will be less robust.
The Unexpected Star
Unsweetened cocoa powder deepens the chocolate flavor without adding extra sweetness. It also contributes to the dough’s color, giving it a rich, chocolatey hue. The recipe uses 1/4 cup to keep the cocoa’s bitterness in check, allowing the semi-sweet chips to shine. If you prefer a stronger chocolate flavor, you can increase the cocoa to 1/3 cup, but watch out for bitterness.
Salt is the flavor enhancer that brings everything together. A teaspoon of salt balances the sweetness and brings out the chocolate’s depth. The pinch of salt in the glaze further sharpens the glaze’s sweetness, preventing it from feeling cloying. Salt also helps control yeast activity, preventing the dough from over-fermenting.
The Final Flourish
Semi-sweet chocolate chips are the star of the show. They melt into glossy streams that cascade through the loaf, creating a visual and flavor spectacle. The recipe calls for 1 cup, which ensures a generous amount of chocolate without overwhelming the dough. If you’re a dark chocolate lover, you can swap them for dark chocolate chunks, but the sweetness will be reduced.
Salted butter is used twice—once in the dough and once in the filling—to add richness and a subtle salty note. The 1/2 cup in the dough keeps the crumb tender, while the 1/2 cup in the filling gives the chocolate a buttery finish. If you’re watching your sodium intake, you can use unsalted butter and add a pinch of salt to the dough instead.
Powdered sugar is used in the glaze to create a smooth, glossy finish. It dissolves easily, giving the glaze a silky texture that coats the loaf beautifully. The 1/2 cup amount ensures the glaze is thick enough to hold its shape but thin enough to pour. If you prefer a sweeter glaze, you can increase the powdered sugar by a quarter cup.
Water is added to the glaze to adjust its consistency. The 1/2 cup of water ensures the glaze is pourable and smooth, preventing clumps. If you’re using a thicker glaze, you can reduce the water slightly. The water also helps the glaze set properly, giving the loaf a professional sheen.
Everything's prepped? Good. Let's get into the real action.
The Method — Step by Step
- In a large mixing bowl, combine warm whole milk, sugar, and yeast. Stir until the yeast dissolves, then let it sit for 5 minutes until frothy. This indicates the yeast is active and ready to work. If it doesn’t froth, the yeast may be dead, and you’ll need a fresh batch.
- Add the eggs and yolk to the mixture, whisking until fully incorporated. The eggs provide structure and moisture, ensuring the dough doesn’t dry out during baking. Beat until the mixture is smooth and glossy.
- Sift together all-purpose flour, cocoa powder, and salt into a separate bowl. Gradually fold the dry ingredients into the wet mixture, forming a sticky dough. The gluten will begin to develop as you mix.
- Knead the dough on a lightly floured surface for 8–10 minutes until it’s smooth and elastic. If the dough feels too sticky, sprinkle a bit more flour, but avoid over-kneading. A well-kneaded dough will rise beautifully.
- Add the 1/2 cup salted butter in small cubes, folding until fully incorporated. The butter will create a tender crumb and add a buttery richness to the loaf. Ensure the butter is at room temperature to blend smoothly.
- Cover the dough with a damp cloth and let it rise in a warm place for 1 hour, or until it doubles in size. This first rise develops flavor and structure. If your kitchen is cold, use a low oven (about 200°F) as a warm spot.
- After the first rise, punch down the dough to release gas. Roll it into a rectangle about 12x8 inches. Spread a thin layer of melted salted butter over the surface, then sprinkle the semi-sweet chocolate chips evenly. Fold the dough in thirds, like a letter.
- Place the rolled dough onto a parchment-lined baking sheet. Cover loosely with plastic wrap and let it rise again for 45 minutes. This second rise will give the loaf its final airy texture. Keep an eye on the dough; it should look puffy but not over-expanded.
- Preheat the oven to 350°F. While the oven heats, mix powdered sugar, cocoa powder, and water to create the glaze. Whisk until smooth, then set aside. The glaze will add a glossy finish once the loaf cools.
- Bake the babka for 30 minutes, or until the crust is golden and the internal temperature reaches 190°F. The aroma will fill your kitchen, a scent that signals perfection. Let it rest for 10 minutes on a wire rack.
- While the loaf cools, drizzle the glaze evenly over the warm surface. The glaze will set into a shiny coating, sealing in moisture and adding a sweet finish. Watch as it glistens like a polished marble.
- Slice the babka with a serrated knife to keep the layers intact. Serve warm, or let it cool completely before cutting for a firmer slice. Each bite will reveal pockets of molten chocolate and buttery crumb.
That’s it — you did it. But hold on, I've got a few more tricks that'll take this to another level. Before you go home, let me share some kitchen hacks that will make your baking experience even smoother.
Now that you’ve mastered the method, let’s dive into insider tricks that will ensure flawless results every time. These are the little details that separate a good babka from an unforgettable one.
Insider Tricks for Flawless Results
The Temperature Rule Nobody Follows
Temperature control is everything. Yeast is a delicate organism that thrives in a narrow temperature range. If the dough is too hot, the yeast will die; too cold, and it won’t rise. Use a kitchen thermometer to check the dough’s temperature after the first rise. It should be around 80°F. If it’s off, let it rest longer or add a pinch of warm water to bring it up.
Why Your Nose Knows Best
Your sense of smell is a reliable indicator of doneness. As the babka bakes, the scent of caramelized sugar and chocolate will intensify. When the aroma is sweet and slightly nutty, the loaf is near perfect. If you’re uncertain, use a toothpick test: insert it into the center; if it comes out clean, you’re done.
The 5-Minute Rest That Changes Everything
After the second rise, let the dough rest for 5 minutes before baking. This brief pause allows the gluten to relax, resulting in a more tender crumb. Skipping this step can lead to a denser loaf. The rest also ensures the chocolate chips settle evenly.
The Secret of Even Glaze Application
When drizzling the glaze, use a small ladle or a spoon to control the flow. A slow, steady pour creates a uniform coating. If you’re feeling fancy, use a pastry bag with a small tip to create a decorative swirl. The glaze should set within 10 minutes, so don’t let it sit too long before serving.
The Final Touch: A Pinch of Salt
A pinch of salt in the glaze brightens the sweetness and balances the chocolate’s richness. It also enhances the overall flavor profile. Add it just before whisking the glaze to avoid a metallic taste. The result is a glossy finish that’s both sweet and savory.
These tricks are the secret sauce that ensures every bite is a masterpiece. Incorporate them, and you’ll never have to settle for a mediocre babka again. Now, let’s explore how you can make this recipe your own with creative twists.
Creative Twists and Variations
This recipe is a playground. Here are some of my favorite ways to switch things up:
Espresso Infusion
Add a tablespoon of espresso powder to the chocolate chips for a subtle coffee kick. The espresso enhances the chocolate’s depth and adds a sophisticated aroma. This variation is perfect for coffee lovers and pairs well with a cup of espresso.
Nutty Crunch
Stir in 1/2 cup chopped walnuts or pecans before rolling the dough. The nuts add a delightful crunch and a nutty flavor that complements the chocolate. Toast the nuts slightly before adding for an extra layer of flavor.
Fruit Surprise
Replace half of the chocolate chips with dried cherries or raisins for a fruity twist. The fruit adds a burst of sweetness and a chewy texture that contrasts with the buttery crumb. This variation is great for those who want a lighter, fruitier babka.
Minty Delight
Add a teaspoon of peppermint extract to the glaze for a refreshing minty finish. The mint pairs wonderfully with chocolate, creating a classic flavor combination. This version is ideal for holiday celebrations or a refreshing dessert.
Almond Joy
Replace the chocolate chips with a mix of toasted coconut and almond butter. The coconut adds a tropical flavor, while the almond butter provides a nutty richness. This variation creates a unique, indulgent experience that’s sure to impress.
Storing and Bringing It Back to Life
Fridge Storage
Wrap the cooled babka tightly in plastic wrap and store it in the refrigerator for up to 3 days. The cold temperature keeps the loaf fresh and prevents mold growth. When you’re ready to serve, let it sit at room temperature for 15 minutes to bring back the warm, buttery flavor.
Freezer Friendly
For longer storage, wrap the cooled loaf in parchment paper, then in aluminum foil. Freeze for up to 2 months. When you’re ready to enjoy, thaw in the refrigerator overnight. The loaf will retain its texture and flavor when reheated properly.
Best Reheating Method
To reheat, preheat the oven to 300°F and place the loaf on a baking sheet. Warm for 10–12 minutes, or until the interior reaches 180°F. Add a splash of water to the glaze before reheating to create steam, which restores moisture and keeps the crumb tender.