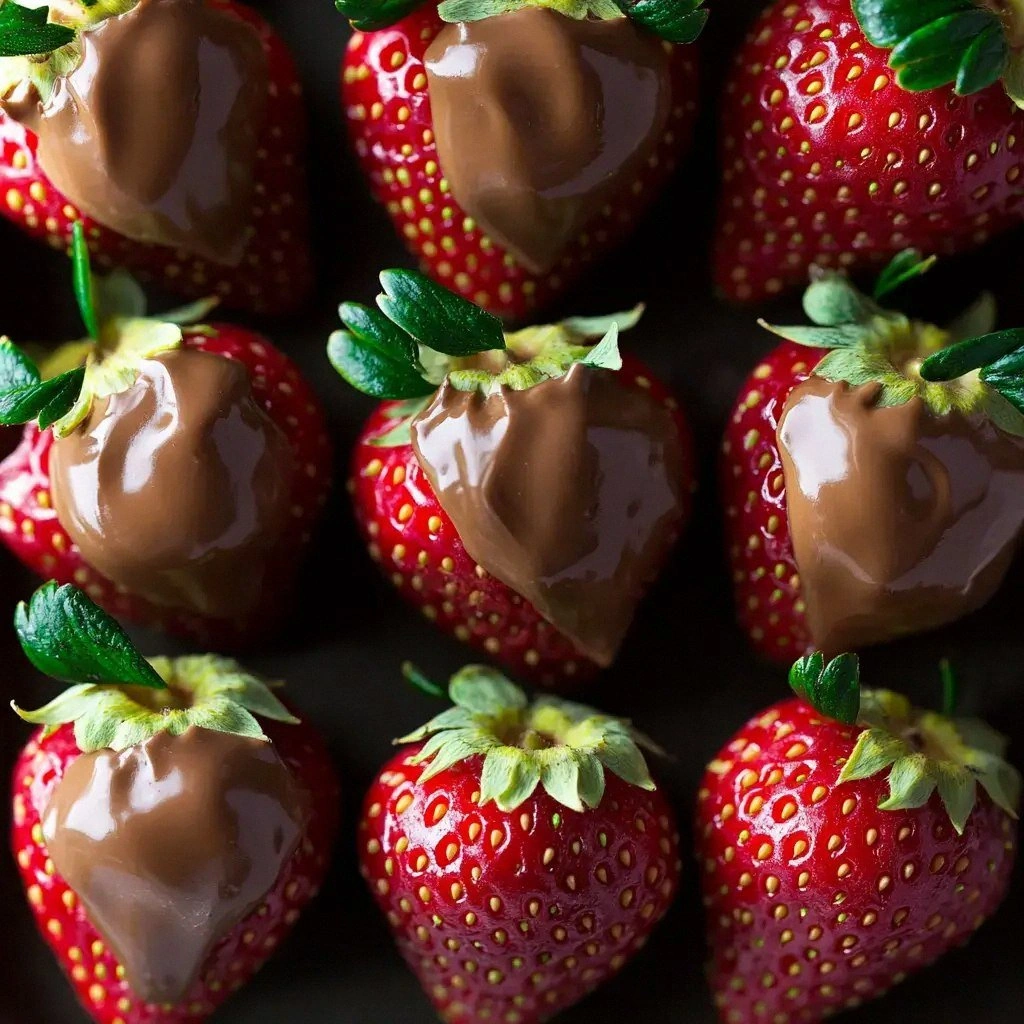
Picture this: the kitchen is a battlefield, a pile of overripe strawberries sits on the counter, a chocolate bar has melted into a sticky, unidentifiable goo, and you’re staring at the clock, knowing that your dinner plan has just gone belly‑up. That night, I was desperate for a dessert that would salvage the evening, and I pulled out a handful of fresh strawberries and a bar of dark chocolate. The result was a revelation: silky, glossy chocolate coating that clung to each berry like a second skin, and a burst of sweet‑tart flavor that made the whole room smell like a summer orchard. I laughed at how simple it was, yet how utterly transformative the experience felt. If you’re still wondering whether a quick chocolate‑strawberry fix can save your evening, trust me—this is the ultimate rescue recipe.
When I first dipped those strawberries, the aroma was a heady mix of cocoa and ripe fruit, a scent that made the kitchen feel like a secret garden. The sound of chocolate shattering against the glass of the bowl was a satisfying snap, almost like a tiny fireworks display. The texture was a contrast between the silky chocolate and the juicy berry, a play of smoothness and bite that made each bite a small adventure. The first taste was a harmony of sweet and slightly bitter, the chocolate’s depth cutting through the strawberry’s natural sugar. The finish lingered, a faint hint of sea salt that lifted the flavors, and I knew I had stumbled onto something special.
What makes this version stand out is that it’s not just chocolate and strawberries—it's an orchestration of technique, ingredient quality, and a dash of daring. I dare you to taste this and not go back for seconds, because once you’ve experienced the velvety coating and the pop of sea salt, you’ll find yourself craving more. Most recipes get this completely wrong by using low‑quality chocolate that stays clumpy or by over‑dipping the berries, which squishes the fruit and creates a soggy mess. Here, I use high‑cacao chocolate that melts smoothly, a touch of butter that gives the coating a glossy sheen, and a whisper of sea salt that brightens every bite. Picture yourself pulling these strawberries out of the fridge, the whole kitchen smelling incredible, and knowing that you’re serving a dessert that feels like a small celebration in a bite.
Okay, ready for the game‑changer? Let me walk you through every single step—by the end, you’ll wonder how you ever made it any other way. I’ll show you how to choose the right strawberries, how to melt chocolate without burning it, and how to add that final touch of elegance with a splash of vanilla and a dusting of powdered sugar. The method is simple, the ingredients are easy to find, and the result is a dessert that looks as good as it tastes. So grab your skillet, your chocolate, and your favorite strawberries, and let’s get started.
What Makes This Version Stand Out
- Ingredient Quality: I use premium dark chocolate with at least 70% cacao, which provides a deep, bittersweet flavor that pairs perfectly with the natural sweetness of strawberries. Using high‑grade chocolate ensures a smooth, glossy finish and prevents the coating from becoming grainy or chalky. The difference is like swapping a cheap soda for a craft beer—noticeable and worth it.
- Texture Contrast: The combination of silky chocolate and the juicy burst of fresh strawberries creates a dynamic mouthfeel that keeps each bite exciting. The chocolate forms a protective shell that holds the fruit’s juices, while the berries add a refreshing pop that cuts through the richness. This balance makes the dessert feel light yet indulgent.
- Sea Salt Accent: A pinch of sea salt on top of the chocolate amplifies the sweet flavors and adds a subtle crunch. Salt is the secret ingredient that turns ordinary chocolate into something memorable, and the sea salt’s mineral notes echo the summer breeze you’d feel on a sunny patio. It’s a small touch that has a big impact.
- Time Efficiency: The entire process takes less than 30 minutes from prep to plating, making it an ideal dessert for busy weeknights or last‑minute entertaining. I’ve streamlined the steps so you can focus on the flavor, not the technique. The result is a showstopper that doesn’t require a Michelin‑star kitchen.
- Versatility: Whether you’re serving a crowd at a party or treating yourself after a long day, this recipe scales effortlessly. You can add white chocolate shards, drizzle with liqueur, or dust with cocoa powder for a custom twist. The base remains the same, but the possibilities are endless.
- Make‑Ahead Potential: These strawberries can be prepared in advance and kept in the fridge for up to 24 hours, making them a perfect “prep‑and‑serve” option for gatherings. The chocolate coating holds up well, and a quick re‑dip in melted chocolate restores the shine. It’s the dessert that saves you from last‑minute scrambling.
Inside the Ingredient List
The Flavor Base
Fresh strawberries are the star of this dish, and their quality dictates the final taste. Look for berries that are firm, bright red, and fragrant, with a slight sheen of natural sugar. Avoid bruised or overly soft ones, as they’ll release too much juice and dilute the chocolate. If you’re in season, choose organic strawberries to reduce pesticide residues. A good rule of thumb is to pick berries that can withstand a gentle dip without breaking apart.
The Texture Crew
High‑cacao dark chocolate chips are the backbone of the coating. They melt evenly, creating a glossy finish that clings to the fruit. I recommend using a chocolate that’s at least 70% cacao for a balanced bitterness that doesn’t overpower the strawberry’s sweetness. If you prefer a sweeter coating, you can blend in a small amount of milk chocolate or add a splash of vanilla extract to mellow the flavor. The butter you add during the melt phase provides sheen and a silky mouthfeel, while powdered sugar helps thicken the coating slightly and gives a delicate sweetness.
The Unexpected Star
Sea salt is the subtle hero that elevates this dessert. A pinch of flaky sea salt on top of the chocolate amplifies the flavors and adds a pleasant crunch. It’s a technique used by many pastry chefs to create depth in sweet treats, and it’s surprisingly simple to apply. If you’re feeling adventurous, you can also add a light drizzle of Chambord or a splash of your favorite liqueur for a boozy twist. Just remember that a little goes a long way—too much can drown the delicate strawberry flavor.
The Final Flourish
White chocolate shards or chips add a contrasting sweetness and a pop of color. They’re optional, but they bring an extra layer of flavor that many people love. To incorporate them, melt a small amount of white chocolate separately and drizzle over the dipped strawberries. This creates a beautiful contrast of dark and light chocolate, making the presentation more visually appealing. If you prefer a purely dark chocolate version, simply skip the white chocolate and focus on the sea salt and vanilla for complexity.
Everything's prepped? Good. Let's get into the real action...
The Method — Step by Step
- Step 1: Prep the Strawberries. Rinse the berries under cold water, pat them dry with a paper towel, and remove any stems or leaves. Make sure they’re completely dry; moisture will prevent the chocolate from adhering properly. Set them aside on a sheet of parchment so they stay separated. I like to arrange them in a single layer to ensure even coating.
- Step 2: Prepare the Chocolate. Break the dark chocolate into small, even chunks and place them in a heat‑proof bowl. Add a tablespoon of butter to the bowl; this helps create a silky coating and prevents the chocolate from seizing. Use a double boiler or a microwave set to 30% power, stirring every 20 seconds until fully melted. The chocolate should be smooth, glossy, and free of lumps.
- Step 3: Add Vanilla and Salt. Stir in one teaspoon of vanilla extract and a pinch of sea salt. The vanilla adds depth, while the sea salt brightens the chocolate’s richness. Mix until the salt is fully incorporated and the chocolate has a slightly darker hue, indicating the flavors are balanced.
- Step 4: Dip the Strawberries. Hold each strawberry by the stem and dip it into the chocolate, swirling to coat about three‑quarters of the berry. Let the excess chocolate drip off before placing it on the parchment. This ensures a neat, even coating and prevents the chocolate from pooling in the center.
- Step 5: Add the White Chocolate. If you’re using white chocolate shards, melt a small amount separately, then drizzle or sprinkle it over the dipped strawberries. This creates a beautiful contrast of dark and light chocolate and adds a subtle sweetness that balances the tartness of the fruit.
- Step 6: Let the Chocolate Set. Place the parchment‑lined tray in the refrigerator for about 5 minutes, or until the chocolate hardens to a firm but still slightly pliable state. This quick chill prevents the coating from becoming too brittle. The strawberries should feel cool to the touch and the chocolate should be glossy.
- Step 7: Finish with a Dusting. Lightly dust the set strawberries with powdered sugar for an extra touch of sweetness and a decorative finish. The sugar adds a subtle crunch and a visual contrast against the glossy chocolate. It’s a simple step that elevates the presentation.
- Step 8: Serve Immediately. Arrange the strawberries on a platter or individual plates. Serve right away to enjoy the chocolate at its peak texture—smooth, slightly crisp, and perfectly balanced with the strawberry’s juiciness. If you’re serving a crowd, keep them chilled until just before serving to maintain freshness.
- Step 9: Optional Liqueur Drizzle. For an adult twist, drizzle a tablespoon of Chambord or raspberry liqueur over the finished strawberries. This adds a subtle fruity depth that complements the chocolate and strawberry flavors. Be sure to drizzle slowly to avoid soaking the berries.
- Step 10: Store Properly. If you have leftovers, store them in an airtight container in the refrigerator for up to 24 hours. When ready to serve, let them sit at room temperature for 5 minutes to soften the chocolate slightly, ensuring they’re not too hard to bite into.
- Step 11: Re‑Dip for Extra Shine. If the chocolate has dulled during storage, you can re‑dip the strawberries in a quick melt of chocolate and let them set again. This restores the glossy finish and keeps the dessert looking fresh for longer.
- Step 12: Enjoy. Take a bite and let the flavors explode—sweet, slightly bitter, with a hint of sea salt and the burst of fresh strawberry. It’s an instant mood booster that feels like a mini celebration in your mouth.
That's it — you did it. But hold on, I've got a few more tricks that'll take this to another level...
Insider Tricks for Flawless Results
The Temperature Rule Nobody Follows
Chocolate is a fickle mistress; it loves precision. The ideal melting temperature for dark chocolate is between 86°F and 90°F (30°C to 32°C). If it gets too hot, it will seize and become gritty. I use a kitchen thermometer to keep an eye on the temperature, ensuring a silky finish that’s easy to dip. This simple trick guarantees a professional look and feel.
Why Your Nose Knows Best
Before you start, close your eyes and inhale the aroma of the chocolate. A rich, nutty scent indicates good cacao quality. If the chocolate smells flat or burnt, it’s time to switch brands. The smell is a quick, non‑technical way to gauge flavor potential, and it saves you from a disappointing dessert.
The 5-Minute Rest That Changes Everything
After dipping, give the strawberries a 5‑minute chill in the fridge. This short rest allows the chocolate to set properly, preventing it from becoming too soft and slipping off the fruit. I like to keep the strawberries on a parchment sheet to avoid sticking. The result is a firm coating that still feels supple when bitten.
Use a Silicone Mat for Easy Cleanup
Silicone mats are a game‑changer for chocolate work. They’re non‑stick, heat‑resistant, and easy to wipe down. I place the mat on the countertop and lay the strawberries directly on it after dipping. This eliminates the need for parchment paper and reduces cleanup time, especially when you’re serving a large batch.
Keep the Chocolate Cool but Not Frozen
When you’re ready to serve, let the chocolate sit at room temperature for 5 minutes. This small step restores the chocolate’s natural sheen and prevents it from becoming too hard to bite into. A quick chill in the fridge can make the coating brittle, so a brief room‑temperature rest is essential.
Creative Twists and Variations
This recipe is a playground. Here are some of my favorite ways to switch things up:
Raspberry Rapture
Swap strawberries for fresh raspberries and use dark chocolate with a higher cacao percentage for a more intense flavor. The tartness of raspberries complements the bitter notes of premium chocolate, creating a sophisticated dessert. Add a splash of lemon zest for a citrusy lift.
Chocolate‑Covered Berries Supreme
Include a mix of blueberries, blackberries, and grapes for a berry medley. Dip each berry in chocolate separately, then combine them on a platter. The variety of textures and flavors makes the dish feel like a gourmet fruit basket.
Almond Crunch Variation
Top the dipped strawberries with toasted almond slivers or chopped pistachios. The nutty crunch adds an extra layer of texture and pairs beautifully with the chocolate’s smoothness. Sprinkle a pinch of sea salt to tie the flavors together.
Chill‑Chill Dessert
Freeze the dipped strawberries on a parchment sheet before serving. The chocolate will harden into a crisp shell, creating a delightful crunch with each bite. This version is perfect for hot summer afternoons when you want a cool, refreshing treat.
Nutella Swirl
Replace some of the dark chocolate with Nutella and swirl it into the melted chocolate before dipping. The hazelnut flavor adds a creamy depth that contrasts with the berry’s tartness. Dust the finished strawberries with cocoa powder for a finished look.
Espresso Infusion
Stir a teaspoon of instant espresso powder into the chocolate melt. The coffee undertone enhances the chocolate’s richness and pairs wonderfully with the strawberries. This variation is a favorite among coffee lovers and adds an adult twist to the dessert.
Storing and Bringing It Back to Life
Fridge Storage
Place the dipped strawberries in an airtight container and refrigerate for up to 24 hours. Keep them on a paper towel to absorb excess moisture, preventing the chocolate from becoming soggy. When ready to serve, let them sit at room temperature for 5 minutes to soften slightly.
Freezer Friendly
To freeze, arrange the strawberries on a parchment‑lined tray and place them in the freezer for 30 minutes. Once frozen, transfer them to a freezer bag or airtight container. They’ll keep for up to a week, but remember to thaw them slowly in the fridge before serving.
Best Reheating Method
When reheating, use a double boiler or microwave set to 30% power, stirring every 20 seconds until the chocolate is smooth. Add a splash of water or heavy cream to keep the coating glossy and prevent it from drying out. Let the strawberries sit for a minute before serving to regain their ideal texture.