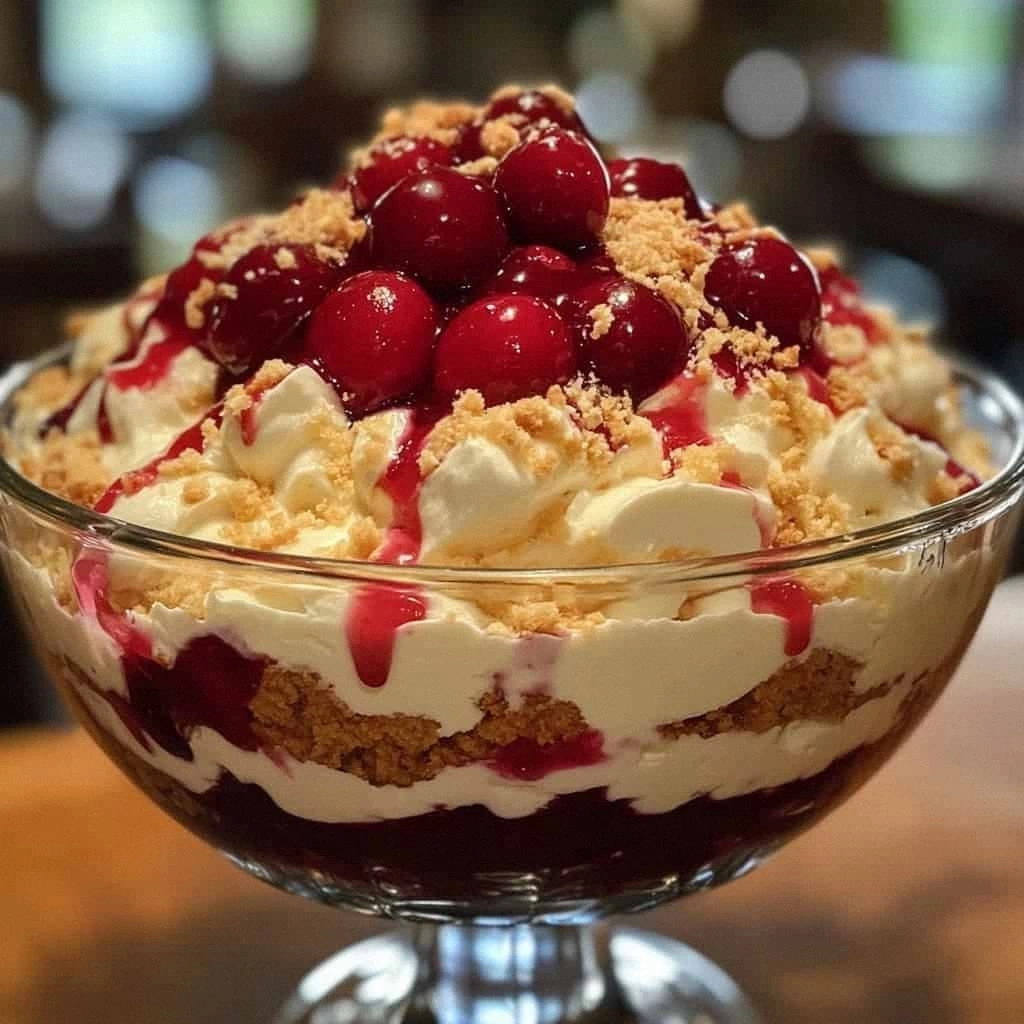
Let me confess something: I once tried to make a fancy layered cake for a dinner party, ended up with something that looked like the Leaning Tower of Pisa, and had to perform emergency surgery with a trifle bowl and a prayer. The result? This cherry cheesecake trifle that made my guests literally scrape the bowl clean with their spoons, asking if I could cater their weddings. Sometimes the best recipes are born from beautiful disasters, and this one is my favorite happy accident.
Picture this: it's 11 PM on a Thursday, you're in pajamas, and suddenly you need something spectacular for tomorrow's potluck. Most people would panic. You? You're about to become the legend who shows up with layers of cloud-like cheesecake filling, juicy cherry bombs, and pound cake soaked in what tastes like liquid summer. I've made this trifle when I was broke, when I was rushed, when I was trying to impress future in-laws — and it has never once let me down.
The magic isn't just in how ridiculously easy this comes together (we're talking 15 minutes of actual work). It's in how the flavors meld into something that tastes like you spent hours slaving away. Each spoonful delivers that perfect bite: tangy cream cheese, sweet cherries, tender cake, and billows of fresh whipped cream that make you close your eyes involuntarily. I dare you to taste this and not go back for seconds — actually, I double-dog dare you, because I've seen grown adults fight over the last spoonful.
Most recipes get trifles completely wrong. They make them too sweet, too soggy, or too complicated with weird ingredients you'll never use again. This version? It's what happens when a cheesecake and a trifle have a beautiful baby, and that baby grows up to be the most popular kid at the party. The secret weapon is that almond extract — just a whisper that makes people ask "what IS that amazing flavor?" while they shovel in another bite. Let me walk you through every single step — by the end, you'll wonder how you ever made it any other way.
What Makes This Version Stand Out
Speed Demon: From zero to hero in under 45 minutes, with most of that time spent letting the flavors party together in the fridge. While other desserts demand precision and patience, this trifle rewards your laziness — the longer it sits, the better it gets. I've assembled this in the parking lot of a tailgate using store-bought everything, and people still talk about it years later.
Texture Paradise: We're talking about distinct layers that stay distinct — no sad, mushy homogenized mess here. The pound cake maintains its dignity while soaking up just enough cherry goodness, the cheesecake layer stays fluffy and light, and those cherries provide pop-in-your-mouth bursts of summer. Every spoonful is a conversation between creamy, cakey, and juicy.
Flexibility Master: Use store-bought pound cake when you're exhausted, or homemade when you want to impress. Fresh cherries in summer, canned in winter, frozen when you're feeling thrifty. I've made this with everything from angel food cake to brownie chunks, and it's never been anything less than spectacular. This recipe bends but never breaks.
Crowd Control: Serves a small army or just you and your midnight cravings — the recipe scales like a dream. I've made individual parfait glasses for fancy dinner parties and giant bowls for potlucks. People who claim they don't like dessert inhale this. People who claim they're full find room. It's dessert diplomacy at its finest.
Make-Ahead Magic: This actually improves with an overnight nap in the fridge, making it the ultimate stress-free entertaining weapon. The flavors meld, the cake settles into perfect tenderness, and you look like a planning genius. I've kept it for three days (not that it ever lasts that long), and it just keeps getting better.
Ingredient Integrity: No weird stabilizers, no chemical aftertaste, no ingredients you can't pronounce. Just honest-to-goodness real food that tastes like summer vacation and childhood memories had a delicious baby. Even the canned cherry pie filling gets elevated into something that tastes handmade and precious.
Inside the Ingredient List
The Flavor Base
The cream cheese is the foundation of everything good here — don't you dare reach for that low-fat stuff. Full-fat cream cheese whips up into clouds of tangy perfection that balance the sweet cherries like a tightrope walker. Let it soften on the counter for at least an hour; cold cream cheese is the enemy of smooth, lump-free filling. I've tried cheating with the microwave, and it always ends up partially melted and weird — patience, grasshopper.
Granulated sugar does more than sweeten — it helps stabilize the cream cheese and creates this gorgeous glossy finish that catches the light like silk. Don't cut it back thinking you're being healthy; the balance is already perfect, and reducing it makes the whole thing taste flat and sad. If you must experiment, swap in half brown sugar for deeper caramel notes, but honestly, the original is perfect.
The Texture Crew
Those eggs aren't just for binding — they're what transform ordinary cream cheese into something that eats like cheesecake clouds. Room temperature eggs incorporate smoothly without those weird scrambled egg bits that happen when cold eggs meet warm cream cheese. I've forgotten the eggs before (don't ask), and while it still tastes good, it lacks that luxurious richness that makes people close their eyes when they eat it.
Sour cream is the unsung hero here — just a quarter cup adds this subtle tang that makes the cherries taste more cherry-like and the cream cheese taste creamier. Full-fat is non-negotiable; low-fat sour cream breaks down and gets watery, ruining that perfect texture we're building. If you're in a pinch, Greek yogurt works, but it adds a slight graininess that purists will notice.
The Unexpected Star
Almond extract is the plot twist that makes people ask for your secret ingredient. Just half a teaspoon transforms ordinary cherry pie filling into something that tastes like it came from a Parisian patisserie. It's subtle — nobody will identify it specifically, but they'll know there's something magical happening. Skip it and the trifle is still good; add it and suddenly you're a dessert wizard.
The Final Flourish
Heavy cream whipped to soft peaks creates those billowy clouds that make this feel like eating dessert in a dream. Cold cream whips faster, so pop your bowl and beaters in the freezer for 15 minutes before starting. Don't overwhip — we're going for clouds, not butter. The powdered sugar stabilizes it just enough to hold up in the fridge overnight without getting grainy.
Everything's prepped? Good. Let's get into the real action...

The Method — Step by Step
- Start with the cream cheese beating — and I mean really beat it. Use your mixer on medium-high for a full three minutes until it looks like thick clouds and has doubled in volume. This is where most people rush and end up with dense, heavy layers. The cream cheese should look almost white and hold soft peaks when you lift the beaters. That sizzle when it hits the bowl? That's the sound of success starting.
- Add the sugar gradually, not all at once like an amateur. Three additions, beating for 30 seconds between each, ensures the sugar dissolves completely and you don't end up with gritty layers. Scrape down the bowl religiously — there's always a pocket of unmixed cream cheese hiding in the bottom corner, waiting to ruin your texture. The mixture should look like glossy silk when you're done, not grainy or separated.
- Beat in the vanilla and almond extracts, then the eggs one at a time. Each egg needs to fully incorporate before adding the next — this is what creates that luscious, custard-like texture that makes people wonder if you secretly went to pastry school. The batter should look like thick whipped cream and fall off the beaters in lazy ribbons. Don't overmix once the eggs are in, or you'll end up with a weirdly spongy texture.
- Fold in the sour cream with a spatula, not the mixer. This keeps the mixture light and airy — overmixing here deflates all that beautiful volume you just created. The sour cream should disappear completely, leaving you with something that looks like fluffy cheesecake clouds. Give the bowl a gentle tap on the counter to release any large air bubbles that might create holes in your layers.
- Time to build the trifle — and this is where the magic happens. Start with a layer of pound cake cubes, packing them in snugly but not squished. Drizzle with just enough milk or cherry juice to moisten, not drown — think of it like giving the cake a quick bath, not throwing it in the deep end. The cake should feel like a perfectly moist sponge cake, not soggy bread.
- Spoon on a generous layer of the cream cheese mixture, smoothing it right to the edges so every bite gets equal distribution. This layer should be about twice as thick as your cake layer — remember, this is the star of the show. Use an offset spatula or the back of a spoon, working from the center outward to avoid dragging cake crumbs into your beautiful white layer.
- Top with cherry pie filling, but don't just dump it on like a caveman. Drop dollops around the surface, then gently spread them together, leaving about half an inch border around the edge for visual appeal. If you're using the optional almond extract in the cherries, mix it in now — just a whisper that amplifies everything without screaming "almond!" The cherries should glisten like jewels against the white background.
- Repeat the layers until you reach the top of your bowl, finishing with a layer of cream cheese mixture. This creates a blank canvas for your final decorations. I like to end with three layers total — any more and it becomes unwieldy to serve; any less and you miss out on the beautiful striated effect that makes people gasp when you slice into it.
- Whip the heavy cream with powdered sugar and vanilla until it holds soft peaks that curl over like gentle waves. Don't overwhip — grainy whipped cream is the enemy of elegance. Spoon it into a piping bag fitted with a large star tip, or just dollop it artistically with a spoon if you're feeling rustic. The cream should look like clouds and hold its shape without being stiff.
- Decorate with fresh cherries, chocolate shavings, and graham cracker crumbs just before serving. The fresh cherries should be firm and glossy — save the best ones for the top because everyone photographs the crown. Chocolate shavings add drama and that sophisticated edge that makes people think you tried harder than you did. A light dusting of graham cracker crumbs ties everything back to cheesecake territory.
That's it — you did it. But hold on, I've got a few more tricks that'll take this to another level...
Insider Tricks for Flawless Results
The Temperature Rule Nobody Follows
Room temperature isn't just a suggestion — it's the difference between smooth, silky layers and a lumpy disaster. I set everything out on the counter first thing in the morning, then go about my day. Cold cream cheese refuses to blend smoothly, cold eggs create curdled-looking streaks, and cold sour cream just sits there like a stubborn lump. Your patience here pays dividends in the final texture that makes people ask for your secret.
Why Your Nose Knows Best
Trust your sense of smell throughout this process — it's your built-in quality control. The cream cheese should smell fresh and tangy, not sour or ammoniated. The cherry filling should smell like summer sunshine, not metallic or overly processed. When you add the almond extract, close your eyes and take a whiff — it should smell like marzipan and memories, not like extract straight from the bottle. If anything smells off, trust your instincts and start over.
The 5-Minute Rest That Changes Everything
After you assemble the trifle, let it rest in the fridge for at least 5 minutes before adding the final whipped cream layer. This brief pause allows the layers to settle and meld, creating a more cohesive dessert that doesn't slide apart when you serve it. I know it's tempting to rush to the finish line, but this tiny pause prevents the layers from shifting and ensures your beautiful presentation stays intact when you dig in.
The Overnight Miracle
Make this the night before you need it, and watch it transform from good to legendary. The flavors meld and deepen, the cake achieves the perfect texture, and you wake up looking like a planning genius. Cover it tightly with plastic wrap pressed right against the surface to prevent it from absorbing fridge odors. Bring it out 30 minutes before serving — just enough time to take the chill off and let the flavors bloom.
The Presentation Secret
Save a few perfect cherries and some chocolate curls to add right before serving. This keeps them looking fresh and prevents the chocolate from getting soft and sad in the fridge. A light dusting of powdered sugar through a fine sieve just before presenting adds that professional bakery touch that makes people reach for their phones to document your genius.
Creative Twists and Variations
This recipe is a playground. Here are some of my favorite ways to switch things up:
The Chocolate Cherry Bomb
Replace the pound cake with chocolate cake cubes and add a tablespoon of cocoa powder to the cream cheese mixture. Use cherry pie filling mixed with a handful of mini chocolate chips for pockets of melted chocolate throughout. Top with chocolate whipped cream (just add cocoa powder to your heavy cream) and chocolate curls. This version tastes like Black Forest cake's cooler, more sophisticated cousin.
The Tropical Escape
Swap the cherry pie filling for pineapple chunks in juice (well-drained) and add coconut extract instead of almond. Use coconut milk to moisten the cake and top with toasted coconut flakes. The cream cheese layer stays the same, but suddenly you're transported to a tropical island where calories don't count and dessert is mandatory.
The Berry Patch Version
Use mixed berry pie filling instead of cherry, and add fresh blueberries and raspberries between the layers. The almond extract becomes optional here — sometimes I swap it for a touch of lemon extract to brighten all those berry flavors. This version is particularly stunning in summer when berries are abundant and cheap.
The Adult-Only Edition
Replace the milk or cherry juice with a generous splash of kirsch, amaretto, or even bourbon. The alcohol cooks off slightly but leaves behind this sophisticated complexity that makes people ask questions. Don't overdo it — a tablespoon or two is plenty to add intrigue without making it taste like a college party.
The Peanut Butter Paradise
Add a quarter cup of creamy peanut butter to the cream cheese mixture and use strawberry pie filling instead of cherry. The peanut butter-cherry combo sounds weird until you taste it — suddenly you're eating a peanut butter and jelly sandwich's glamorous older sister. Top with chopped peanuts for crunch and peanut butter cups because why not live a little?
The Holiday Hero
Use cranberry sauce instead of cherry filling for Thanksgiving and Christmas. Add orange zest to the cream cheese mixture and swap the almond extract for orange extract. The tart cranberries cut through the richness beautifully, and the whole thing tastes like the holidays in a bowl. This version has converted more cranberry haters than I can count.
Storing and Bringing It Back to Life
Fridge Storage
This trifle keeps beautifully in the fridge for up to 3 days, making it the ultimate make-ahead dessert. Cover it tightly with plastic wrap pressed directly against the surface to prevent it from forming a skin or absorbing weird fridge flavors. Store any extra whipped cream separately in an airtight container — it deflates and gets weepy if left on the trifle too long. I've successfully kept individual portions in mason jars for weekday treats, and they stay perfect for the full 3 days.
Freezer Friendly
While you can't freeze the fully assembled trifle (the texture gets weird and weepy), you can freeze components for future quick assembly. The cream cheese mixture freezes beautifully in an airtight container for up to 2 months — just thaw overnight in the fridge and give it a quick whisk to restore its fluffiness. Cake cubes freeze well too, and frozen cherries work great in a pinch. Think of it as your emergency dessert kit for when unexpected guests show up or you need comfort food STAT.
Best Reheating Method
Good news — this doesn't need reheating! In fact, it's best served cold, straight from the fridge. If it's been sitting out at a party and gotten too soft, just pop it back in the fridge for 15 minutes to firm up. The cream cheese layer should be cool and refreshing, not room temperature. If your whipped cream has deflated, just whip up a quick fresh batch and dollop it on top — takes 2 minutes and makes it look brand new.