I still remember the exact moment I became obsessed with recreating the perfect Cheesy Gordita Crunch. It was 2:47 a.m. on a Tuesday, I was still wearing my work badge from the previous day, and I had just demolished a drive-through version that tasted like cardboard dipped in sadness. You know that feeling when you bite into something that should be life-changing, but instead it's just...meh? Yeah, that was me, sitting in my car in an empty parking lot, sauce dripping onto my scrubs, thinking "there has to be a better way." Fast forward through three failed attempts, a small kitchen fire (don't ask), and what my neighbors probably thought was a midnight taco cult ritual, and I finally cracked the code. This isn't just another copycat recipe — this is the version that made my notoriously picky brother text me at midnight saying "WHAT DID YOU PUT IN THESE I'M ADDICTED." The crunch that shatters like thin ice under your teeth, the cheese pull that could stretch across a football field, and that secret sauce that coats everything like liquid gold. Picture yourself pulling these out of the oven, the whole kitchen smelling like a Mexican restaurant had a baby with a grilled cheese factory, and your family circling like vultures. I dare you to taste this and not go back for thirds — yes, thirds, because seconds are a given. Let me walk you through every single step — by the end, you'll wonder how you ever made it any other way.
What Makes This Version Stand Out
Double-Decker Magic: We're not just slapping cheese on a taco here. We're creating a soft pillowy gordita that hugs a crispy taco shell like they were made for each other. The contrast between the tender exterior and the shatter-crisp interior is what dreams are made of.
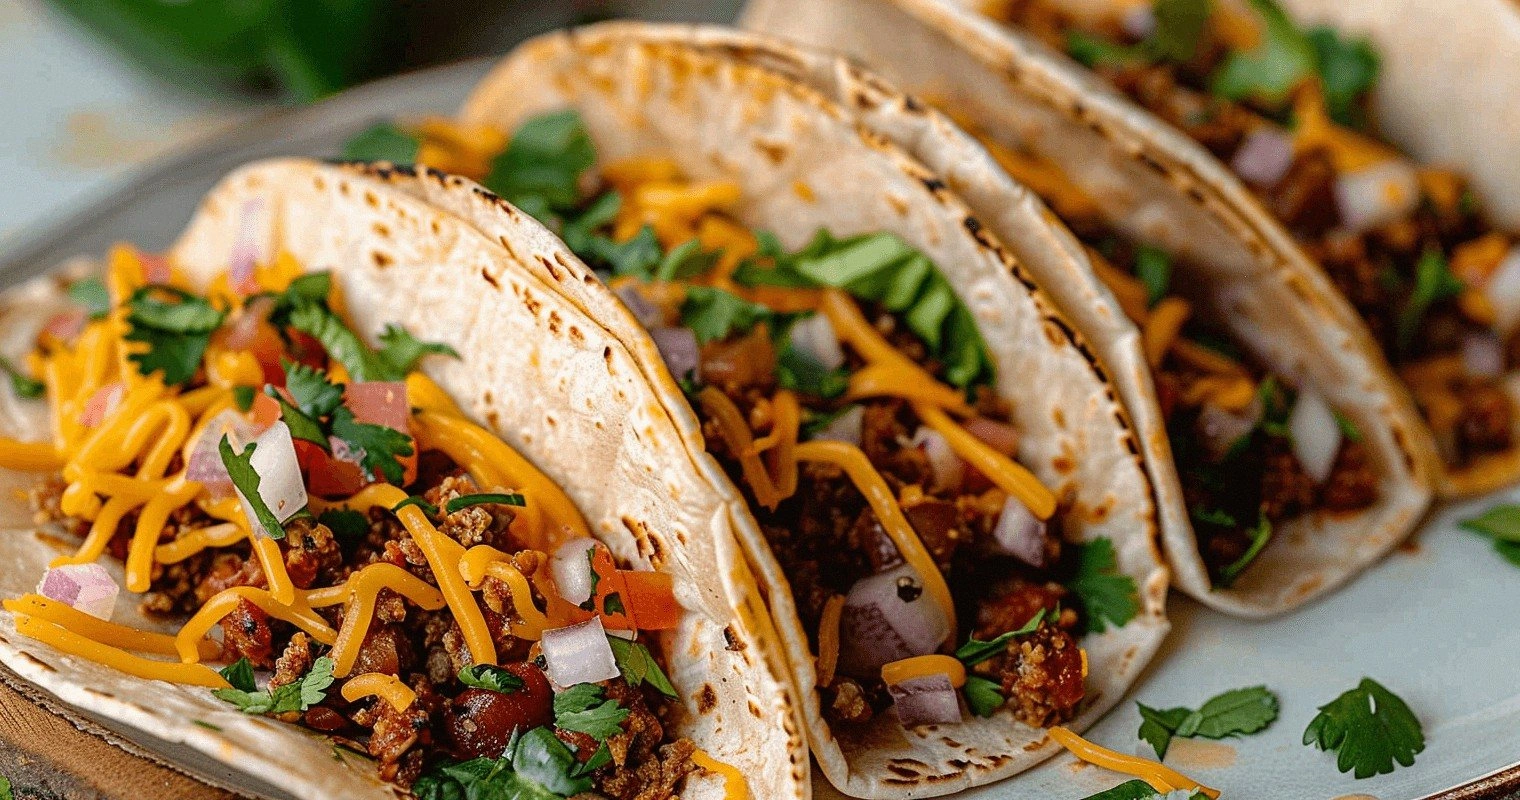
Three-Cheese Strategy: Most recipes get this completely wrong. We're using a strategic blend of melty mozzarella for stretch, sharp cheddar for flavor, and pepper jack for that subtle kick that sneaks up on you. Each cheese has a job, and they work together like a dairy-based Avengers team.
Homemade Spice Blend: That seasoning packet you buy? Throw it out. We're toasting whole spices, grinding them fresh, and creating a flavor bomb that makes your kitchen smell like you died and went to taco heaven. The difference is so dramatic, you'll never go back.
Temperature Precision: Here's what actually works — cooking the beef at two different temperatures for maximum flavor development. We start high for that beautiful browning (hello, Maillard reaction), then drop it low and slow for tenderness that melts in your mouth.
The Secret Crunch Coating: Stay with me here — this is worth it. We're brushing the taco shell with a thin layer of egg wash and crushed corn chips before baking. The result? A crunch so satisfying, you'll want to record it for your ASMR channel.
Make-Ahead Champion: I ate half the batch before anyone else got to try them because I was "testing for quality control." The good news? These freeze beautifully, so you can always have emergency cheesy gordita crunch reserves for those midnight cravings.
Inside the Ingredient List
The Flavor Foundation
The ground beef isn't just any ground beef — we're talking 80/20 chuck that brings enough fat for flavor but not so much that you're eating a grease bomb. I learned this the hard way after making a batch with 70/30 that required three napkins per bite. The fat renders down and mingles with our spice blend, creating a sauce that coats every crevice of the meat. Don't you dare reach for that pre-packaged taco seasoning — we're building layers here that start with toasted cumin, smoky paprika, and just enough chipotle powder to make your taste buds tango. The onion gets grated instead of diced, which sounds weird but trust me — it melts into the meat and adds sweetness without any crunch. Garlic gets added at two different stages because I'm a firm believer that you can never have too much garlic, and each addition serves a different purpose in the flavor development.
The Texture Trio
Let's talk about the cheese situation because this is where most people mess up. The mozzarella goes on first — it's the melty base layer that acts like edible glue between the soft gordita and crispy taco shell. Then we add the cheddar for that sharp, tangy punch that cuts through the richness of the beef. The pepper jack is the final sprinkle on top, giving you those beautiful browned spots and a gentle heat that builds with each bite. The gordita dough is a simple mixture of masa harina, warm water, and a touch of baking powder for lift. It should feel like playdough that just came out of a fresh container — pliable but not sticky. If you've ever struggled with homemade tortillas that crack and break, you're not alone — and I've got the fix coming up in the method section.
The Unexpected Heroes
Here's where we get a little weird in the best way possible. A teaspoon of honey in the meat mixture balances the heat and adds depth that makes people say "what is that amazing flavor?" The egg wash for our crunch coating gets a splash of hot sauce mixed in — not enough to make it spicy, just enough to add another layer of complexity. And the secret ingredient that nobody ever guesses? A pinch of cinnamon in the spice blend. Not enough to taste it directly, but it warms everything up and makes the other flavors sing in harmony. The lime juice goes on at the very end, brightening everything up and cutting through the richness like a culinary spotlight.
The Final Flourish
Our special sauce is basically the love child of ranch dressing and taco sauce — creamy, tangy, with just enough heat to keep things interesting. The sour cream base gets lime juice, garlic powder, and a secret pinch of sugar that balances everything out. Fresh cilantro is optional but highly recommended — those bright, citrusy notes are the perfect counterpoint to all that cheesy richness. And don't even think about using pre-shredded cheese unless you want your gorditas to have the texture of cardboard. I know grating cheese feels like a pain when you're hangry, but the anti-caking agents in pre-shredded cheese will prevent that beautiful melty cohesion we're after.
The Method — Step by Step
- Start by making your spice blend because this needs time for the flavors to meld together. In a dry skillet, toast the cumin seeds, coriander seeds, and peppercorns until they smell like you walked into a spice market in Mexico City — about 2-3 minutes over medium heat. You'll know they're ready when they start dancing in the pan and your kitchen fills with this intoxicating aroma that makes you want to bottle it as cologne. Grind them fresh in a spice grinder or mortar and pestle — yes, you can use pre-ground, but you'll miss out on that volatile oil magic that makes people ask "what did you put in this?" Mix with the paprika, chipotle powder, oregano, salt, and that secret pinch of cinnamon. Set this aside and try not to stick your nose in the container every five minutes.
- Now for the meat — and this is where timing matters. Heat a heavy-bottomed skillet (cast iron if you've got it) over medium-high heat until a drop of water sizzles away immediately. Add the ground beef and don't touch it for a full 3 minutes — I know it's tempting, but let it develop that beautiful brown crust that equals flavor. Break it up with a wooden spoon, then let it cook undisturbed again. This double-browning technique is what separates restaurant-quality taco meat from the sad gray stuff your college roommate used to make. Once it's properly browned, drain off all but about 2 tablespoons of fat — we need some for flavor, but we don't want to swim in it.
- Here's where the magic happens. Push the meat to one side of the pan and add the grated onion to the empty space. Let it cook until it turns translucent and starts to caramelize — about 4-5 minutes. The onion will release its sugars and create these sticky brown bits on the bottom of the pan that are pure gold. Stir in half the garlic and cook for 30 seconds until fragrant, then add your spice blend. Toss everything together until the meat is coated in this beautiful rust-colored mixture that smells like you should open a taco truck. Add the tomato paste and cook for another minute — this caramelizes the tomato and removes any raw taste. Pour in the beef broth, honey, and bring to a simmer.
Insider Tricks for Flawless Results
The Temperature Rule Nobody Follows
Here's the thing that separates the pros from the amateurs — temperature control. Your pan needs to be hot enough to sear, but not so hot that your spices burn and turn bitter. I keep a laser thermometer in my kitchen (yes, I'm that person) and aim for 375°F when I add the meat. If you don't have one, test by sprinkling a few drops of water — they should dance and evaporate quickly but not explode. The same goes for your griddle when cooking the gorditas — too cool and they'll dry out, too hot and they burn before cooking through. After making probably 200 of these, I've learned that medium heat on most stoves translates to about 5-6 minutes of preheating time.
Why Your Nose Knows Best
I'll be honest — I ate half the batch before anyone else got to try them because I was using my nose as quality control. The moment your spices hit the pan, they should smell warm and toasty, not sharp or acrid. If they smell bitter or burnt, you've gone too far and need to start over. The same principle applies to the meat — properly browned meat has this nutty, almost caramel-like aroma that makes your stomach growl. If it smells gray and sad, you haven't developed enough flavor yet. Trust your senses over the clock every single time. This sensory checkpoint system has saved me from serving mediocre tacos more times than I can count.
The 5-Minute Rest That Changes Everything
Okay, ready for the game-changer? After you assemble your gordita crunch, wrap it in foil and let it rest for 5 minutes. I know, I know — when you're hungry, 5 minutes feels like an eternity. But this brief steam session allows the cheeses to fully melt and meld together, creating this cohesive structure that doesn't fall apart when you bite into it. The gordita softens slightly from the steam, making it more pliable, while the taco shell maintains its crunch. It's like a warm hug that brings everything together. My impatience cost me three broken gorditas before I learned this lesson, so learn from my mistakes.
The Cheese Melt Sequence
Most recipes get this completely wrong by adding all the cheese at once. Here's what actually works: add the mozzarella first, directly onto the warm gordita so it starts melting immediately. Then add your hot beef, which continues the melting process from above. The cheddar goes on third, followed by the pepper jack on top. This staggered approach ensures every cheese reaches its optimal melting point. The mozzarella becomes the melty base layer, the cheddar gives you that perfect gooey texture, and the pepper jack creates those Instagram-worthy cheese pulls. A friend tried skipping this step once — let's just say it didn't end well for their cheese distribution.
Creative Twists and Variations
This recipe is a playground. Here are some of my favorite ways to switch things up:
The Breakfast Gordita Bomb
Replace the ground beef with chorizo that's been cooked with diced potatoes until crispy. Add a fried egg on top and swap the pepper jack for queso fresco. The runny yolk creates this sauce that mingles with the chorizo spices in ways that should probably be illegal. I made these for brunch once and my friends still talk about them like they were a religious experience.
The Green Chile Monster
Mix a can of diced green chiles into your beef during the last 5 minutes of cooking. Swap the cheddar for Monterey Jack and add roasted poblano strips to the assembly. The gentle heat from the green chiles builds slowly, and the poblanos add this smoky depth that takes it to another dimension. This version is perfect for those who want flavor without setting their mouth on fire.
The Surf and Turf Deluxe
Keep the seasoned beef but add some quickly seared shrimp on top — just toss them with lime juice, garlic, and a touch of the same spice blend. The sweetness of the shrimp plays beautifully against the savory beef. Use a mix of mozzarella and Oaxaca cheese for maximum stretch. This is what I make when I want to impress people but still keep it approachable.
The Vegetarian's Revenge
Replace the beef with a mixture of roasted cauliflower that's been tossed with the spice blend and black beans for protein. Add some roasted corn for sweetness and textural contrast. The key is to roast the cauliflower until it's deeply caramelized — those crispy edges are what make you not miss the meat at all. Even my carnivore husband devours these without complaint.
The Fire-Breather's Special
Add a diced habanero to the beef during cooking, and swap the pepper jack for habanero cheddar if you can find it. Mix some chipotle peppers in adobo into your special sauce. This version brings the heat in waves — the immediate kick from the habanero, then the smoky heat from the chipotle, finishing with the gentle burn from the cheese. I made this for my spice-loving cousin and he actually cried (in a good way).
Storing and Bringing It Back to Life
Fridge Storage
Store leftover components separately for best results. The beef keeps for up to 4 days in an airtight container, and honestly, it gets better as the flavors meld together. The gorditas can be refrigerated for 2 days, but warm them on a dry skillet before assembling — the microwave makes them rubbery and sad. Store the special sauce for up to a week (if it lasts that long). Whatever you do, don't store fully assembled gordita crunches — they become a soggy mess that even the most desperate midnight snacker would reject.
Freezer Friendly
These are surprisingly freezer-friendly if you do it right. Freeze the cooked beef in portion-sized bags — it reheats beautifully in a skillet with a splash of broth. The gorditas freeze well too, just separate them with parchment paper and wrap tightly. The taco shells are best made fresh, but in a pinch, you can freeze them and reheat in a 400°F oven for 5-7 minutes. The cheese... just buy fresh cheese, okay? Some things aren't worth compromising.
Best Reheating Method
The key to reheating is restoring that contrast between soft and crunchy. Warm the gordita on a dry skillet for 30 seconds per side until pliable. Reheat the beef in a skillet with a splash of broth — the microwave turns it into leather. Assemble with fresh lettuce and tomato, and if you're feeling fancy, make a fresh batch of the special sauce. A tiny splash of water on the taco shell before reheating in the oven helps restore some of that original crunch. It's not quite as good as fresh, but it's about 90% there, which beats most leftovers by a long shot.