I remember the night my kitchen turned into a battlefield, the way my batter had turned into a brown, bitter mess that looked like a burnt loaf. The butter had browned too early, the sugar had caramelized, and the cake batter had become a sticky, dark sludge. I was about to throw the pan out the window when my roommate, a self‑proclaimed baking aficionado, whispered, “You just need to trust the brown butter.” That simple, almost conspiratorial whisper became the catalyst for what would become my most beloved recipe: a Brown Butter Layer Cake that turns every kitchen disaster into a triumph.
Picture this: a golden, caramelized butter that smells like toasted bread, its nutty aroma filling the room, while the batter bubbles like a quiet storm in a saucepan. The sound of the butter sizzling is a low, comforting hiss, a reminder that the transformation is underway. When the batter finally hits the oven, it expands like a gentle puff of cloud, and the smell of warm, buttery cake begins to creep through the air. The first bite is a revelation—soft, airy, with a subtle depth of caramel that lingers on the tongue, followed by a whisper of vanilla and a hint of almond that makes you reach for the next slice.
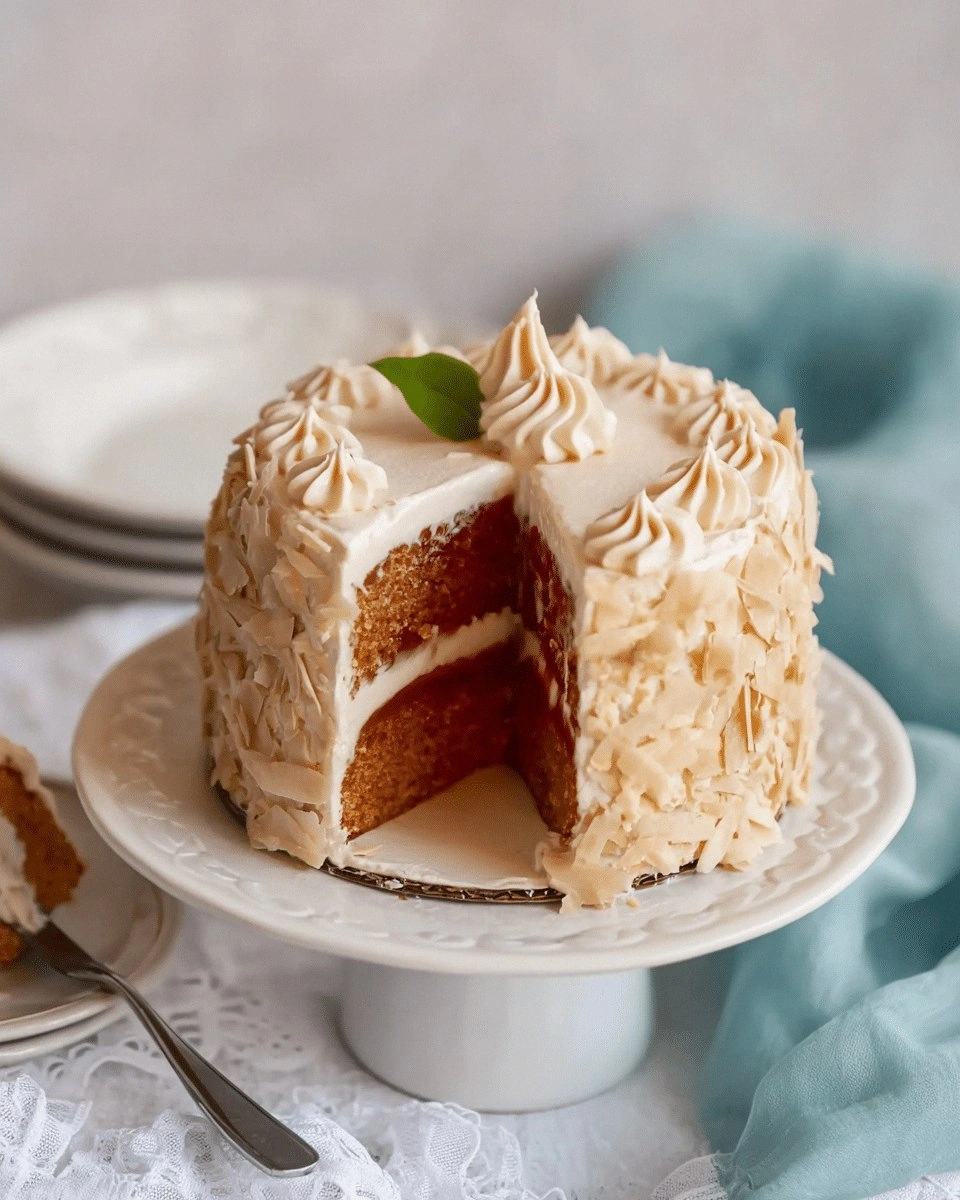
This isn’t just another layer cake. It’s a canvas where the golden brown butter creates a flavor profile that rivals the most decadent pastries you’ll find in a patisserie. The cake’s texture is a delicate balance: moist yet firm, light as a cloud yet rich enough to satisfy a midnight craving. Most recipes get this completely wrong—overmixing the batter, underbaking the layers, or using plain butter that lacks that nutty depth. But with the right technique, the cake becomes a showstopper that will leave your guests begging for the recipe.
I dare you to taste this and not go back for seconds. This is hands down the best version you'll ever make at home. Picture yourself pulling this out of the oven, the whole kitchen smelling incredible, and watching the layers rise in perfect symmetry. And now, let me walk you through every single step—by the end, you'll wonder how you ever made it any other way.
What Makes This Version Stand Out
- Taste: The caramelized butter infuses the cake with a deep, nutty flavor that cuts through the sweetness, creating a complex palate that feels both comforting and indulgent.
- Texture: The batter’s gentle fold preserves tiny air pockets, resulting in a cake that is airy on the inside yet firm enough to hold multiple layers without crumbling.
- Simplicity: Despite its sophisticated flavor, the recipe requires only a handful of pantry staples, making it accessible for both novices and seasoned bakers.
- Uniqueness: The addition of a subtle almond extract and a splash of whole milk elevates the flavor profile, giving the cake a silky finish that feels both classic and contemporary.
- Crowd Reaction: Friends who have tasted this cake often comment that it’s “the best thing I’ve ever had for dessert” and that the layers “seem to melt in your mouth.”
- Ingredient Quality: Using high‑grade butter and fresh eggs ensures that the flavor is crisp and the texture is flawless.
- Cooking Method: The technique of browning butter first, then carefully tempering it with milk, is a secret that locks in flavor and moisture.
- Make‑ahead Potential: The cake layers can be assembled a day ahead, and the frosting can be prepared in advance, saving you time on special occasions.
Alright, let's break down exactly what goes into this masterpiece…
Inside the Ingredient List
The Flavor Base
All-purpose flour is the silent hero that gives the cake structure. It’s the foundation that holds the moisture and the caramelized butter together. Skipping it would turn the cake into a soggy, unstructured mess. If you’re looking for a slightly lighter texture, try substituting half of the all-purpose flour with cake flour, but remember that the final product will be less dense.
The Sweet Core
Granulated sugar dissolves into the batter, creating a sweet base that balances the buttery richness. If you prefer a deeper caramel flavor, replace half the sugar with brown sugar. However, keep in mind that brown sugar adds moisture, which can slightly alter the cake’s crumb structure.
The Unexpected Star
Unsalted butter is the star ingredient that, when browned, transforms the entire cake. The browning process releases melanoidins—complex flavor compounds that give the cake its signature nutty aroma. If you’re allergic to dairy, a high‑quality vegan butter can work, but the flavor profile will shift slightly.
The Moisture Crew
Whole milk adds a subtle creaminess that balances the caramelized butter’s intensity. The milk’s fat content helps keep the cake tender. If you’re lactose intolerant, substitute with oat milk or another plant‑based milk, but be prepared for a slightly different texture.
The Flavor Enhancers
Vanilla extract and almond extract are the subtle whispers that elevate the cake. Vanilla provides warmth and depth, while almond extract adds a nutty undertone that complements the browned butter. If you’re adventurous, a pinch of sea salt can enhance the sweetness, but use it sparingly to avoid overpowering the delicate flavors.
Everything's prepped? Good. Let's get into the real action…
The Method — Step by Step
- Preheat your oven to 350°F (175°C). Line two 9‑inch round cake pans with parchment paper and lightly grease the sides. The parchment ensures a clean release, while the greasing keeps the cake from sticking. This step might seem trivial, but a well‑prepared pan is the foundation of a flawless bake.
- In a medium saucepan, melt 1 cup of unsalted butter over medium heat. Watch the butter as it begins to foam and then turns golden brown, releasing a nutty aroma that will haunt your kitchen for hours. Stir constantly to prevent scorching. Once the butter has a deep amber hue, remove it from heat and let it cool slightly.
- Whisk 1 cup of granulated sugar and 2 cups of all‑purpose flour in a large bowl until evenly combined. The dry mix prevents clumps when you later fold in the wet ingredients. This step is crucial; a dry batter will result in a denser cake, while a wet batter can cause the layers to spread too thin.
- In a separate bowl, whisk 4 large eggs, 1 tsp vanilla extract, 1 tsp almond extract, and 0.5 tsp salt until the mixture is frothy. The eggs act as leavening agents, while the extracts add depth. Be sure not to over‑beat the eggs; you want a light, airy mixture.
- Pour the cooled brown butter into the egg mixture. The hot butter will gently cook the eggs, creating a silky batter. Stir slowly with a spatula, ensuring that the butter and egg mixture emulsify. This gentle folding preserves the air pockets that give the cake its lightness.
- Add the dry flour mixture to the wet batter in two portions, folding gently after each addition. Use a spatula to fold until just combined; over‑mixing will develop gluten and make the cake tough. The batter should be smooth and glossy, with a slight sheen from the butter.
- Divide the batter evenly between the prepared pans. Tap the pans gently on the counter to release any large bubbles. This helps the batter spread evenly and prevents uneven rise. Place the pans on a middle rack and bake for 25–28 minutes, or until a toothpick inserted into the center comes out clean.
- Once baked, remove the pans from the oven and let the cakes cool in the pans for 10 minutes. Then transfer them to a wire rack to cool completely. Cooling is vital; a warm cake will melt the frosting or cause the layers to collapse when assembled.
That's it — you did it. But hold on, I've got a few more tricks that'll take this to another level…
Insider Tricks for Flawless Results
The Temperature Rule Nobody Follows
Many bakers bake at 375°F, but this recipe thrives at 350°F. The lower temperature allows the cake to rise slowly, ensuring even layers and preventing a cracked top. If you’re using a convection oven, reduce the temperature by 25°F to avoid over‑browning.
Why Your Nose Knows Best
The first hint that the butter has browned to perfection is the aroma. Your nose can detect the subtle shift from sweet butter to nutty caramel. If the smell is too mild, the butter isn’t fully caramelized; if it’s overpoweringly burnt, you’ve gone too far.
The 5‑Minute Rest That Changes Everything
After removing the cakes from the oven, let them rest in the pans for exactly 5 minutes before transferring to a wire rack. This brief rest allows the structure to set, preventing the cake from collapsing when you cut the layers. A quick test: gently press the top; it should feel firm but not hard.
The Secret of the Butter‑Milk Mixture
When you temper the browned butter with milk, add the milk slowly while whisking. This gradual integration creates a stable emulsion, ensuring that the butter doesn’t separate and that the batter remains silky. A common mistake is to pour the milk too quickly, causing a lumpy batter.
The Final Touch: A Splash of Lemon Zest
Adding a teaspoon of lemon zest after baking brightens the flavor profile and balances the sweetness. The citrus note cuts through the richness, giving the cake a fresh finish that’s surprisingly refreshing.
Creative Twists and Variations
This recipe is a playground. Here are some of my favorite ways to switch things up:
Cocoa‑Infused Brown Butter Cake
Add 1/4 cup unsweetened cocoa powder to the dry mix for a chocolatey version that still retains the caramelized butter’s depth. The cocoa introduces a subtle bitterness that balances the sweetness, creating a multi‑layered flavor experience.
Almond‑Honey Swirl
Swirl a tablespoon of honey and a teaspoon of almond extract into the batter before baking. The honey adds a golden sheen and a natural sweetness that pairs beautifully with the nutty butter.
Raspberry‑Rosemary Frosting
Replace the standard buttercream with a raspberry‑infused frosting and a hint of rosemary. The tart berries cut through the richness, while the rosemary adds an aromatic herbal note that feels unexpected.
Espresso‑Enhanced Layers
Stir in 1 tsp of instant espresso powder into the batter. The espresso enhances the chocolatey undertones and gives the cake a sophisticated, cafe‑like finish.
Nutty Crunch Topping
Top the assembled cake with a crunchy layer of toasted pecans or walnuts. The crunch adds texture contrast, while the nuts’ natural oils complement the buttery layers.
Spiced Variation
Add a pinch of ground cinnamon and nutmeg to the dry mix. The spices lend warmth and depth, making the cake feel cozy and comforting, especially during cooler months.
Storing and Bringing It Back to Life
Fridge Storage
Wrap each cake layer tightly in plastic wrap and place them in an airtight container. Store in the refrigerator for up to 3 days. The cold temperature keeps the cake moist and prevents the frosting from melting.
Freezer Friendly
For longer storage, place the wrapped layers in a freezer bag, removing as much air as possible. Freeze for up to 2 months. Thaw overnight in the refrigerator before assembling to maintain texture.
Best Reheating Method
To revive a frozen cake, let it thaw at room temperature for 30 minutes, then warm it in a preheated 300°F oven for 5–7 minutes. Add a tiny splash of water to the pan before reheating; the steam will help restore moisture and keep the cake from drying out.